
1. Introduction
This manual provides detailed instructions for the installation, operation, and maintenance of your 9imod DS35MG-180 35KG High Torque Waterproof RC Steering Servo Motor. This digital servo is designed for various remote control applications, including 1/8, 1/10, and 1/12 scale RC cars, crawlers, trucks, buggies, and robotic projects. Please read this manual thoroughly before use to ensure proper function and longevity of the product.

Figure 1: 9imod DS35MG-180 35KG High Torque Waterproof RC Steering Servo Motor with included accessories.
2. Key Features
- High Voltage and High Torque: Operates at 7.4V, providing strong torque output for precise and stable control in various RC applications.
- Quick Response High Speed: Features fast response speed for accurate steering control, ensuring immediate reaction to commands.
- IP67 Waterproof Rating: Designed to function reliably in damp, dusty, and muddy conditions, protecting the servo from water and dust.
- Efficient Heat Dissipation: Equipped with an aluminum alloy casing for effective heat management during prolonged high-load operations.
- Full Metal Gear: Utilizes high-precision steel gears for enhanced durability, accuracy, and extended service life.
- Versatile Application: Suitable for 1/8, 1/10, 1/12 RC cars, crawlers, trucks, buggies, and robotic projects.

Figure 2: Overview of the 9imod 35KG HV Digital Servo's primary features.
3. Product Components
The 9imod DS35MG-180 servo consists of several key components designed for performance and durability.

Figure 3: Exploded view illustrating the internal and external components of the servo.
4. Specifications
Detailed technical specifications for the 9imod DS35MG-180 servo are provided below:
| Parameter | Value |
|---|---|
| Model | DS35MG-180 |
| Stall Torque (6.0V) | 30kg-cm |
| Stall Torque (7.4V) | 35kg-cm |
| Stall Torque (8.4V) | 38kg-cm |
| Operating Speed (6.0V) | 0.14sec/60° |
| Operating Speed (7.4V) | 0.13sec/60° |
| Operating Speed (8.4V) | 0.11sec/60° |
| Control Angle | 180° ±1° |
| Dead Band | 2 µSec |
| Neutral/Refresh Rate | 1500µs |
| Motor Type | DC Motor |
| Gear Material | Strength Steel |
| Case Material | AL6061T6 |
| Horn Gear Spline | 25T-φ5.92mm |
| Bearing | Double Ball Bearings |
| Operating Temperature | -20°C ~ +60°C |
| Pulse Width | 500 to 2500 µSec |
| Size (L x W x H) | 40 x 20 x 40.5 mm (1.57 x 0.78 x 1.57 inches) |
| Net Weight | 80g (2.75oz) |
| Connector Wire Length | JR 300 mm (11.81 inches) |

Figure 4: Comprehensive technical specifications of the 9imod DS35MG-180 servo.
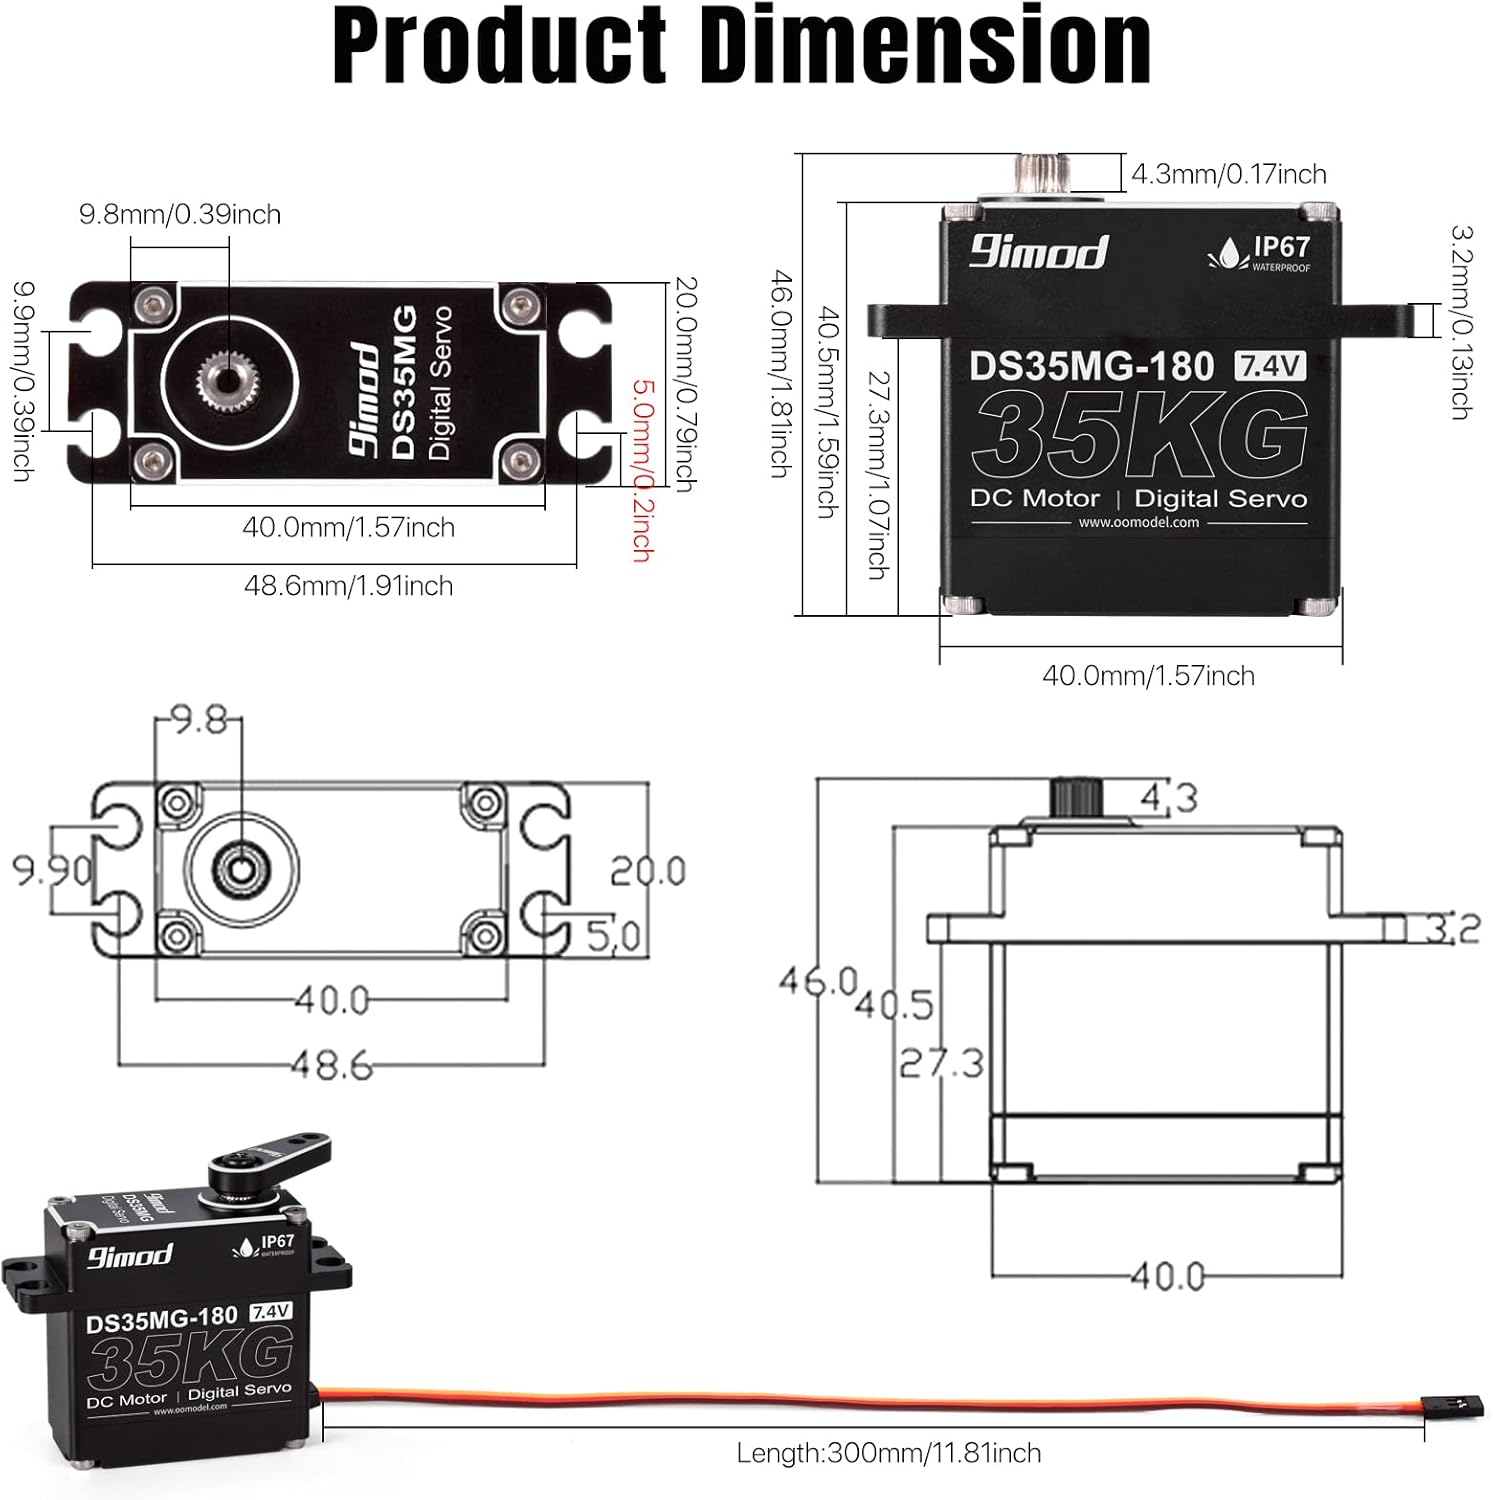
Figure 5: Dimensional drawings of the 9imod DS35MG-180 servo.
5. What's in the Box
- 1 x 9imod DS35MG-180 35KG RC Servo
- 1 x 25T Metal Servo Horn
- Mounting Screws and Accessories
6. Setup and Installation
6.1 Mounting the Servo
- Identify the designated servo mounting location on your RC vehicle chassis or robotic arm.
- Secure the servo using the provided mounting screws. Ensure the servo is firmly attached to prevent movement during operation.
- Attach the 25T metal servo horn to the servo output shaft. Align the horn correctly for your application.

Figure 6: Example of the 9imod servo installed in an RC vehicle chassis.
6.2 Wiring and Connection
- Connect the servo's JR connector to the appropriate channel on your RC receiver or flight controller. The standard wiring is typically: Brown (Ground), Red (VCC/Power), Orange (Signal).
- Ensure the power supply to the servo is within the recommended voltage range (6.0V-8.4V).
- The servo operates using a Pulse Width Modulation (PWM) signal. Refer to the diagram below for signal interpretation.

Figure 7: PWM Communication Interface and Control Angle Diagram.
7. Operating Instructions
- After installation and wiring, power on your RC system (transmitter first, then receiver/vehicle).
- Test the servo's movement by operating the corresponding control stick or input on your transmitter.
- Observe the servo's response and ensure it moves smoothly and accurately to the desired positions.
- Adjust endpoints and sub-trim settings on your transmitter as needed to achieve the full range of motion without binding or over-travel.

Figure 8: High Torque and High Speed performance data.
8. Maintenance
- Regular Inspection: Periodically check the servo for any signs of damage, loose screws, or excessive wear on the gears.
- Cleaning: Due to its IP67 rating, the servo is resistant to dust and water. However, it is recommended to clean any accumulated dirt or debris from the exterior using a soft, dry cloth. Avoid using harsh chemicals.
- Gear Lubrication: While the metal gears are durable, occasional light lubrication with a suitable servo gear grease can extend their lifespan and maintain smooth operation. Do not over-lubricate.
- Connection Check: Ensure all electrical connections remain secure and free from corrosion.
9. Troubleshooting
- Servo Not Responding:
- Check power connections to the receiver and servo.
- Verify the servo is plugged into the correct channel on the receiver.
- Ensure the transmitter is powered on and bound to the receiver.
- Inspect the servo wire for any cuts or damage. - Erratic Movement or Glitching:
- Check for radio interference. Try operating in a different location.
- Ensure the servo wire is not routed too close to high-current wires (e.g., motor wires).
- Verify the power supply is stable and sufficient for the servo's demands. - Weak or Slow Response:
- Check the battery voltage of your RC system. Low voltage can affect servo performance.
- Ensure there is no mechanical binding in the steering linkage or robotic arm that could impede servo movement.
- Verify the servo is receiving adequate current from the power source. - Servo Overheating:
- Reduce the load on the servo if possible.
- Check for any mechanical binding that might be causing the servo to work excessively hard.
- Ensure proper ventilation around the servo.
10. Safety Information
- Always disconnect power to the servo and RC system before performing any maintenance or installation.
- Keep fingers and loose clothing away from moving parts of the servo and connected mechanisms during operation.
- Ensure the servo is used within its specified voltage range to prevent damage.
- Do not attempt to disassemble the servo beyond routine maintenance, as this may void any potential warranty and cause damage.
- Store the servo in a dry, cool place away from direct sunlight and extreme temperatures.
11. Warranty and Support
9imod products are manufactured to high-quality standards. For specific warranty information and technical support, please refer to the documentation provided with your purchase or visit the official 9imod website. Keep your purchase receipt as proof of purchase for any warranty claims.