
LILYGO T-Display-S3 AMOLED
Contents
LILYGO T-Display-S3 AMOLED Development Board User Manual
Model: T-Display-S3 AMOLED (Welded Pin Version)
1. Introduction
The LILYGO T-Display-S3 AMOLED is an advanced development board featuring the ESP32-S3 microcontroller and a vibrant 1.91-inch RM67162 AMOLED display. This board is designed for a wide range of applications requiring wireless connectivity (Wi-Fi and Bluetooth 5 LE) and a high-quality visual interface. It serves as an excellent platform for embedded system development, IoT projects, and custom display solutions.
This manual provides essential information for setting up, operating, maintaining, and troubleshooting your T-Display-S3 AMOLED development board.
2. Safety Information
- Electrostatic Discharge (ESD) Precautions: Always handle the board by its edges and use anti-static measures (e.g., anti-static wrist strap, mat) to prevent damage from static electricity.
- Power Supply: Use only appropriate power sources (e.g., USB-C port, battery connector) within the specified voltage range. Incorrect voltage can damage the board.
- Environmental Conditions: Avoid exposing the board to extreme temperatures, humidity, dust, or corrosive substances. Operate within recommended temperature and humidity ranges.
- Physical Handling: Do not apply excessive force to the board or its components. Avoid bending or dropping the board.
- Soldering: If soldering is required (for unwelded pin versions or custom connections), ensure proper ventilation and use appropriate safety equipment.
3. Package Contents
Verify that all items are present in your package:
- 1 x LILYGO T-Display-S3 AMOLED Development Board
- 2 x 14-pin Headers (for welded pin version, these are pre-soldered)
- 1 x Power Cable (JST-SH 1.0mm 4-Pin)
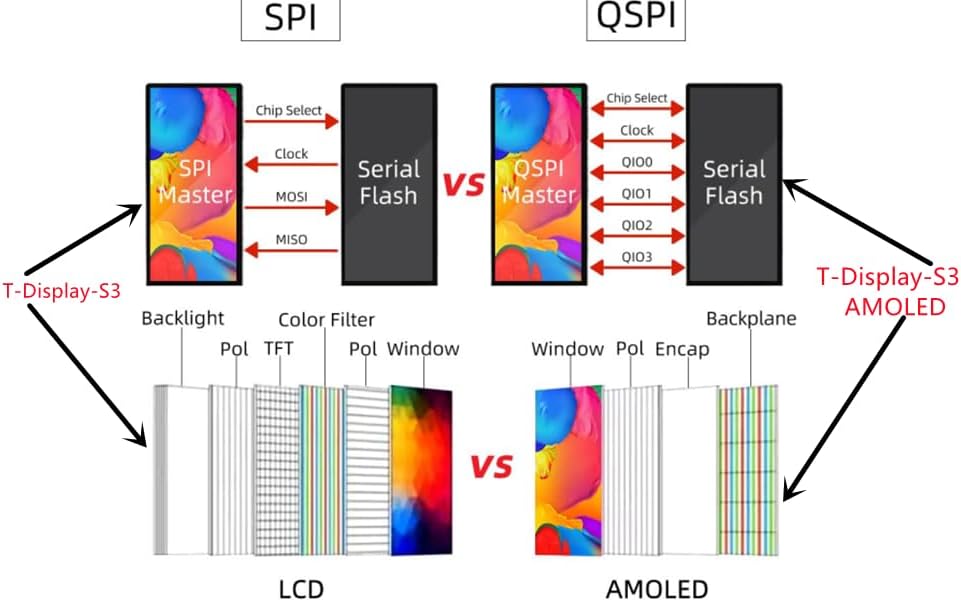
Image: Contents of the LILYGO T-Display-S3 AMOLED package.
4. Product Overview
The T-Display-S3 AMOLED integrates an ESP32-S3R8 dual-core LX7 microprocessor with a 1.91-inch AMOLED display. Key features include:
- Upgraded Display: Transition from LCD to AMOLED for superior color, contrast, and power efficiency.
- Faster Interface: Upgraded from SPI to QSPI for improved display data transfer speeds.
- Enhanced Wireless: Features a 3D antenna for better Wi-Fi and Bluetooth signal reception compared to onboard antennas.
- Onboard Functions: Includes Boot (IO0), Reset, and IO21 buttons for easy interaction and programming.
- Battery Management: Supports battery voltage detection (IO04) and includes a JST-SH 1.0mm 4-Pin connector for external battery.

Image: Front view of the T-Display-S3 AMOLED.

Image: Back view of the T-Display-S3 AMOLED.

Image: Pinout diagram of the T-Display-S3 AMOLED.

Image: SPI vs QSPI and LCD vs AMOLED comparison.
5. Specifications
| Feature | Detail |
|---|---|
| Brand | LILYGO |
| Model Name | T-Display-S3 AMOLED |
| MCU | ESP32-S3R8 Dual-core LX7 microprocessor |
| Display Type | 1.91 inch RM67162 AMOLED |
| Display Resolution | 240(W) x RGB x 536(H) |
| Display Interface | QSPI |
| Wireless Connectivity | 2.4 GHz Wi-Fi & Bluetooth 5 (LE) |
| Flash Memory | 16MB PSRAM |
| RAM | 8MB |
| Operating System | FreeRTOS (supports Arduino, PlatformIO-IDE, Micropython) |
| Product Dimensions | 2.36 x 1 x 0.39 inches (60 x 25.5 x 10 mm) |
| Item Model Number | AMOLED |
6. Setup Guide
6.1 Initial Connection
- Connect the T-Display-S3 AMOLED to your computer using a USB-C cable. The board should power on, and the display may show a default test pattern or remain blank if no firmware is loaded.
- If using an external battery, connect it to the JST-SH 1.0mm 4-Pin battery connector. Ensure correct polarity.
6.2 Software Environment Setup
The LILYGO T-Display-S3 AMOLED can be programmed using various development environments. The most common are Arduino IDE, PlatformIO, and Micropython.
- Arduino IDE: Install the ESP32 board package and necessary libraries (e.g., TFT_eSPI). Refer to the official LILYGO GitHub repository for specific board definitions and example code.
- PlatformIO: Set up your PlatformIO environment and configure it for the ESP32-S3 board. Example projects are available on the LILYGO GitHub.
- Micropython: Flash the Micropython firmware to the ESP32-S3 and use a serial terminal or IDE (like Thonny) to interact with the board.
Important: For detailed setup instructions, driver installation, and example code, always refer to the official LILYGO GitHub repository: github.com/Xinyuan-LilyGO/T-Display-S3-AMOLED
7. Operating Instructions
7.1 Uploading Firmware
Once your development environment is set up, you can upload your custom code or example sketches to the board.
- Select the correct board (ESP32-S3 Dev Module) and COM port in your IDE.
- Compile your code.
- Press the "Upload" button in your IDE. You may need to press and hold the Boot (IO0) button while pressing and releasing the Reset button to put the ESP32-S3 into download mode, then release the Boot button.
7.2 Using the AMOLED Display
The 1.91-inch AMOLED display offers vibrant colors and deep blacks. Libraries like TFT_eSPI are commonly used for graphics operations. Refer to the library documentation and LILYGO examples for drawing text, shapes, images, and managing display updates.
7.3 Wireless Connectivity
The ESP32-S3 supports 2.4 GHz Wi-Fi and Bluetooth 5 (LE). You can integrate network functionalities into your projects, such as connecting to Wi-Fi networks, hosting web servers, or communicating with Bluetooth devices. Standard ESP-IDF or Arduino Wi-Fi/Bluetooth libraries are compatible.
7.4 Onboard Buttons
- Boot (IO0): Used to put the ESP32-S3 into firmware download mode.
- Reset: Restarts the board.
- IO21: A general-purpose input/output button that can be programmed for various functions within your application.
8. Maintenance
- Cleaning: Use a soft, dry, anti-static cloth to clean the board and display. Avoid using liquids or abrasive materials.
- Storage: Store the board in an anti-static bag in a cool, dry place when not in use.
- Firmware Updates: Regularly check the LILYGO GitHub repository for updated firmware, libraries, and examples to ensure optimal performance and access to new features.
- Protective Film: The display may come with a thin protective plastic film. This should be carefully peeled off before use to ensure clear viewing and prevent confusion with potential "dead pixels" as noted by some users.
9. Troubleshooting
| Problem | Possible Cause / Solution |
|---|---|
| Display is blank or shows artifacts. |
|
| Cannot upload code to the board. |
|
| Wi-Fi or Bluetooth not working. |
|
| Board not recognized by computer. |
|
For more specific issues or advanced debugging, consult the LILYGO GitHub repository's issues section or community forums.
10. Warranty Information
LILYGO products are typically covered by a limited manufacturer's warranty against defects in materials and workmanship. The specific terms and duration of the warranty may vary. Please retain your proof of purchase for warranty claims.
For detailed warranty information and to initiate a claim, please contact the seller or refer to the official LILYGO website.
11. Support
For technical support, documentation, and community resources, please visit the official LILYGO GitHub repository:
github.com/Xinyuan-LilyGO/T-Display-S3-AMOLED
This repository contains:
- Example code and libraries
- Detailed schematics and datasheets
- Firmware updates
- Community discussion and issue tracking
For purchase-related inquiries, returns, or replacements, please contact Amazon customer service directly.
Ask a question about this manual
Ask about setup, troubleshooting, compatibility, parts, safety, or missing instructions. Manuals+ will review the question and use this page’s manual context to help answer it.