1. Introduction
This manual provides detailed instructions for the proper setup, operation, and maintenance of your SIRUI Carbon Fiber Travel Tripod with E-10 360° Ball Head (Model AT-125+E-10). Designed for portability and stability, this tripod features carbon-fiber legs, a versatile center column, and a robust ball head, making it suitable for various photographic applications.

Image: The SIRUI AT-125+E-10 Carbon Fiber Travel Tripod, including the E-10 ball head and a carry bag.
Key features include:
- Lightweight carbon fiber construction for enhanced portability.
- Quick leg setup with a single twist lock mechanism.
- Versatile two-section center column, reversible for macro and low-angle shooting.
- E-10 360° ball head for precise camera positioning.
- Stabilizing hook for added stability in challenging conditions.
2. Product Components
Familiarize yourself with the main parts of your SIRUI AT-125+E-10 tripod system:

Image: Numbered diagram illustrating the various components of the SIRUI AT-125+E-10 tripod.
- Arca Swiss Compatible Plate: For quick attachment and detachment of your camera.
- 1/4" Standard Screw: Located on the quick release plate for camera mounting.
- 360° Ball Head (E-10): Allows for flexible camera positioning and panoramic shots.
- 3/8" Hole Adapter Platform: For mounting the ball head to the tripod.
- Leg Angle Adjuster: Buttons to set the leg spread to different angles.
- Center Column with Hook: Extends height and provides a hook for ballast.
- Twist Leg Lock: Mechanism for extending and retracting leg sections.
- Carbon Fiber Leg: Lightweight and durable tripod legs.
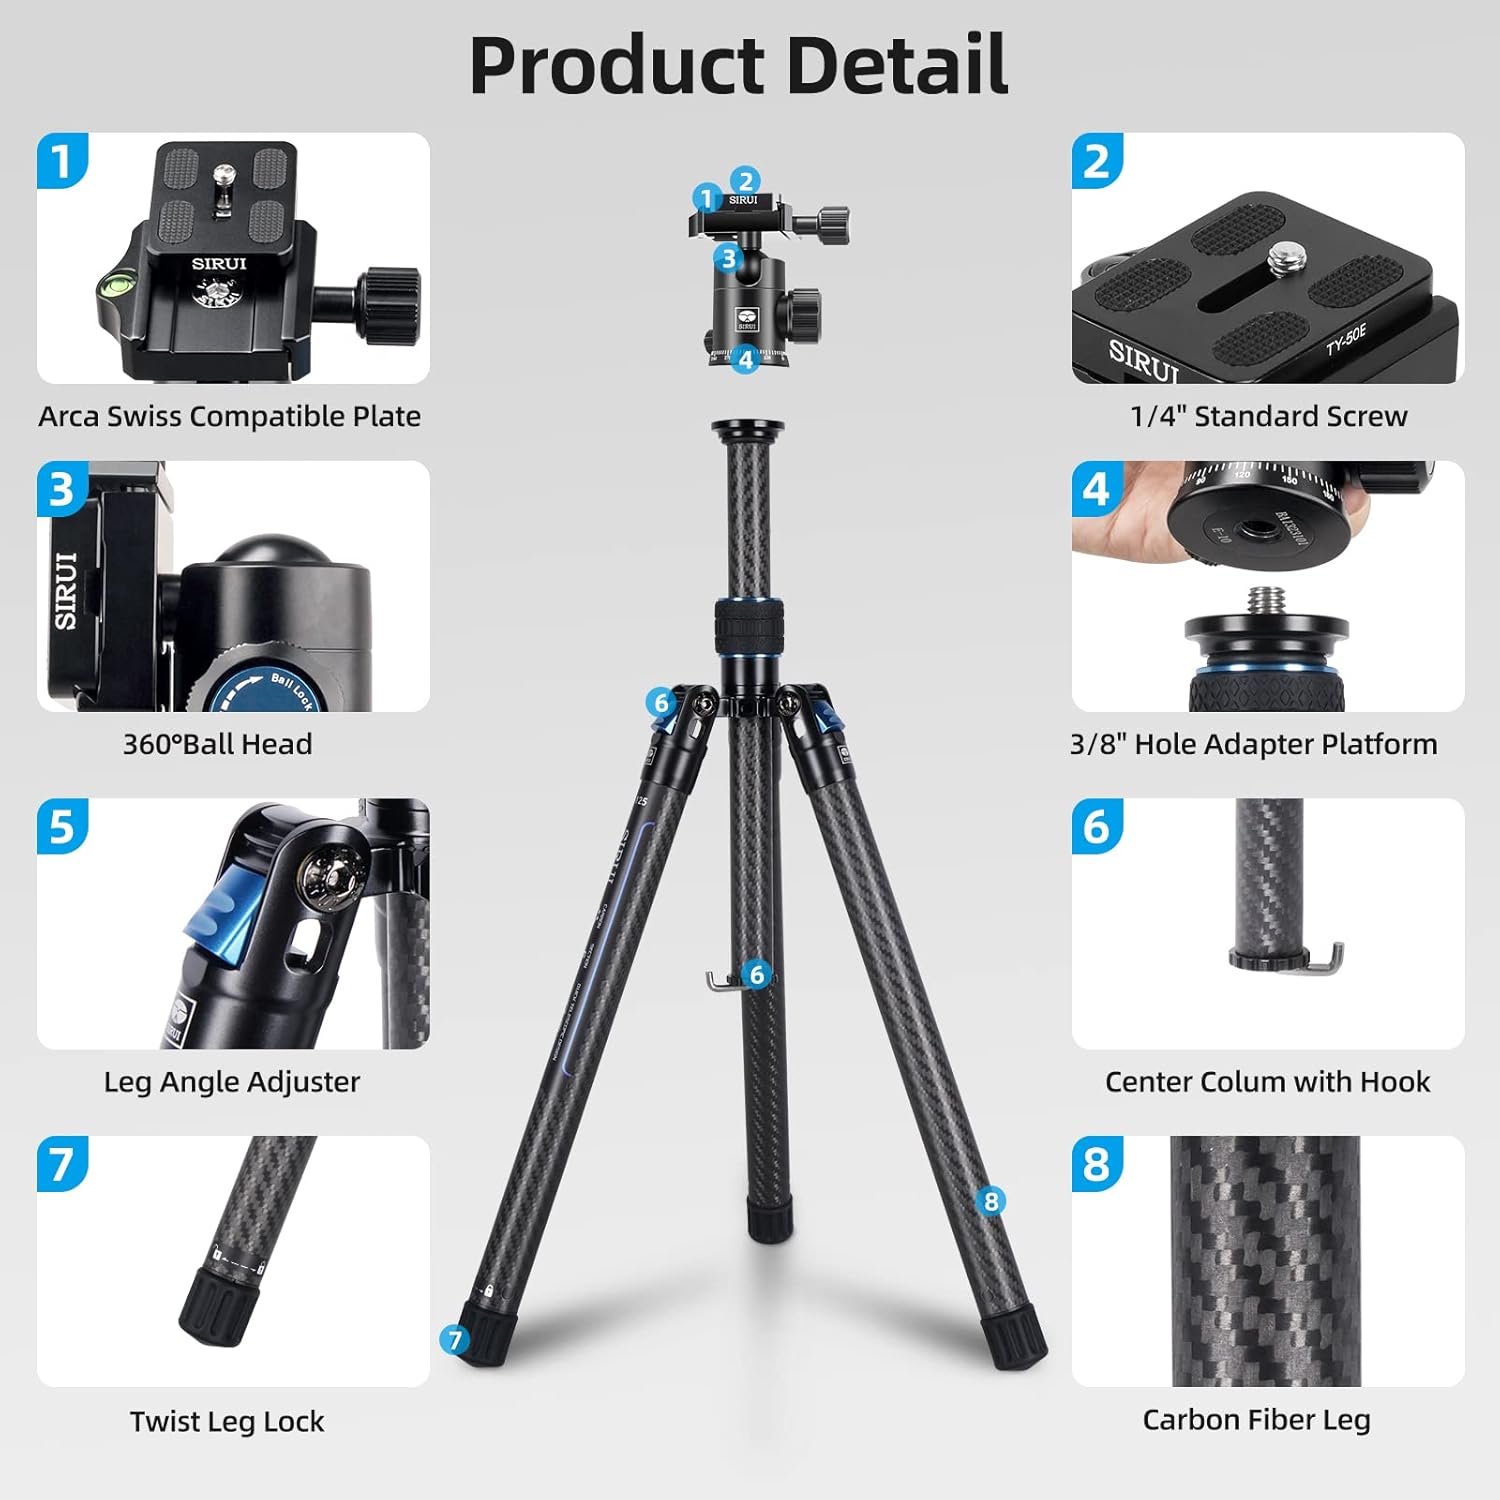
Image: Detailed breakdown of the SIRUI E-10 Ball Head features, including the 1/4" screw, bubble level, QR plateform, plate knob, panning knob, ball lock, 3/8" hole, and 360° panorama base.
3. Setup Instructions
3.1 Unfolding the Tripod
- Grasp the tripod legs and rotate them 180 degrees outwards from their folded position until they lock into place.
- Press the leg angle adjustment buttons on each leg to select the desired spread angle. There are typically multiple angle stops for versatility.

Image: Illustration of the compact folding size achieved by 180-degree reverse folding of the tripod legs.
3.2 Adjusting Leg Height
- To extend a leg section, twist the leg lock counter-clockwise until it loosens.
- Pull the leg section outwards to the desired length.
- Twist the leg lock clockwise to secure the section firmly in place. Repeat for all leg sections and legs as needed.

Image: Visual guide for quick height and angle setup, demonstrating leg angle adjustments and the twist-to-lock mechanism for leg extension.
3.3 Attaching the Ball Head and Camera
- Ensure the E-10 ball head is securely screwed onto the tripod's 3/8" mounting screw.
- Attach the quick release plate to the bottom of your camera by screwing the 1/4" standard screw into the camera's tripod socket. Ensure it is tightened securely.
- Open the quick release clamp on the ball head. Slide the camera with the attached quick release plate into the clamp.
- Close the quick release clamp lever to lock the camera in place. Verify the camera is secure before releasing your grip.
4. Operating the Tripod
4.1 Adjusting Center Column Height
The center column can be extended for additional height. Loosen the center column locking knob, raise the column to the desired height, and then tighten the knob firmly.
4.2 Macro and Low-Angle Shooting
The two-section center column can be reversed or shortened for macro and low-angle photography:
- Short Center Column: The center column can be twisted off to remove the longer section, allowing for a shorter column and lower shooting angles.
- Reversible Center Column: For extreme low-angle or macro shots, the entire center column can be removed and re-inserted upside down, allowing the camera to hang below the tripod's apex.

Image: Instructions for using the two-section center column, showing how to twist off/on for long or short column configurations.

Image: Example of macro shooting setup using the reversible center column, allowing the camera to be positioned very close to the ground.
4.3 Using the E-10 Ball Head
The E-10 ball head offers precise control over camera movement:
- Ball Lock Knob: Loosen to adjust the camera's angle (tilt and swivel). Tighten to lock the camera firmly in position.
- Panning Knob: Loosen to rotate the camera horizontally 360 degrees for panoramic shots without affecting the tilt. Tighten to lock the panning movement.
- Quick Release Plate: Allows for rapid attachment and detachment of your camera. Ensure the safety lock is engaged when the camera is mounted.

Image: Illustration of 360-degree panoramic shooting capabilities and the ball head's 90-degree tilt range, along with locking and sliding mechanisms.
4.4 Stabilizing Hook
A stabilizing hook is located at the bottom of the center column. You can hang a weight, such as a camera bag, from this hook to increase the tripod's stability, especially in windy conditions or when using heavy camera equipment.
5. Maintenance
Proper maintenance ensures the longevity and optimal performance of your SIRUI tripod:
- Cleaning: After use, especially in dusty, sandy, or wet environments, wipe down the tripod legs and ball head with a soft, dry cloth. If necessary, use a slightly damp cloth and then dry thoroughly.
- Lubrication: Avoid applying lubricants to the leg locking mechanisms or ball head components unless specifically instructed by SIRUI. Improper lubrication can attract dirt and impair function.
- Storage: Store the tripod in its carry bag in a dry, cool place away from direct sunlight and extreme temperatures.
- Inspection: Periodically check all screws and connections to ensure they are tight. Do not overtighten.
6. Troubleshooting
Here are solutions to common issues you might encounter:
- Legs not extending/retracting smoothly: Ensure the twist locks are fully loosened before attempting to extend or retract. Clean any dirt or debris from the leg sections and locking mechanisms.
- Camera not stable on ball head: Verify that the quick release plate is securely attached to the camera and that the quick release clamp on the ball head is fully tightened. Ensure the ball lock knob is also tightened.
- Ball head movement is stiff or loose: Check the ball lock knob. If it's too loose, the ball head will move freely. If it's too tight, movement will be restricted. Adjust to your preference.
- Tripod instability: Ensure all leg sections are fully extended and locked, and leg angles are set evenly. For added stability, use the stabilizing hook with a counterweight.
7. Specifications
| Feature | Detail |
|---|---|
| Model Name | Traveler X-II (AT-125+E-10) |
| Material | Carbon Fiber |
| Item Weight | 2.11 pounds (0.96 Kilograms) |
| Weight Limit | 17 Pounds |
| Maximum Height | 59.8 inches (154 Centimeters) |
| Minimum Height | 8.3 inches (21 Centimeters) |
| Product Dimensions (Folded) | 16.3 x 4 x 4.2 inches |
| Tripod Head Type | Ball Head (E-10) |
| Special Features | Adjustable, Compact, Flexi, Lightweight |
8. Warranty and Support
SIRUI products are manufactured to high-quality standards. For specific warranty information, including terms and conditions, please refer to the warranty card included with your product or visit the official SIRUI website. For technical support, spare parts, or service inquiries, please contact SIRUI customer service through their official channels.
You can find more information and support on the official Sirui website: Visit the Sirui Store on Amazon


