Important Safety Information
Please read all instructions carefully before assembly and use. Keep this manual for future reference.
- Ensure all parts are present and undamaged before beginning assembly. Do not use if any parts are missing or broken.
- Assemble the desk on a soft, clean surface to prevent scratches.
- Tighten all screws and bolts securely, but do not overtighten to avoid stripping threads.
- Do not exceed the maximum weight capacity of 204 kg (450 lbs) for the desktop.
- Keep electrical components (LED lights, power outlets) away from water and moisture.
- Ensure the power cord is not pinched or damaged during assembly or use.
- Supervise children around the desk, especially during assembly.
Package Contents
Verify that all components listed below are included in your package. If any parts are missing, please contact Armocity customer support.
- Desktop Panels (Main, Hutch, Monitor Stand)
- Metal Frame Components (Legs, Crossbars)
- Storage Shelves
- Pegboard and 4 Hooks
- LED Light Strip
- Built-in Power Station (3 AC Outlets, 2 USB Ports)
- Assembly Hardware (Screws, Allen Wrench, etc.)
- Instruction Manual

Figure 1: Overview of desk components including the main desk, bookshelf, and pegboard, illustrating how they combine to form the complete unit.
Assembly Instructions (Setup)
Follow these steps carefully to assemble your Armocity Magic Computer Desk. It is recommended to have two people for assembly.
- Unpack and Identify Parts: Lay out all components on a clean, soft surface. Refer to the parts list and diagrams to identify each piece.
- Assemble the Main Frame: Attach the metal legs to the main desktop panel using the provided screws. Ensure the frame is stable.
- Install Side Shelves: Secure the storage shelves to the side metal frames. These shelves provide additional storage for your CPU or other items.
- Attach the Hutch Frame: Connect the hutch support frame to the main desktop. This forms the upper structure for the hutch and pegboard.
- Mount the Pegboard: Secure the DIY pegboard to the designated area on the hutch frame. You can then attach the included hooks as desired.
- Place the Monitor Stand: Position the movable monitor stand on the main desktop. This stand helps in achieving a correct sitting posture.
- Install the Power Station: The built-in power station with 3 AC outlets and 2 USB ports can be installed on either the right or left side of the desk, depending on your preference. Secure it firmly.
- Attach LED Light Strip: Adhere the LED light strip to the underside of the hutch or other desired location. Connect its USB cable to one of the desk's USB ports or an external power source.
- Final Tightening: Once all components are in place, carefully go through all screws and bolts and tighten them securely.

Figure 2: The reversible power station can be positioned on either the left or right side of the desk for convenience.
Operating Instructions
LED Light Operation
The integrated LED lights enhance your workspace ambiance. They can be controlled via a mobile application or an RF remote control.
- App Control: Download the specified mobile application (refer to the LED light manual or QR code provided with the lights). Connect your device via Bluetooth. The app allows control over brightness, speed, color modes, and music synchronization.
- RF Remote Control: Use the provided RF remote to adjust light settings. Functions typically include power on/off, color selection, brightness adjustment, and mode changes.
- Music Sync: When using the mobile app, the LED lights can synchronize with music playing on your mobile device, creating dynamic lighting effects.

Figure 3: The LED lights can be controlled via a mobile app for music synchronization or a dedicated RF remote control.
Power Station Usage
The built-in power station provides convenient access to power for your devices.
- AC Outlets: Plug in your computer, monitor, lamps, or other AC-powered devices into the 3 standard outlets.
- USB Ports: Use the 2 USB ports to charge your smartphone, tablet, or other USB-powered accessories. These ports offer fast charging capabilities.
- Cable Management: Utilize the included Velcro strap to manage and secure cables, preventing clutter.
Pegboard and Hooks
The versatile pegboard and included hooks offer customizable storage and display options.
- Hang headphones, tools, keys, or small decorative items on the hooks.
- The pegboard can also serve as a backdrop for notes or photos.
Movable Monitor Stand
The monitor stand helps in maintaining an ergonomic posture while working or gaming.
- Place your monitor on the stand to elevate it to eye level, reducing neck and eye strain.
- Adjust the position of the stand on the desktop to suit your comfort.
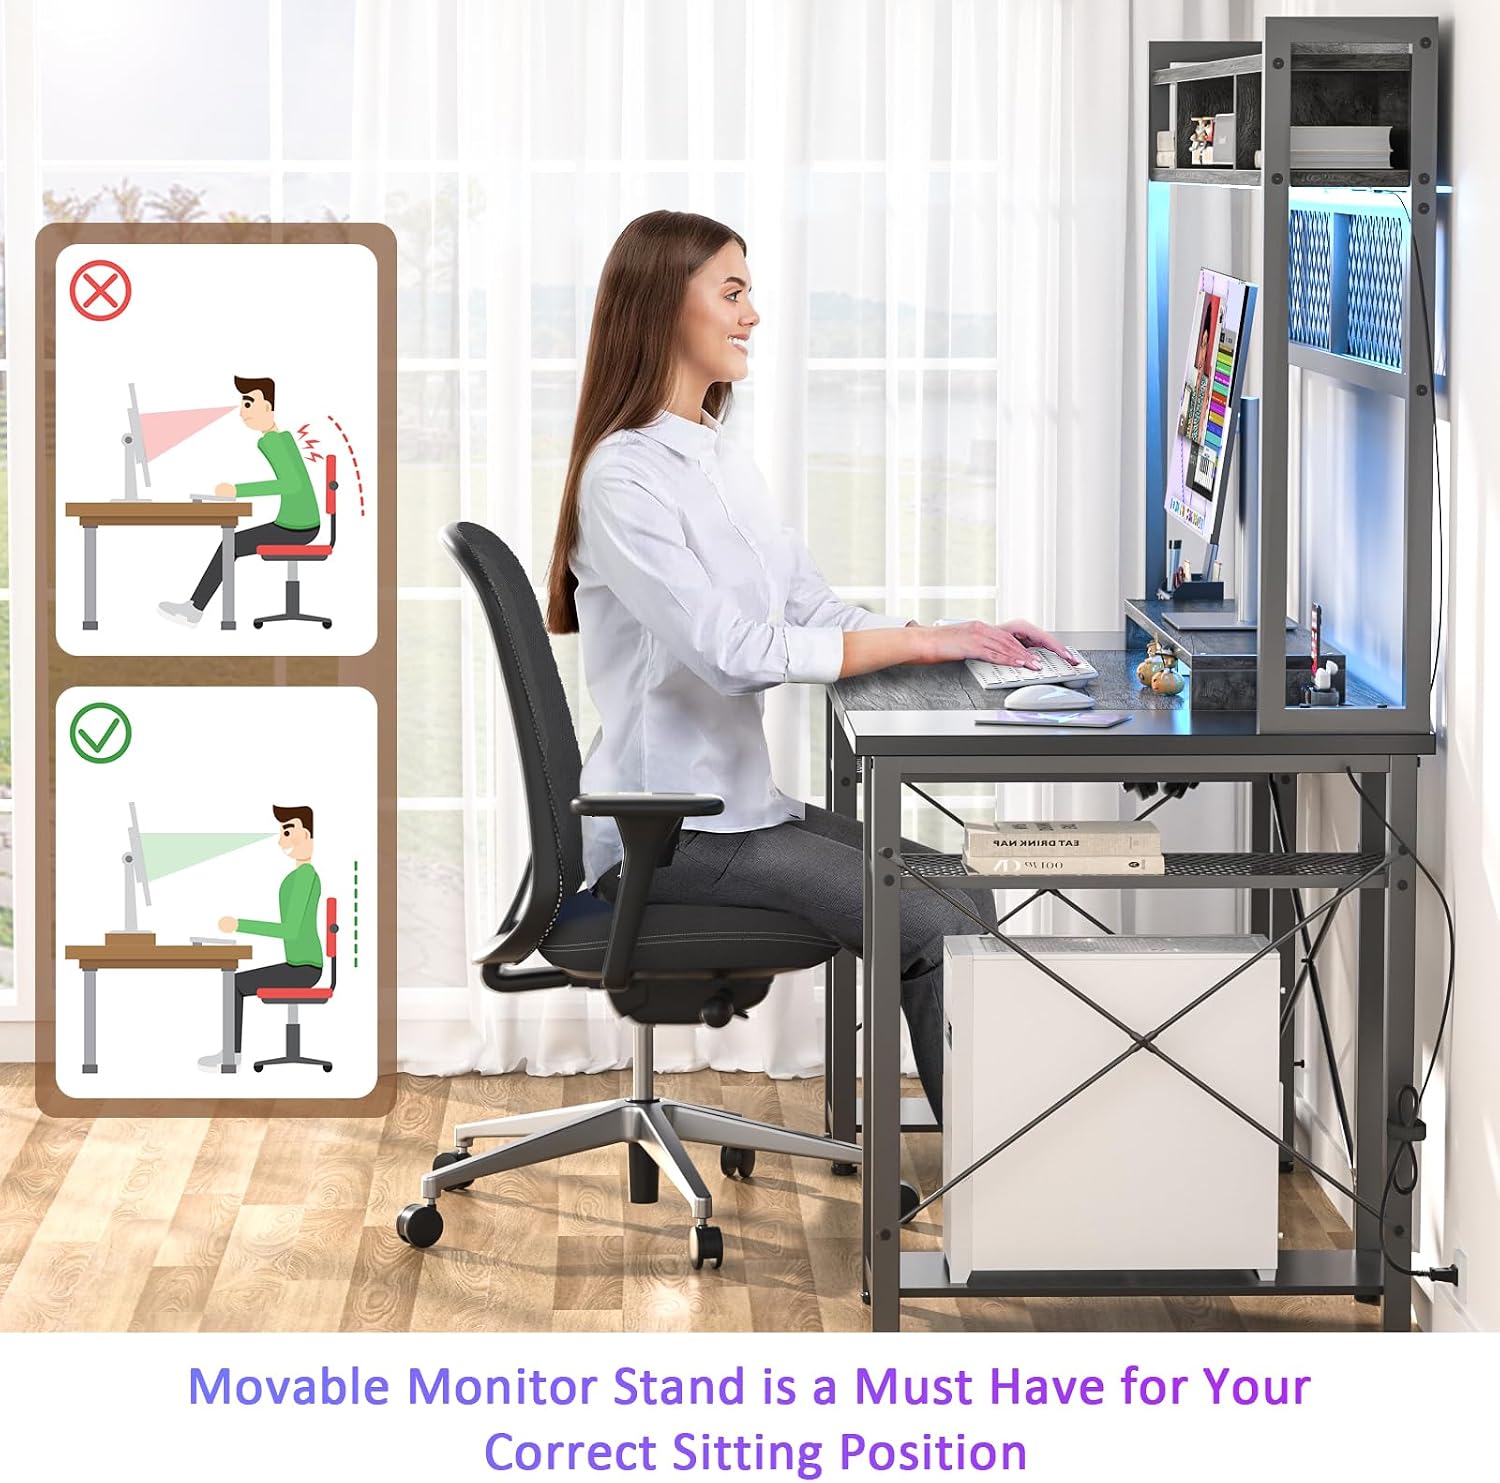
Figure 4: Proper monitor height, facilitated by the movable stand, promotes a correct and ergonomic sitting position.
Maintenance
Regular maintenance will help prolong the life and appearance of your Armocity desk.
- Cleaning: Wipe the desk surfaces with a soft, damp cloth. Avoid harsh chemicals or abrasive cleaners that could damage the finish.
- Dusting: Regularly dust the LED lights and power outlets to prevent accumulation that could affect performance.
- Hardware Check: Periodically check all screws and bolts to ensure they remain tight. Retighten if necessary.
- Electrical Components: Do not attempt to repair the LED lights or power station yourself. If issues arise, contact customer support.
Troubleshooting
If you encounter any issues with your desk, refer to the following common problems and solutions.
| Problem | Possible Cause | Solution |
|---|---|---|
| Desk is wobbly/unstable. | Loose screws or uneven floor. | Ensure all assembly screws are tightened. Adjust leveling feet if present, or place shims under legs on uneven surfaces. |
| LED lights are not working. | Power connection issue, remote battery dead, or app not connected. | Check if the USB cable is securely plugged in. Replace remote battery. Ensure Bluetooth is enabled and the app is correctly paired. |
| Power outlets/USB ports not functioning. | Desk's main power cord not plugged in, or circuit overload. | Verify the desk's main power cord is fully plugged into a working wall outlet. Unplug some devices if overloaded. |
| Parts do not align during assembly. | Incorrect orientation of parts or manufacturing defect. | Review the assembly diagrams carefully. If parts are still misaligned, contact customer support. |
Specifications
Detailed specifications for the Armocity Magic Computer Desk, Model DJ47.
| Feature | Detail |
|---|---|
| Brand | Armocity |
| Model Number | DJ47 |
| Color | Grey/Black |
| Dimensions (L x W x H) | 119.89 x 50.04 x 73.91 cm (47.2 x 19.7 x 29.1 inches) |
| Weight | 24.95 kg (55 lbs) |
| Material | Engineered Wood (Desktop), Metal (Frame) |
| Special Features | Reversible Design, LED Lights (App/RF Control, Music Sync), Built-in Power Station (3 AC Outlets, 2 USB Ports), Pegboard with Hooks, Movable Monitor Stand, Tall Hutch, Ample Leg Room |
| Weight Capacity | 204 kg (450 lbs) |

Figure 5: Key features of the Armocity desk, including storage, power options, and ergonomic design elements.
Warranty and Support
Armocity provides a 2-year warranty for this computer desk.
If you have any questions regarding assembly, missing parts, damaged components, or require technical assistance, please contact Armocity customer service. Provide your model number (DJ47) and purchase details for faster service.
For support, please refer to the contact information provided with your purchase or visit the official Armocity website.