1. Introduction
Thank you for choosing the Armocity 140.2cm Gaming Desk (Model GR1). This manual provides essential information for the safe assembly, operation, and maintenance of your new desk. Please read it thoroughly before beginning assembly and keep it for future reference.
This versatile desk is designed to enhance your gaming, work, or study environment. It features a spacious 140.2 cm surface, integrated LED lighting, convenient power outlets, a reversible storage shelf unit, and a customizable pegboard. Its sturdy construction and thoughtful design aim to provide an ergonomic and organized workspace.
2. Safety Information
- Proper Anchoring: Always anchor the desk securely to a wall to prevent tipping, especially if children are present or if heavy items are placed on the upper shelves. Use appropriate wall anchors for your wall type.
- Electrical Safety: Do not touch the power transformer during assembly or operation. Keep all electrical components, including the power strip and LED lights, away from water and moisture. Ensure all connections are secure before plugging into a power source.
- Children: Keep children away from small parts during assembly. Ensure the desk is fully assembled and stable before allowing children to use it.
- Weight Capacity: Do not exceed the maximum weight capacity of the desk (approximately 249.50 kg). Distribute weight evenly across the desk surface and shelves.
- Assembly: Follow all assembly instructions carefully. Do not force parts together. If you encounter any difficulties, refer to the troubleshooting section or contact customer support.
3. Setup and Assembly
Before you begin, ensure you have all components and tools listed in the packaging. Assembly typically takes 1-2 hours. It is recommended to assemble the desk in the room where it will be used, or in a space that allows for easy movement of the assembled sections.
3.1 Unpacking and Component Check
Carefully unpack all components and lay them out on a clean, soft surface to prevent scratches. Verify that all parts are present against the included parts list.
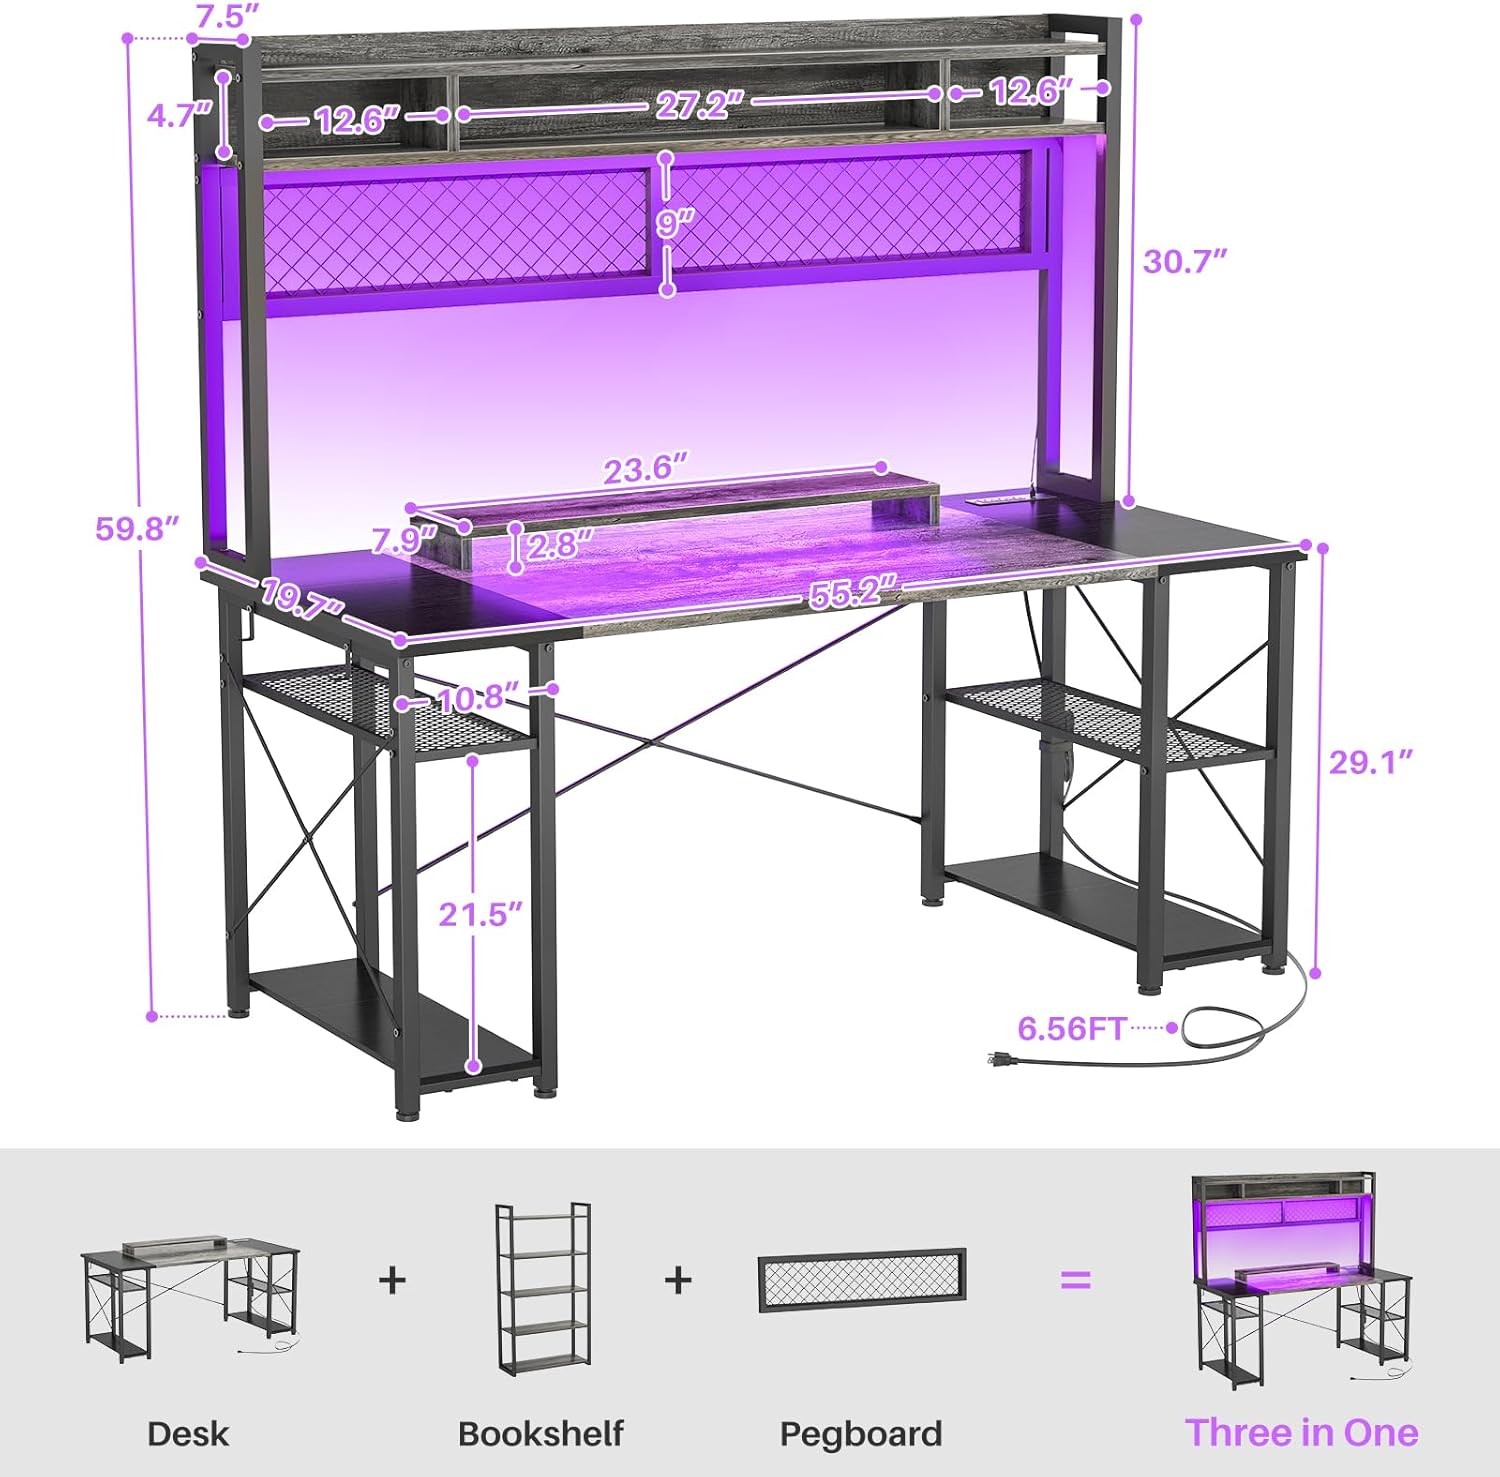
Figure 3.1: Overview of desk components and dimensions. The image illustrates the desk, separate bookshelf, and pegboard, combining to form the complete unit. Key dimensions are indicated for the overall structure and individual sections like the upper shelf, monitor stand, and legroom.
3.2 Desk Assembly Steps
- Assemble the Main Desk Frame: Connect the metal frame components using the provided screws and tools. Ensure all connections are tightened securely.
- Attach the Desktop: Carefully place the desktop panels onto the assembled frame. The desk features a modern two-tone design (grey and black).
- Install the Reversible Storage Shelves: The desk includes a reversible storage unit. Decide whether you want the shelves on the right or left side of the desk based on your preference and room layout. Attach the shelves to the main frame.
- Mount the Upper Shelf Unit: Attach the upper shelf unit, which includes the baffle edge and three storage shelf cases, to the main desk frame.
- Install the Pegboard: The versatile pegboard can be installed on the upper hutch. Use the included 4 hooks to customize your storage for tools, keys, or headphones.
- Position the Moveable Monitor Stand: Place the monitor stand on the desktop. This stand is designed to help maintain a correct sitting posture by elevating your monitor to eye level.
- Connect the Integrated Power Strip: The desk comes with an integrated power strip featuring 3 outlets and 2 USB ports. Route the power cable (2m length) neatly and secure it using the adhesive Velcro strip provided. The charging base is designed to be placed on either the right or left side as needed.
- Install LED Lights: The LED lights are pre-installed or easily attachable. Connect them to one of the USB ports on the integrated power strip.
- Final Check: Ensure all screws are tight and the desk is stable. Properly anchor the desk to a wall for added safety.

Figure 3.2: Detailed features of the Armocity Gaming Desk. This image highlights the upper shelf with baffle edge, 3 storage shelf cases, DIY pegboard with 4 hooks, moveable monitor stand, two-color deskboard, 2 iron hooks, 3 power outlets, 2 USB ports, ample leg room, 2 CPU stands, and the sturdy metal frame.
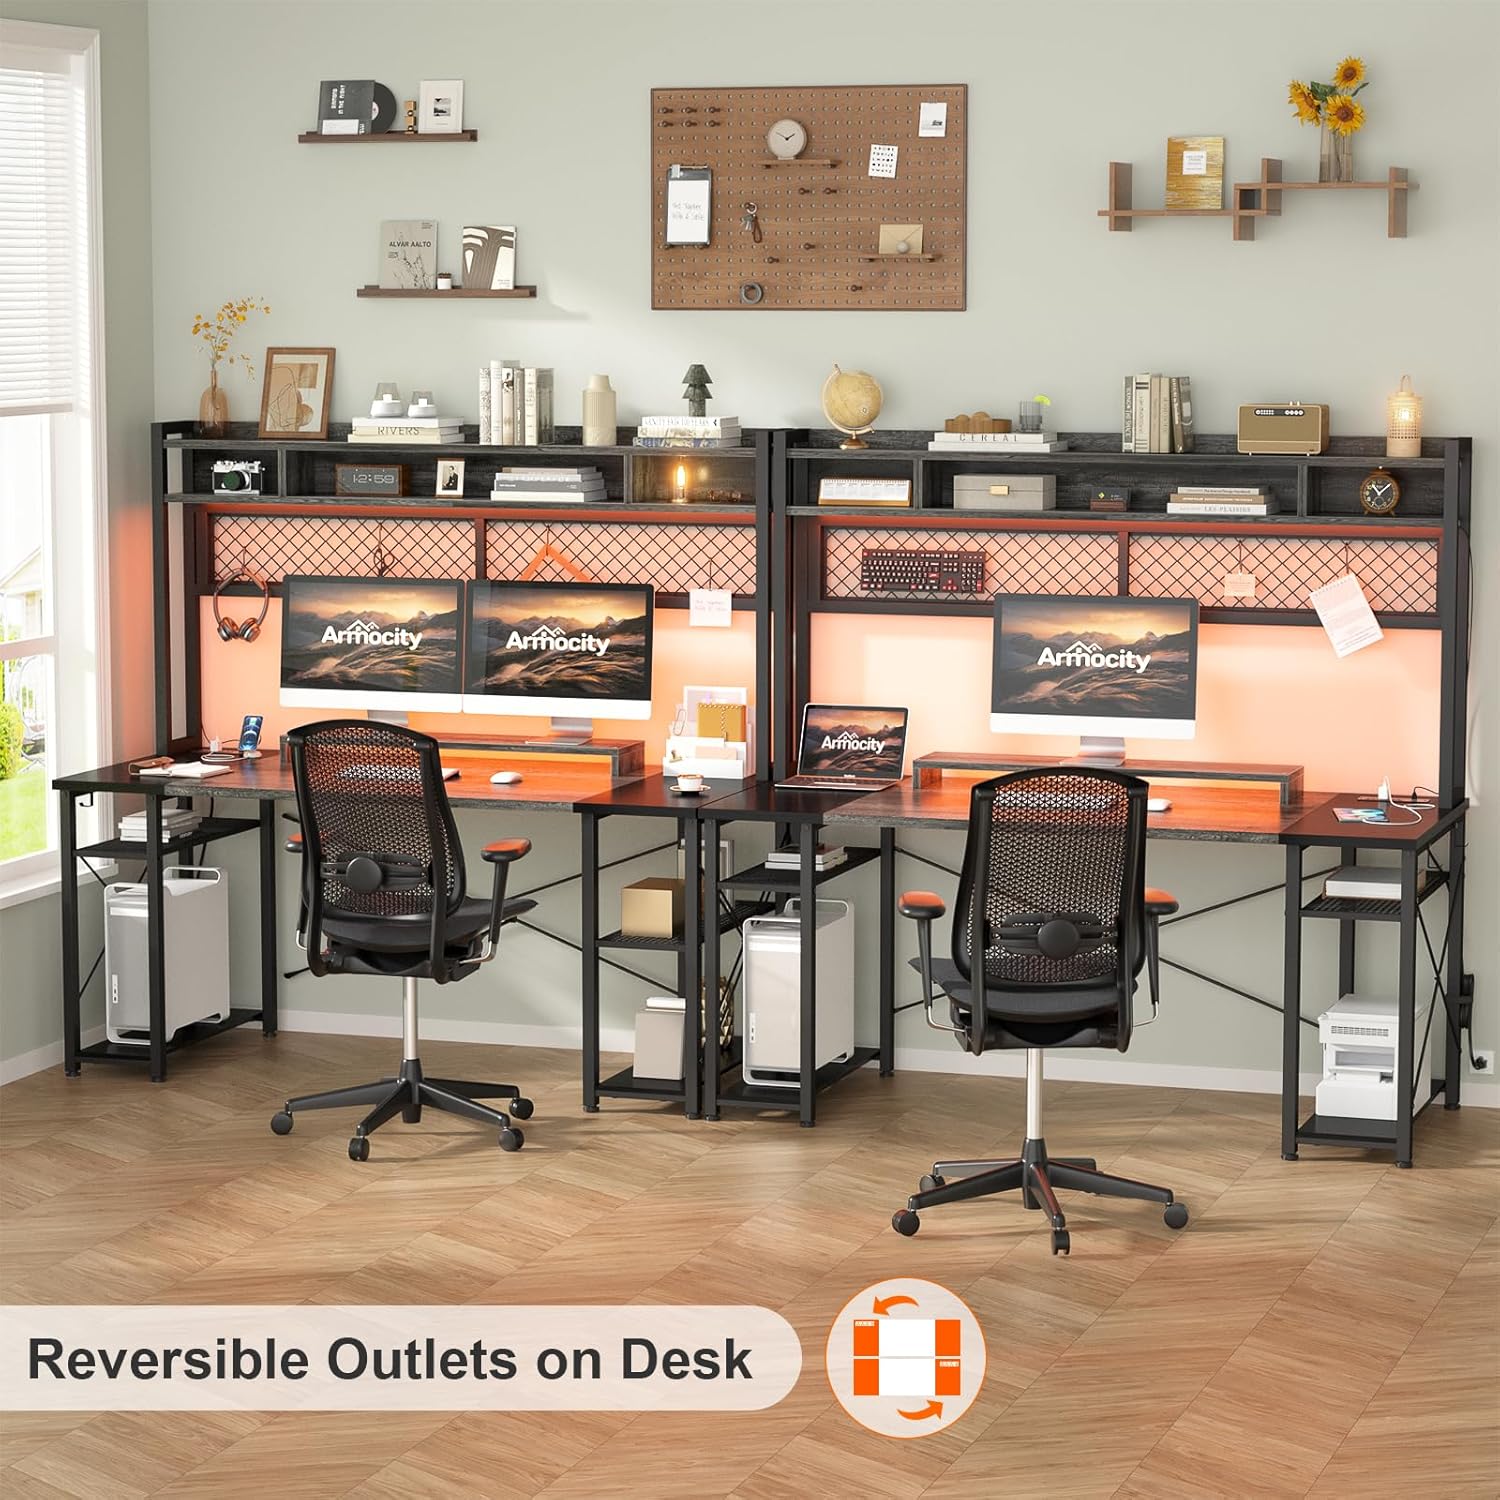
Figure 3.3: Reversible outlet placement. The power strip can be installed on either the left or right side of the desk to suit your setup.
4. Operating Instructions
4.1 LED Lighting System
The integrated LED lighting system adds ambiance to your workspace. It can be controlled via a mobile application or a wireless remote control.
- App Control: Download the designated mobile application (refer to the LED light instruction sheet for app name and QR code). Connect your smartphone to the LED lights via Bluetooth. The app allows you to adjust brightness, change lighting modes, control speed, and even sync the lights with music playing on your mobile device.
- Remote Control: Use the provided wireless remote control to adjust the brightness, change colors, and select various lighting effects. Ensure the remote has working batteries.

Figure 4.1: LED light control options. The desk's LED lighting can be managed through a dedicated mobile application or a wireless remote control, offering RGB colors, a built-in microphone for sound reactivity, and music synchronization.
4.2 Power Outlets and USB Ports
The desk includes a built-in power strip with 3 standard outlets and 2 USB ports for convenient charging and powering of your devices.
- Usage: Plug in your computer, monitor, gaming equipment, lamps, mobile phones, tablets, and other devices directly into the integrated power strip.
- Cable Management: Utilize the provided Velcro strap to bundle and secure cables, keeping your workspace tidy and free from clutter.
4.3 Ergonomic Monitor Stand
The moveable monitor stand helps you achieve an ergonomic sitting position by raising your monitor to an optimal viewing height.
- Adjustment: Position the monitor stand to ensure your eye level is at the top third of your monitor screen, promoting better posture and reducing neck strain.

Figure 4.2: Importance of correct sitting posture. The moveable monitor stand helps achieve an ergonomic setup, aligning your eyes with the top of the screen to prevent strain.
5. Maintenance
Regular maintenance will help prolong the life and appearance of your Armocity Gaming Desk.
- Cleaning: Wipe the desk surface and metal frame with a soft, damp cloth. Avoid using harsh chemicals, abrasive cleaners, or polishes that may damage the finish.
- Spills: Immediately wipe up any spills to prevent staining or damage to the desktop material.
- Tighten Fasteners: Periodically check all screws and fasteners to ensure they are tight. Re-tighten if necessary to maintain stability.
- Electrical Components: Keep the power strip and LED lights free from dust. Do not attempt to repair electrical components yourself; contact a qualified technician if issues arise.
6. Troubleshooting
If you encounter any issues with your Armocity Gaming Desk, refer to the following common problems and solutions:
| Problem | Possible Cause | Solution |
|---|---|---|
| Desk is wobbly or unstable. | Loose fasteners; uneven floor; improper assembly. | Check and tighten all screws. Ensure the desk is on a level surface; use shims if necessary. Review assembly steps. Ensure desk is anchored to the wall. |
| LED lights are not working. | Loose USB connection; power strip off; remote battery dead; app not connected. | Ensure the LED light USB cable is securely plugged into a working USB port. Check if the power strip is on. Replace remote batteries. Reconnect the app via Bluetooth. |
| Power outlets/USB ports not working. | Power strip not plugged in; power strip switch off; circuit breaker tripped. | Ensure the desk's main power cable is securely plugged into a wall outlet. Check if the power strip's master switch is on. Reset your home's circuit breaker if necessary. |
| Missing parts during assembly. | Packaging oversight. | Contact Armocity customer support with your purchase details and the specific missing parts. |
If the problem persists after attempting these solutions, please contact Armocity customer support for further assistance.
7. Specifications
| Feature | Detail |
|---|---|
| Brand | Armocity |
| Model Number | GR1 |
| Color | Grey and Black |
| Product Dimensions (D x W x H) | 140.2 cm x 50.04 cm x 73.91 cm (Desk Height) |
| Overall Dimensions (Approx.) | 140.2 cm (W) x 50.04 cm (D) x 152 cm (H, including hutch) |
| Item Weight | 11.34 Kilograms |
| Material | Metal Frame, Wood Desktop |
| Special Features | Reversible storage, LED lights, Integrated power outlets (3 AC, 2 USB), Pegboard with hooks, Moveable monitor stand |
| Weight Capacity | Approximately 249.50 kg |
| Cable Length | 2 meters (for power strip) |
8. Warranty and Support
Armocity is committed to providing high-quality products. While specific warranty details are not provided in this manual, please retain your proof of purchase for any warranty claims.
8.1 Customer Support
For any questions regarding assembly, operation, missing parts, or warranty information, please contact Armocity customer support through the retailer where you purchased the product or visit the official Armocity website for contact details.
Please have your model number (GR1) and purchase date ready when contacting support.


