1. Introduction
The Nolan N-com B101 R Intercom is a communication system designed for integration with Nolan helmets, providing enhanced audio capabilities for riders. This manual provides comprehensive instructions for the installation, operation, maintenance, and troubleshooting of your N-com B101 R system.
2. Safety Information
Please read all safety warnings and instructions carefully before using the N-com B101 R Intercom. Failure to follow these instructions may result in injury or damage to the device.
- Do not attempt to disassemble or modify the intercom unit.
- Ensure the unit is securely installed in the helmet before riding.
- Avoid exposing the device to extreme temperatures or direct sunlight for prolonged periods.
- Keep the device away from water and moisture.
- Always prioritize road safety. Do not operate the intercom in a way that distracts you from riding.
3. Package Contents
Verify that all components are present in the package:
- Nolan N-com B101 R Intercom Unit
- Microphone
- Speakers (2x)
- Mounting Hardware
- USB Charging Cable
- User Manual (this document)

Figure 3.1: The Nolan N-com B101 R Intercom packaging, showing the product and key features.
4. Product Overview
The N-com B101 R system is designed for seamless integration into compatible Nolan helmets. It features a compact main unit, high-quality speakers, and a microphone for clear communication.

Figure 4.1: Front view of the Nolan N-com B101 R Intercom system integrated into a helmet, showing the main unit and microphone placement.
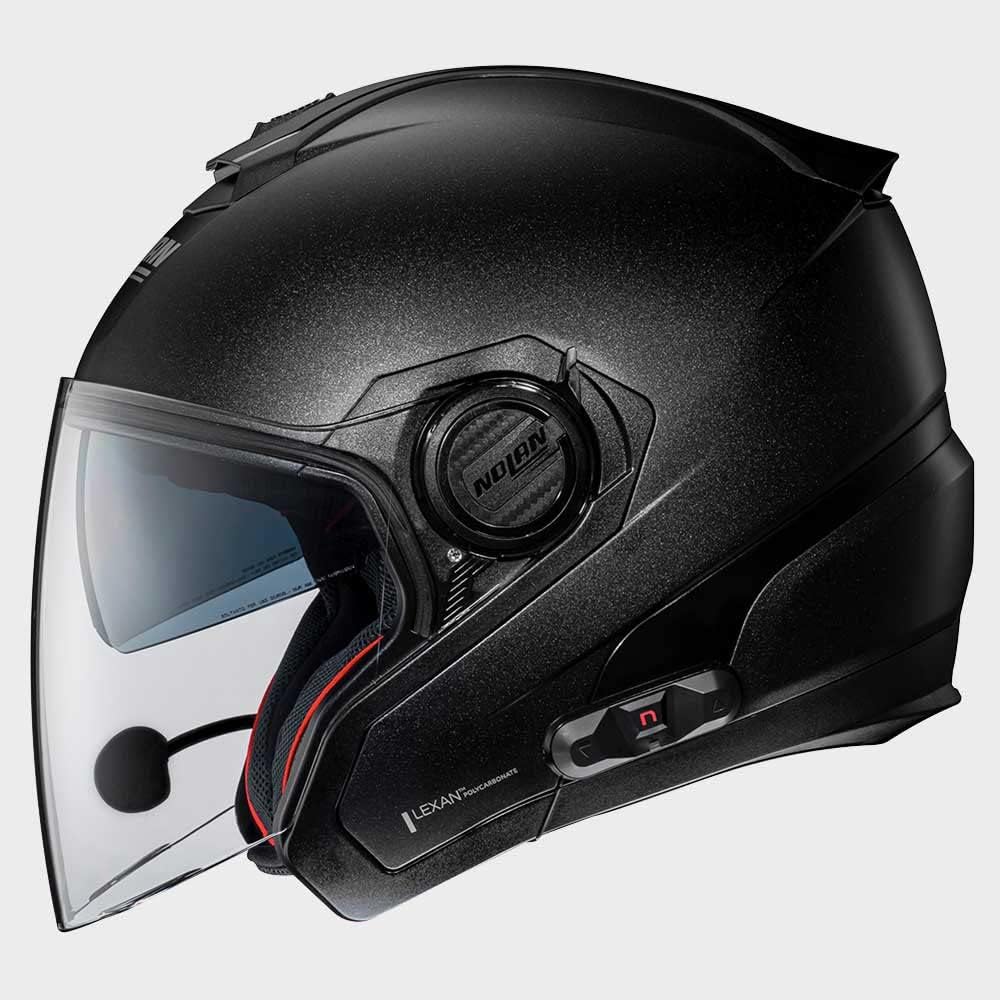
Figure 4.2: Side view of the Nolan N-com B101 R Intercom system integrated into a helmet, highlighting the sleek profile of the communication unit.

Figure 4.3: Rear view of the Nolan N-com B101 R Intercom system integrated into a helmet, showing the discreet placement of the unit.
5. Setup and Installation
Follow these steps to install the N-com B101 R Intercom into your compatible Nolan helmet:
- Prepare the Helmet: Remove the helmet's internal padding as per your helmet's specific instructions to access the speaker and microphone recesses.
- Install Speakers: Place the speakers into the designated ear recesses inside the helmet. Ensure they are positioned comfortably and securely.
- Install Microphone: Attach the microphone to the helmet's chin bar or cheek pad area, ensuring it is close to your mouth for optimal voice pickup. Route the cable discreetly along the helmet's interior.
- Mount Main Unit: Secure the main intercom unit to the exterior of the helmet using the provided mounting hardware. Typically, this involves a clip or adhesive mount on the side of the helmet.
- Connect Cables: Connect the speaker and microphone cables to the main intercom unit. Ensure all connections are firm.
- Reassemble Helmet: Carefully reinsert the helmet's internal padding, ensuring no cables are pinched or exposed.
- Initial Charge: Before first use, fully charge the intercom unit using the supplied USB cable. The charging indicator will change when charging is complete.
6. Operating Instructions
6.1 Power On/Off
- To Power On: Press and hold the Power button for approximately 3 seconds until you hear an audible tone or see the indicator light illuminate.
- To Power Off: Press and hold the Power button for approximately 3 seconds until you hear an audible tone and the indicator light turns off.
6.2 Bluetooth Pairing
To pair your N-com B101 R with a mobile phone or other Bluetooth device:
- Ensure the intercom is powered off.
- Press and hold the Power button for approximately 5-7 seconds until the indicator light flashes rapidly, indicating pairing mode.
- On your mobile device, enable Bluetooth and search for available devices.
- Select "N-com B101 R" from the list of found devices.
- If prompted for a passcode, enter "0000".
- Once paired, the indicator light on the intercom will change to a slow flash or solid blue.
6.3 Basic Functions
- Answer/End Call: Press the Multi-function button once.
- Reject Call: Press and hold the Multi-function button for 2 seconds.
- Play/Pause Music: Press the Multi-function button once.
- Volume Up: Press the Volume Up button.
- Volume Down: Press the Volume Down button.
7. Maintenance
Proper maintenance ensures the longevity and optimal performance of your N-com B101 R Intercom.
- Cleaning: Use a soft, damp cloth to clean the exterior of the intercom unit. Do not use abrasive cleaners or solvents.
- Storage: When not in use for extended periods, store the intercom in a cool, dry place.
- Battery Care: To maintain battery health, charge the unit regularly, even if not in frequent use. Avoid fully discharging the battery before recharging.
8. Troubleshooting
| Problem | Possible Cause | Solution |
|---|---|---|
| Intercom does not power on. | Low battery. | Charge the intercom unit fully. |
| Cannot pair with phone. | Intercom not in pairing mode; Bluetooth off on phone; previously paired device interfering. | Ensure intercom is in pairing mode (rapid flashing light). Turn phone's Bluetooth off and on. Forget previous pairings on phone. |
| No audio from speakers. | Speakers not connected; volume too low; faulty connection. | Check speaker connections. Increase volume. Re-seat speaker cables. |
| Microphone not picking up voice. | Microphone not connected; microphone positioned incorrectly. | Check microphone connection. Ensure microphone is close to your mouth and not obstructed. |
9. Specifications
| Feature | Detail |
|---|---|
| Model Name | BNCOM00000045 |
| Brand | Nolan |
| Product Dimensions | 10 x 10 x 10 cm |
| Item Weight | 280 g |
| Colour | Black |
| Material | Polyester |
| Manufacturer | N-COM |
| Certificate Type | ECE |
| Closure Type | Ratchet |
10. Warranty and Support
For warranty information and technical support, please refer to the official Nolan N-com website or contact your authorized dealer. Keep your proof of purchase for warranty claims.
For further assistance, visit: www.n-com.it


