1. Introduction
This manual provides detailed instructions for the setup, operation, maintenance, and troubleshooting of your ORIA Projection Alarm Clock. Please read this manual thoroughly before using the product to ensure proper function and longevity.
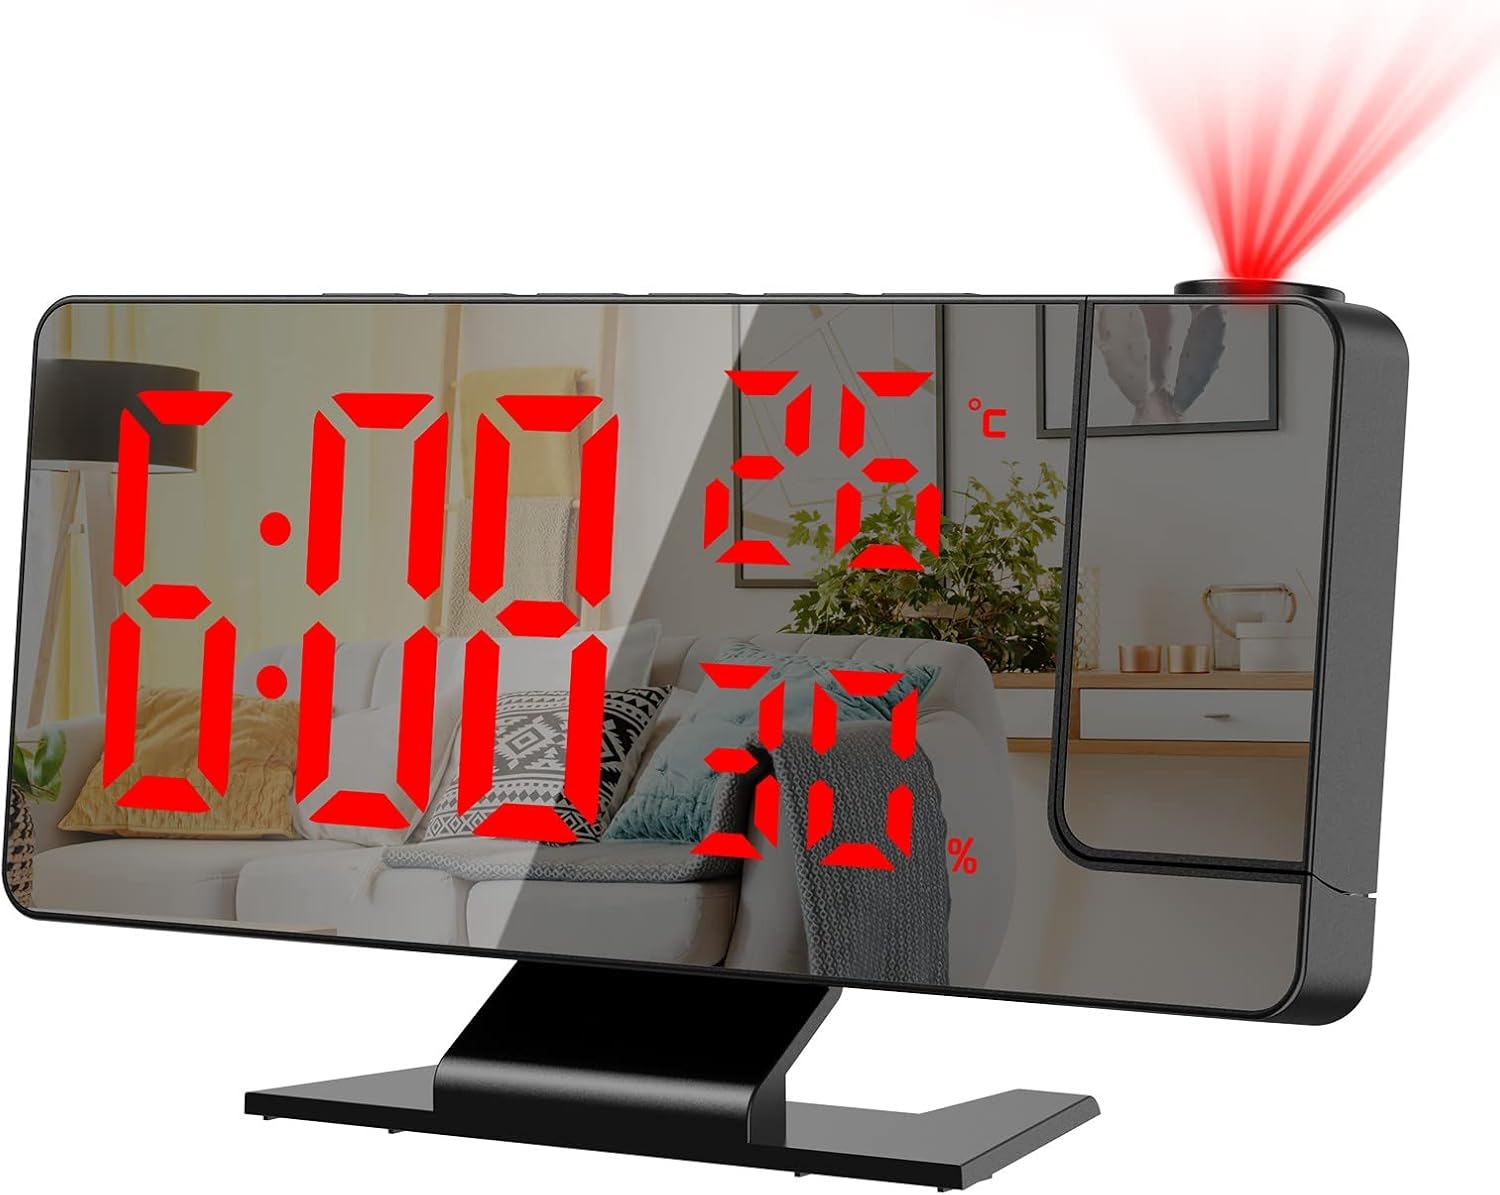
Image 1.1: Front view of the ORIA Projection Alarm Clock displaying time, temperature, and humidity, with a red projection on the wall.
2. Product Features
The ORIA Projection Alarm Clock is designed with multiple features to enhance your daily routine:
- 180° Rotatable Projection: Projects time onto your ceiling or wall with adjustable brightness and a projection distance of 2-5 meters (6.5-16 feet).
- Adjustable Display Brightness: The 7.8-inch mirror LED display offers 4 levels of brightness (Bright, Medium, Dim, OFF) to suit your preference.
- Night Mode: Automatically dims the screen from 18:00 to 5:59 to prevent disturbance during sleep. The time range is adjustable.
- Multifunction Display: Shows time, temperature, and humidity simultaneously.
- Multiple Alarm Modes: Set alarms for Monday-Friday, Monday-Saturday, or Monday-Sunday.
- Snooze Function: Provides an adjustable snooze duration from 1 to 60 minutes.
- USB Charging Port: Features a USB output port for charging other devices.
- Memory Function: Built-in CR2032 backup battery (included) retains time settings during power outages.

Image 2.1: Overview of the alarm clock's main functions and dimensions.
3. Setup
3.1 Package Contents
Before proceeding, please verify that all items are present in the package:
- 1 x ORIA Projection Alarm Clock
- 1 x 1.5m USB Cable (Power adapter not included)
- 1 x CR2032 Backup Battery (pre-installed)
- 1 x User Manual

Image 3.1: Contents included in the product package.
3.2 Power Connection
The alarm clock requires continuous power via the included USB cable. It is not equipped with a charger, so you will need to use a standard USB power adapter (e.g., phone charger) or a USB port on another device.
- Connect the small end of the USB cable to the power port on the back of the alarm clock.
- Connect the large end of the USB cable to a USB power adapter (not included) or a powered USB port.
- The display will illuminate, indicating the clock is powered on.
3.3 Backup Battery
A CR2032 button cell battery is pre-installed to provide backup power for time settings during power interruptions. The screen will not display when running on backup battery power alone.

Image 3.2: Rear view of the alarm clock with labeled components, including the power port and battery compartment.
4. Operating Instructions
4.1 Button Functions
Familiarize yourself with the control buttons located on the top and back of the unit:
- SNOOZE/LIGHT: Activates snooze, adjusts display brightness.
- ALARM: Enters alarm setting mode.
- MODE: Switches between time, temperature, and humidity display modes; enters time setting mode.
- UP: Increases values during setting; switches 12/24H format.
- DOWN: Decreases values during setting; adjusts projection brightness.
- PROJECT: Activates/deactivates projection; flips projection orientation.
4.2 Setting Time
- Press and hold the MODE button for 3 seconds to enter time setting mode. The hour digits will flash.
- Use the UP or DOWN buttons to adjust the hour.
- Press MODE again to confirm the hour and move to minute setting. The minute digits will flash.
- Use the UP or DOWN buttons to adjust the minute.
- Press MODE to confirm and exit time setting.
4.3 12/24 Hour Format
To switch between 12-hour and 24-hour time formats:
- In normal time display mode, press the UP button. The display will toggle between 12H and 24H format.

Image 4.1: Switching between 12-hour and 24-hour time formats.
4.4 Setting Alarms
The clock supports multiple alarm modes.
- Press the ALARM button to enter alarm setting mode. The alarm hour will flash.
- Use the UP or DOWN buttons to adjust the alarm hour.
- Press ALARM again to confirm the hour and move to minute setting. The alarm minute will flash.
- Use the UP or DOWN buttons to adjust the alarm minute.
- Press ALARM again to select the alarm mode (1-5 for Monday-Friday, 1-6 for Monday-Saturday, 1-7 for Monday-Sunday). Use UP or DOWN to cycle through options.
- Press ALARM to confirm and exit alarm setting.

Image 4.2: Available alarm modes for different days of the week.
4.5 Snooze Function
When the alarm sounds, press the SNOOZE/LIGHT button to activate the snooze function. The alarm will pause for the set snooze duration (default 9 minutes, adjustable from 1-60 minutes) and sound again afterward.
- To adjust snooze duration: While in alarm setting mode (after setting hour and minute), press ALARM until the snooze duration flashes. Use UP or DOWN to set the desired minutes.

Image 4.3: The snooze button and its function.
4.6 Display Brightness Adjustment
The main LED display has 4 brightness levels:
- In normal time display mode, short press the SNOOZE/LIGHT button to cycle through brightness levels: Bright, Medium, Dim, OFF.

Image 4.4: Four levels of screen brightness adjustment.
4.7 Night Mode
The clock features an automatic night mode that dims the display during specific hours.
- Default night mode is from 18:00 (6 PM) to 5:59 (5:59 AM). During this period, the screen brightness will automatically switch to the lowest setting.
- To adjust night mode time: Press and hold the MODE button until the hour flashes. Press MODE repeatedly until the
Related Documents - DS-3718LW

NieNie LED Temperature and Humidity Projection Clock Instruction Manual
Comprehensive user manual for the NieNie LED Temperature and Humidity Projection Clock (models 3718LW, NNBB-24039, 3618LW). Details functions, setup, alarm, temperature/humidity display, night mode, projection, and power failure protection.
DS-3822LP Digital Clock User Manual: Features, Operation, and Settings
Comprehensive user manual for the DS-3822LP digital clock, alarm, and thermometer with LED/LCD display and projection function. Learn how to set time, date, alarms, adjust brightness, and use projection features.
DS-3618LP Projection Clock: User Manual and Features
Detailed instructions and features for the DS-3618LP projection clock, including alarm, temperature display, night mode, and projection functions. Learn how to set up and use your digital alarm clock.
NieNie DS-6657 9-Inch Digital Wall Clock User Manual - Features & Specifications
Comprehensive user manual for the NieNie DS-6657 digital wall clock. Learn about its 9-inch LED display, USB power, temperature/humidity monitoring, auto-dimming, DST, and alarm functions. Includes detailed specifications and operation guide.
NieNie DS-6691R: Large Digital Wall Clock with Mood Light & Remote Control - User Guide
Comprehensive user guide for the NieNie DS-6691R, a versatile digital wall clock featuring a large LED display, 9-color mood lighting, dual alarms, timer, remote control, and adjustable brightness.
DS-6681/5519 LED Digital Clock User Manual
Comprehensive user manual for the DS-6681/5519 LED Digital Clock, detailing features, setup, and operation in multiple languages. Includes instructions for time, date, alarm, temperature, and brightness settings.