
1. Introduction
This manual provides detailed instructions for the installation, operation, and maintenance of your VSDISPLAY 10.4-inch 1024x768 TFT IPS Capacitive Touch LCD with the VS-TY2662V1-99 VGA AV LVDS Controller Board. This product is designed for various display applications requiring a high-resolution, touch-enabled screen with multiple video input options.
2. Safety Information
- Ensure the power adapter is 12V DC, rated at 2A or higher, with a 5.5 x 2.1 mm port. Using an incorrect power supply can damage the device.
- Always disconnect power before making any connections or disconnections.
- Handle the LCD panel with care to avoid damage to the screen surface or internal components.
- Operate the controller board in an isolated environment to prevent electrical interference or short circuits.
- Avoid exposing the device to moisture, extreme temperatures, or direct sunlight.
- Do not attempt to disassemble or repair the components yourself. Refer to qualified personnel for service.
3. Package Contents
Verify that all items listed below are included in your package:
- 1 x HD-MI VGA 2AV LCD Controller Board (VS-TY2662V1-99)
- 1 x 10.4-inch 1024x768 LCD Screen (VS104T-004A)
- 1 x Capacitive Touch Panel (VS104TC01-B1)
- 1 x Converter Board
- 1 x USB Controller Board
- 1 x LVDS Cable
- 1 x Keyboard with Cable

Image 3.1: Overview of included components in the package.
4. Specifications
4.1. LCD Controller Board (VS-TY2662V1-99)
- Input Power: 12V DC, >2A (5.5 x 2.1 mm port)
- Video Input: HD-MI, VGA, AV1, AV2
- Standby Mode: <1W power consumption when no signal is input
- Reversing Function: Supports automatic switch to AV2 when ACC 12V is connected
- OSD Menu: Brightness, Contrast, Auto-adjustment, etc.
- OSD Languages: English, French, German, Spanish, Italian, etc.
- Board Dimensions: 91 x 66 x 12 mm
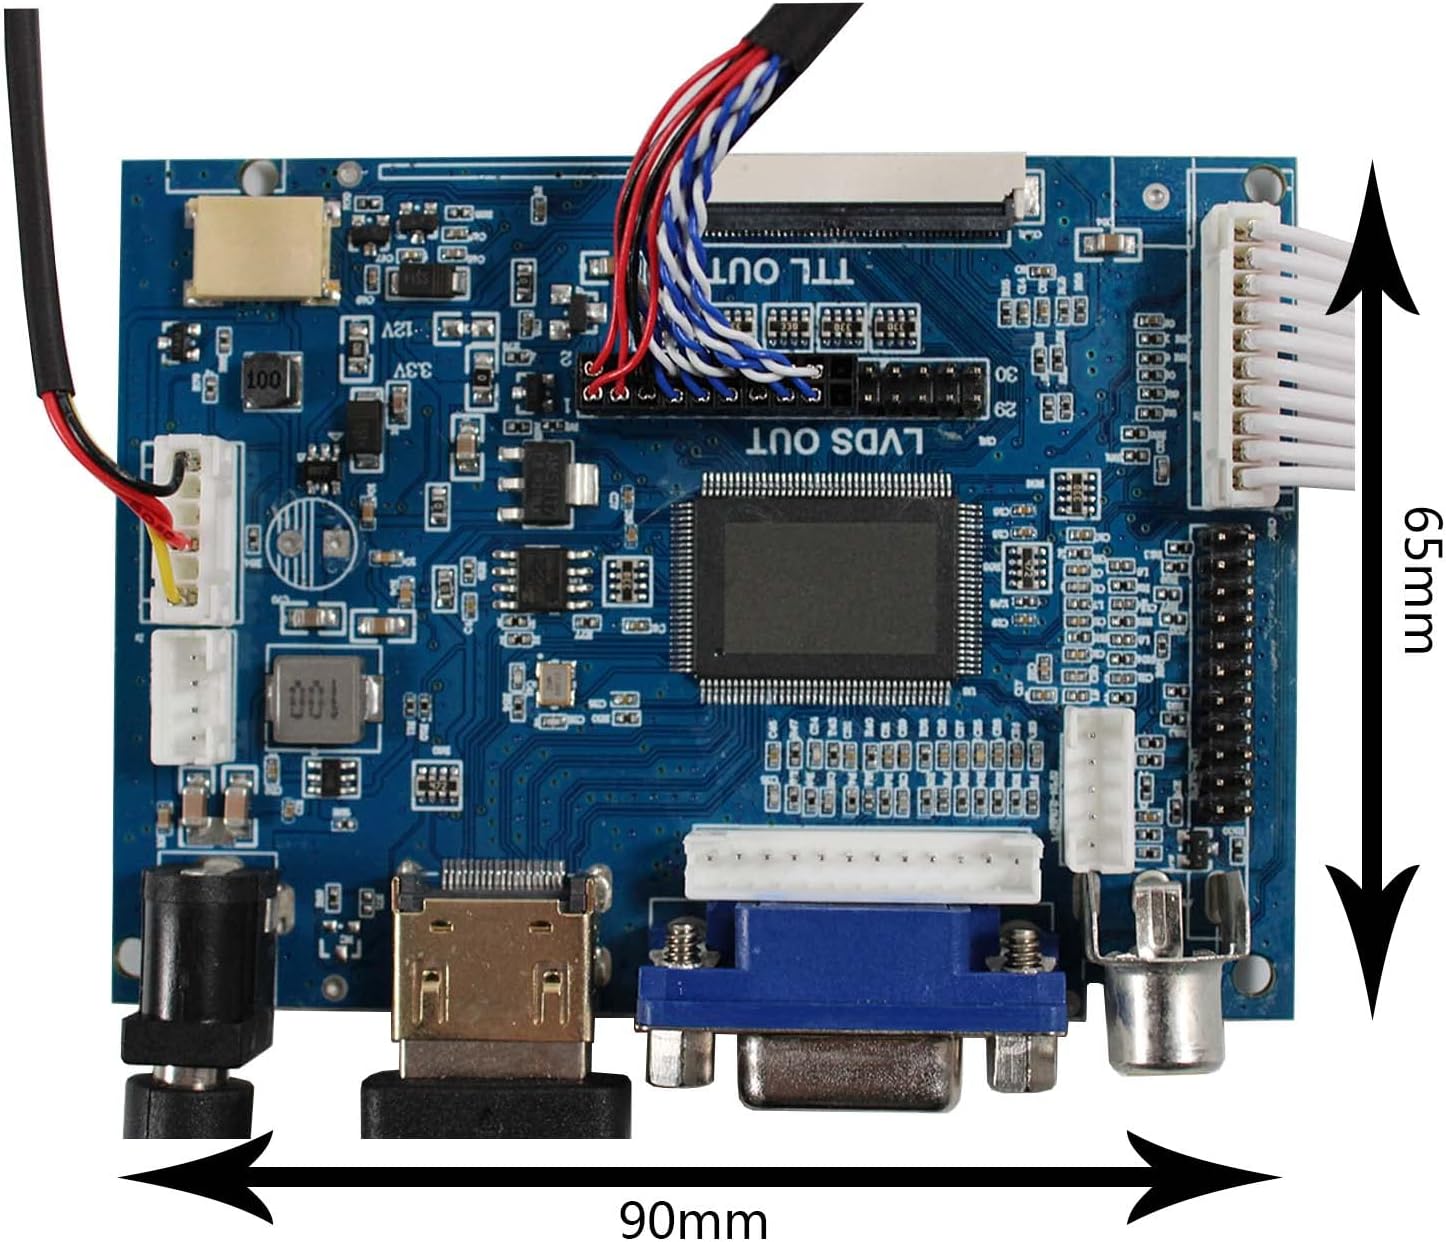
Image 4.1: Dimensions of the VS-TY2662V1-99 LCD Controller Board.
4.2. 10.4-inch LCD Screen (VS104T-004A)
- Display Mode: IPS Pro, Normally Black, Transmissive
- Resolution: 1024 x 768
- Outline Dimensions: 227 x 175.80 x 7 mm (H x V x D)
- Display Area: 210.43 x 157.824 mm (H x V)
- Brightness: 400 cd/m² (Typ.)
- Contrast Ratio: 1000:1 (Typ.)
- Viewing Angle: 80/80/80/80 (Typ.) (Left/Right/Up/Down)
- Signal Interface: LVDS (1 ch, 8 bits), Connector, 30 pins
- Backlight: WLED
- Input Voltage: 3.3V
4.3. Capacitive Touch Panel (VS104TC01-B1)
- Touch Type: Capacitive Multi-touch (10 points)
- Connection: USB (via USB Controller Board)
- Driver: Driver-free operation
Image 4.2: Dimensions of the 10.4-inch LCD screen and capacitive touch panel.
5. Setup and Installation
Follow these steps to correctly assemble and connect your LCD kit:
- Connect the LVDS Cable: Carefully connect the LVDS cable to the 30-pin connector on the LCD panel and the corresponding LVDS OUT port on the controller board. Ensure correct orientation and secure locking mechanisms if present.
- Connect the Touch Panel: Connect the flexible flat cable from the capacitive touch panel to the converter board, and then connect the converter board to the USB controller board. Finally, connect the USB controller board to a USB port on your host device (e.g., PC, Raspberry Pi) using the provided USB cable. The touch function is driver-free.
- Connect the Keyboard: Attach the keyboard cable to the designated port on the controller board. This keyboard is used for OSD menu navigation.
- Connect Power: Connect a 12V DC power adapter (not included) to the power input jack (5.5 x 2.1 mm) on the controller board. Ensure the power adapter provides at least 2A.
- Connect Video Source: Connect your video source (e.g., PC, media player) to the desired input port on the controller board (HD-MI, VGA, AV1, or AV2).

Image 5.1: Step-by-step connection guide for the LCD panel, controller board, and touch components.
6. Operating Instructions
6.1. Power On/Off
Once all connections are secure, plug in the 12V DC power adapter. The display should power on automatically. To power off, disconnect the power adapter.
6.2. Input Source Selection
Use the provided keyboard to navigate the OSD menu. Press the 'MENU' button to access the OSD. Use the arrow keys to select 'Input Source' and choose between HD-MI, VGA, AV1, or AV2. Press 'OK' or 'MENU' again to confirm your selection.
6.3. OSD Menu Adjustments
The OSD menu allows you to adjust various display settings:
- Brightness/Contrast: Adjust these settings for optimal visual comfort.
- Auto Adjustment: For VGA input, this option automatically optimizes the display settings.
- Language: Select your preferred OSD menu language.
- Aspect Ratio: Adjust the display's aspect ratio if needed.
6.4. Capacitive Touch Function
The capacitive touch panel supports 10-point multi-touch. Once the USB controller board is connected to your host device, the touch function should be recognized automatically without requiring additional drivers. Interact with the screen as you would with any standard touch display.
6.5. Reversing Camera Function (AV2)
If the ACC 12V signal is connected to the controller board, the display will automatically switch to the AV2 input when a signal is detected on the ACC line. This feature is typically used for automotive reversing camera applications.
7. Maintenance
- Cleaning the Screen: Use a soft, lint-free cloth slightly dampened with water or a non-abrasive screen cleaner. Do not spray liquid directly onto the screen.
- Cleaning the Controller Board: Ensure the power is disconnected. Use a soft brush or compressed air to remove dust from the board. Avoid using liquids.
- Storage: When not in use for extended periods, store the components in a dry, dust-free environment at moderate temperatures.
8. Troubleshooting
- No Display/Black Screen:
- Check if the 12V DC power adapter is correctly connected and providing power.
- Ensure the LVDS cable is securely connected to both the LCD panel and the controller board.
- Verify that the video source is connected and outputting a signal.
- Confirm the correct input source is selected via the OSD menu.
- No Touch Functionality:
- Ensure the touch panel's flexible cable is properly connected to the converter board.
- Verify the USB controller board is correctly connected to the converter board and the host device's USB port.
- Try connecting the USB cable to a different USB port on your host device.
- Image Distortion/Incorrect Colors:
- Check the LVDS cable for any damage or loose connections.
- If using VGA, try the 'Auto Adjustment' option in the OSD menu.
- Ensure the video source is outputting a compatible resolution (1024x768 is native).
9. Warranty and Support
Information regarding specific warranty terms and conditions for this product is not available in the provided documentation. For technical support or warranty inquiries, please contact your retailer or the VSDISPLAY customer service directly through their official channels.