1. Introduction
This user manual provides comprehensive instructions for the safe and effective use of your ILM Smart Bicycle Helmet. Designed for enhanced safety and convenience, this helmet features integrated LED lighting, automatic brake warning, light sensing capabilities, and intelligent turn signals. Please read this manual thoroughly before first use to ensure proper operation and maintenance.

Figure 1: Rear view of the ILM Smart Bicycle Helmet, highlighting the integrated LED lights.
2. Safety Information
Your safety is paramount. Adhere to all local traffic laws and regulations. This helmet is designed to provide protection but cannot prevent all injuries. Always wear appropriate safety gear when cycling.
- Certification: The ILM Smart Bicycle Helmet is composed of a polycarbonate shell and shock-absorbing EPS material, meeting safety standards such as CPSC. It is suitable for speeds up to 12.5 m/s (approximately 45 km/h or 28 mph).
- Light Functionality: The automatic light control and turn signal features are designed to enhance visibility. Note that these functions may not operate optimally or at all during daylight hours. Always ensure you are visible to others, especially in low-light conditions.
- Proper Fit: A helmet must fit snugly and be properly secured to provide effective protection. Refer to the "Adjusting Fit" section for guidance.
- Maintenance: Regularly inspect your helmet for any signs of damage. Do not use a damaged helmet.
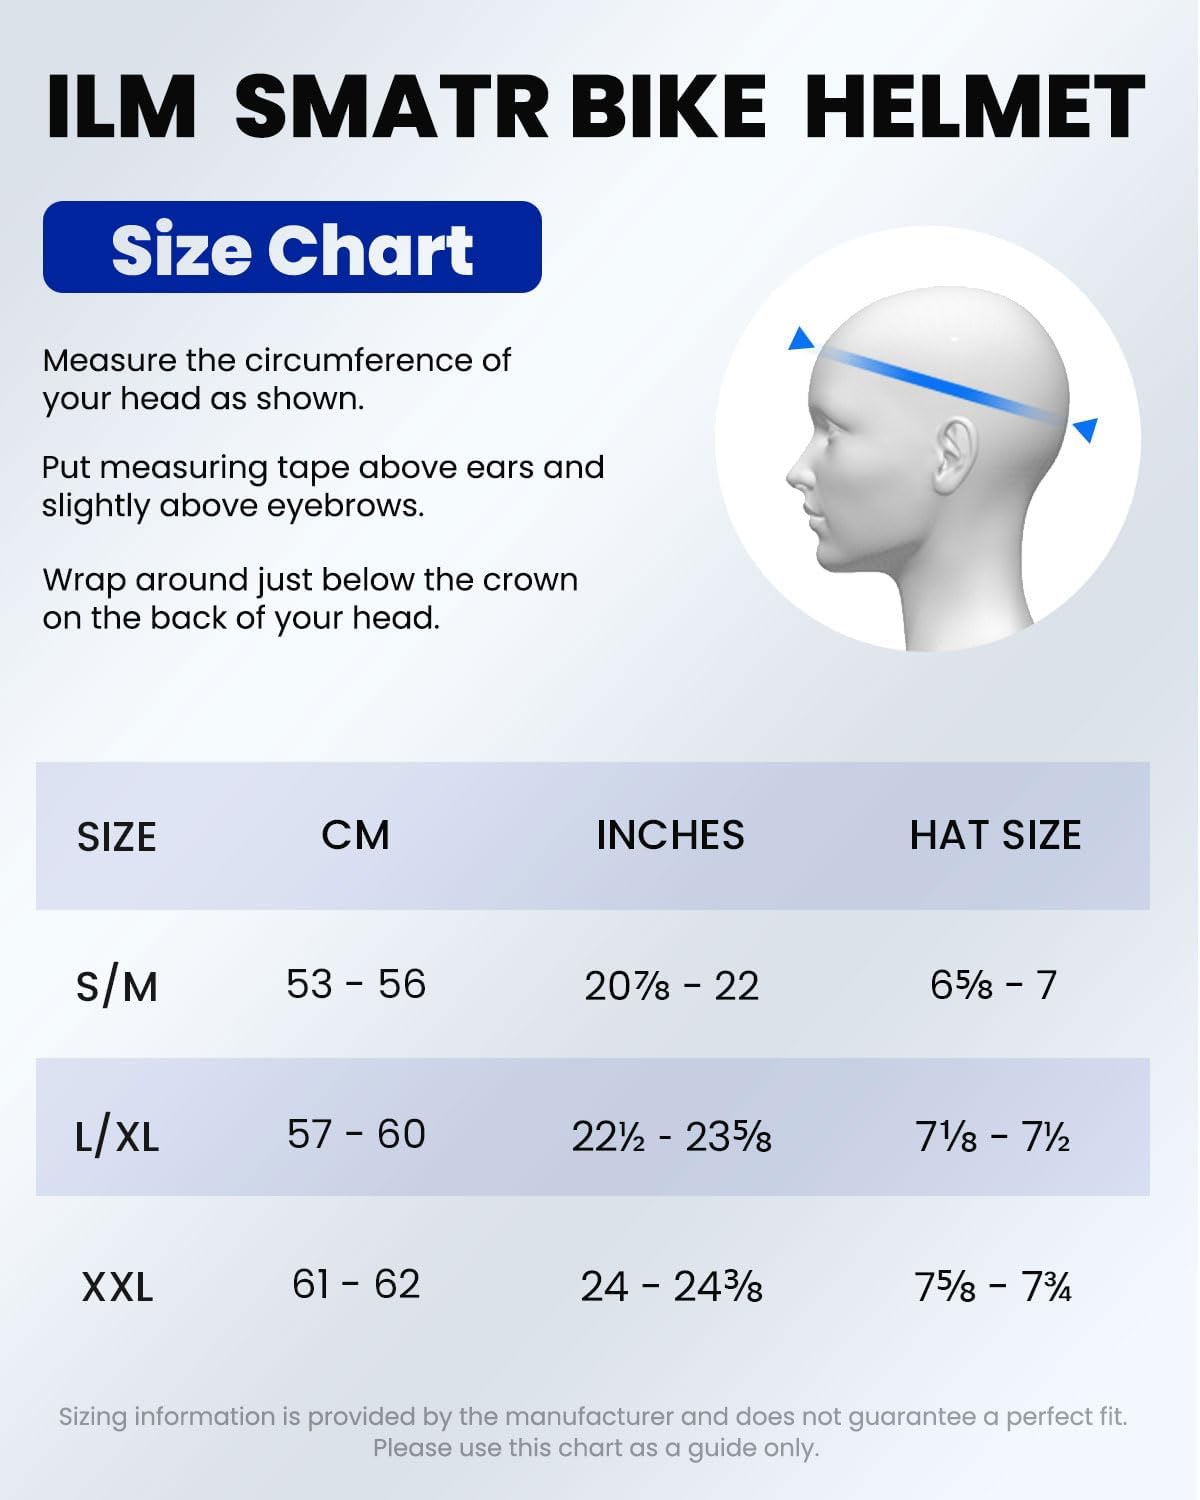
Figure 2: Safety certifications (NTA-8776, ASTM, CPSC, CE) and recommended speed limit for the helmet.
3. Setup
3.1 Unboxing and Initial Inspection
Carefully remove the helmet and all accessories from the packaging. Inspect the helmet for any visible damage that may have occurred during shipping. If any damage is found, do not use the helmet and contact customer support immediately.
3.2 Charging the Helmet
Before first use, fully charge the helmet's integrated battery. Locate the charging port, typically covered by a rubber flap. Use the provided USB-C charging cable. A full charge typically takes a few hours. The indicator light will change to show charging status (e.g., red for charging, green for fully charged).
Note: Some users have reported that only the supplied USB-C cable works reliably for charging due to the port's design. Ensure you use the original cable or a compatible alternative that fits correctly.
3.3 Adjusting Fit
A correctly fitted helmet is crucial for safety and comfort. Follow these steps:
- Measure Head Circumference: Use a measuring tape to measure the circumference of your head. Place the tape just above your ears and slightly above your eyebrows. Wrap it around the back of your head, just below the crown.
- Select Correct Size: Refer to the size chart below to choose the appropriate helmet size.
- Position the Helmet: Place the helmet squarely on your head, ensuring it covers your forehead. It should not tilt back or forward.
- Adjust Retention System: Use the adjustable dial or straps at the back of the helmet to tighten or loosen the fit until it feels snug but comfortable. The helmet should not move freely when you shake your head.
- Adjust Chin Straps: Fasten the quick-release buckle on the chin strap. Adjust the straps so they form a "V" shape just below your ears. The chin strap should be snug against your throat, allowing only one or two fingers to fit between the strap and your chin.

Figure 3: Size chart and head measurement guide for ILM Smart Bicycle Helmets.

Figure 4: Proper helmet positioning and fit on a user's head.
4. Operating Instructions
4.1 Power On/Off
To power on the helmet, press and hold the main power button (location may vary, typically on the rear or side) for a few seconds until the lights illuminate. To power off, press and hold the same button until the lights turn off.
4.2 Light Control Function
The helmet features intelligent front and rear LED lights with multiple modes and automatic brightness adjustment.
- Automatic Brightness Adjustment: When the main power is on, the front and rear lights automatically adjust their brightness based on ambient light intensity. They will automatically turn on at night or in low-light conditions. Note: This function does not operate during daylight hours.
- Light Modes: The helmet offers different lighting modes for the front and rear lights. These modes can be cycled through by pressing the light mode button (refer to your helmet's specific button layout).
- Mode 1: Front Light: Steady, Rear Light: Flash twice.
- Mode 2: Front Light: Steady, Rear Light: Steady.
- Mode 3: Front Light: Steady, Rear Light: Fast flash.

Figure 5: Illustration of the three available LED light modes.

Figure 6: Automatic light adjustment feature based on ambient light conditions.
4.3 Automatic Brake Lights and Turn Signals
The helmet is equipped with gravity-sensing technology for automatic brake lights and turn signals.
- Brake Warning: When the helmet detects a significant deceleration (e.g., braking), the rear lights will illuminate brighter or flash to warn following traffic.
- Turn Signals: To activate a turn signal, tilt your head more than 15 degrees to the left or right. The corresponding turn signal will illuminate for 10 seconds. Note: This function does not operate during daylight hours.

Figure 7: How the gravity-sensing turn signals activate with head tilt.
4.4 Removable Visor
The helmet includes a removable black visor designed to protect against ultraviolet rays, dust, and stone chips. It can be easily attached or detached as needed.
4.5 Bluetooth Functionality (Optional)
This helmet model is upgradeable to a Bluetooth version. Individual Bluetooth ear pads are available for separate purchase and installation. These ear pads allow for audio playback and hands-free communication while cycling. Refer to the instructions provided with the Bluetooth ear pads for installation and pairing procedures.
5. Maintenance
5.1 Cleaning
- Exterior: Clean the helmet's exterior with a soft cloth dampened with mild soap and water. Avoid abrasive cleaners or solvents that could damage the shell or finish.
- Interior Padding: The interior padding can typically be removed and hand-washed with mild soap and water. Allow it to air dry completely before reinserting.
- Visor: Clean the visor with a soft, lint-free cloth and a solution of mild soap and water. Do not use harsh chemicals or abrasive materials that could scratch the visor.
5.2 Storage
Store the helmet in a cool, dry place away from direct sunlight and extreme temperatures. Avoid placing heavy objects on top of the helmet, as this can cause damage.
5.3 Battery Care
To prolong battery life, avoid fully discharging the battery frequently. If storing the helmet for an extended period, charge the battery to approximately 50% and recharge every few months.
6. Troubleshooting
- Lights not working during the day: This is normal. The automatic light control and turn signal functions are designed to operate in low-light conditions or at night for optimal visibility. They are programmed not to activate during bright daylight.
- Charging issues: Ensure the USB-C cable is fully inserted and making proper contact. Some users have noted that only the provided cable fits correctly. Try a different power source or outlet.
- Turn signals not activating: Ensure your head tilt is greater than 15 degrees. Confirm the helmet is powered on and the battery has sufficient charge. Remember, turn signals may not activate in bright daylight.
- Helmet feels too tight/loose: Re-adjust the retention system and chin straps as described in the "Adjusting Fit" section. Ensure you have selected the correct size based on the size chart.
- Padded strips coming unglued: If internal padding detaches, it can often be re-secured with a suitable adhesive. Ensure the adhesive is safe for use with helmet materials.
7. Specifications
| Feature | Detail |
|---|---|
| Brand | ILM |
| Model Number | E3-12LS |
| Color | Grey (XXL variant) |
| Age Range (Description) | Adult |
| Outer Material | Polycarbonate (PC) |
| Special Features | Adjustable Strap, Visor, Integrated LED Lights, Automatic Brake Warning, Light Sensor, Gravity-Sensing Turn Signals |
| Recommended Product Uses | Cycling (including electric bicycles, electric motorcycles, mopeds, and electric scooters) |
| Safety Standard | CPSC (Consumer Product Safety Commission) |
| Battery | 1 Lithium-ion (included) |
| Item Weight | 980 grams |
| Package Dimensions | 31.19 x 24.89 x 19.1 cm |
8. Warranty and Support
For warranty information, product support, or to report any issues, please contact the seller directly. The seller for this product is ILM-DIRECT. You can typically find their contact information or support portal through your purchase platform.
For general inquiries or to access seller support, please visit the seller's page on Amazon: ILM-DIRECT Seller Page.


