
1. Introduction
This manual provides detailed instructions for the assembly, operation, and maintenance of your Spider Farmer Grow Tent Kit SF4000. Please read this manual thoroughly before setting up and operating the kit to ensure safe and efficient use. Proper installation and care will maximize the lifespan and performance of your grow tent system.
The Spider Farmer Grow Tent Kit SF4000 is a complete indoor growing solution, featuring a 4x4ft grow tent, a SF4000 LED grow light with Samsung LM301H EVO diodes, a 6-inch inline fan, a carbon filter, and a clip fan, along with essential accessories.
2. Package Contents
Verify that all components listed below are present in your package. If any items are missing or damaged, please contact Spider Farmer customer support.
- Grow Tent (48"x48"x80")
- SF4000 LED Grow Light
- 6-inch Inline Fan
- 6-inch Carbon Filter
- Flexible Ducting (6-inch)
- Duct Clamps
- 6-inch Clip Fan
- Temperature and Humidity Monitor
- 24-Hour Plug-in Timer
- Grow Bags (x6)
- Trellis Plant Netting
- Rope Hangers (YOYO Hanger x4)
- Vent Covers (x2)
- Corner Shelves (x2)
- Instruction Manual

3. Safety Information
Adhere to the following safety guidelines to prevent injury or damage to the equipment:
- Always unplug the grow light and ventilation system before performing any maintenance or adjustments.
- Ensure the grow tent is assembled on a flat, stable surface.
- Do not overload electrical outlets. Use a surge protector if necessary.
- Keep all electrical components away from water and excessive humidity.
- Do not block ventilation openings. Ensure adequate airflow around the tent.
- Keep children and pets away from the grow tent and its electrical components.
- Wear appropriate protective gear, such as gloves, during assembly.
4. Setup Instructions
Follow these steps for the proper assembly of your Spider Farmer Grow Tent Kit.
4.1. Grow Tent Assembly
- Unpack all tent components and lay them out.
- Assemble the metal frame by connecting the poles with the corner connectors. Ensure all connections are secure. The triangular design of the connectors enhances stability.
- Drape the tent fabric over the assembled frame. Carefully pull the fabric down, ensuring it fits snugly over the frame.
- Zip up the tent completely.


4.2. SF4000 LED Grow Light Installation
- Hang the SF4000 LED grow light using the provided rope hangers from the top bars of the tent frame. Ensure it is securely fastened and level.
- Connect the power cord to the LED light and route it through one of the tent's cable ports.
- Adjust the height of the light according to your plant's growth stage.

4.3. Ventilation System Setup
- Attach the 6-inch carbon filter to one end of the flexible ducting using a duct clamp.
- Attach the 6-inch inline fan to the other end of the ducting, ensuring the airflow direction arrow on the fan points away from the carbon filter (towards the exhaust). Secure with a duct clamp.
- Mount the inline fan and carbon filter assembly inside the tent using the provided hangers, typically at the top of the tent.
- Connect the inline fan to the speed controller and route the power cord out of the tent through a cable port.
- Connect the speed controller to a power source.


4.4. Clip Fan Installation
- Attach the 6-inch clip fan to one of the tent poles at a desired height.
- Angle the fan to provide gentle air movement across your plants, avoiding direct, strong airflow onto them.
- Connect the clip fan to a power source.

4.5. Accessories Setup
- Temperature and Humidity Monitor: Place the monitor inside the tent at plant canopy level for accurate readings.
- 24-Hour Plug-in Timer: Plug the grow light into the timer, then plug the timer into a power outlet. Set the desired ON/OFF schedule for your light cycle.
- Grow Bags: Fill the grow bags with your chosen growing medium and place them inside the tent.
- Trellis Plant Netting: Install the netting horizontally across the tent poles to support plants as they grow.

5. Operating Instructions
5.1. LED Grow Light Operation
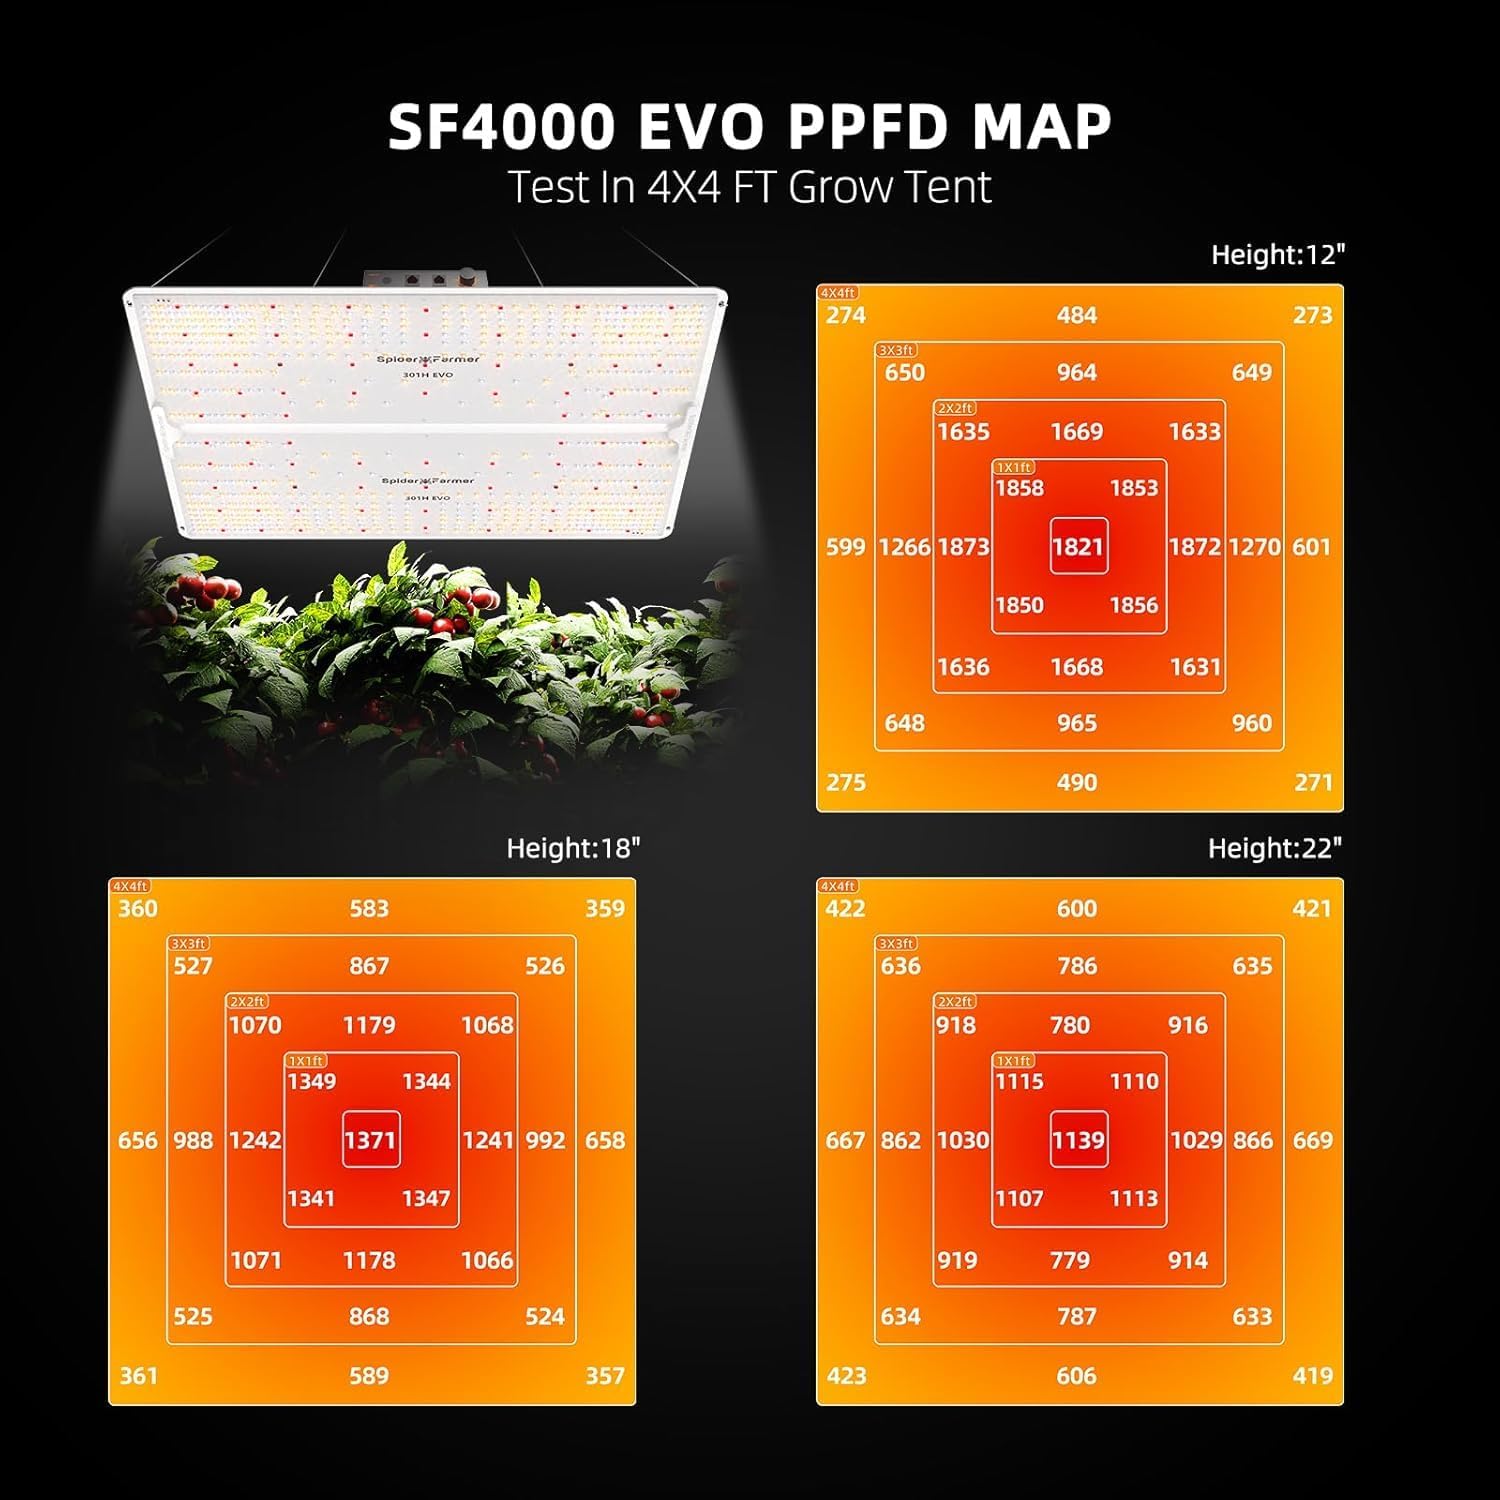
The SF4000 LED grow light features a dimming box to adjust light intensity. Refer to the specific instructions for the SF4000 light for optimal PPFD (Photosynthetic Photon Flux Density) levels for different growth stages. The light provides an optimized full spectrum, including 5000K for germination, 3000K for flowering, 660nm for accelerating growth, and 730nm for increasing yields.


5.2. Ventilation System Operation
Use the speed controller to adjust the inline fan's airflow. The carbon filter effectively removes odors. Ensure the fan is running during the light cycle and for a period after to maintain air quality and temperature. The clip fan provides additional air circulation within the tent, which is crucial for plant health and preventing hot spots.


5.3. Environmental Monitoring
Regularly check the temperature and humidity readings on your monitor. Adjust fan speed, light intensity, and potentially introduce a humidifier/dehumidifier as needed to maintain optimal environmental conditions for your plants.
6. Maintenance
6.1. Grow Tent Cleaning
Periodically wipe down the interior and exterior of the tent with a damp cloth and mild detergent. Ensure the tent is completely dry before zipping it up. The removable floor tray can be easily cleaned to prevent water leakage and maintain hygiene.
6.2. Carbon Filter Maintenance
The carbon filter's effectiveness will diminish over time. Replace the carbon filter when odors are no longer effectively removed. The reversible flange design can help extend the filter's life by allowing you to flip it when one side becomes saturated.
6.3. LED Grow Light Care
Keep the LED light clean from dust and debris to ensure maximum light output. Use a soft, dry cloth to gently wipe the diodes. Do not use abrasive cleaners or immerse the light in water.
7. Troubleshooting
- No Power to Light/Fan: Check all power connections, ensure the timer is correctly set and functioning, and verify that the power outlet is active.
- Excessive Heat in Tent: Increase inline fan speed, ensure all ventilation ports are open, and consider adjusting the LED light's dimming setting or raising its height.
- Unwanted Odors: Ensure the carbon filter is properly installed and sealed. If odors persist, the carbon filter may need replacement.
- Poor Air Circulation: Adjust the clip fan's position and speed. Ensure no obstructions are blocking the fan or ventilation ports.
- Tent Leaks Light: Check all zippers for full closure and inspect seams for any damage. The 1680D Oxford cloth is designed to be light-proof.
8. Specifications
| Component | Specification |
|---|---|
| Grow Tent Dimensions | 48"L x 48"W x 80"H (4x4ft) |
| Tent Material | 1680D Oxford cloth (Outer), 100% Reflective Mylar (Inner) |
| Frame Material | Metal (16mm diameter, 0.8mm thickness) |
| LED Grow Light Model | SF4000 (Samsung LM301H EVO Diodes) |
| LED Light Wattage | 450W |
| Inline Fan Size | 6-inch |
| Inline Fan Airflow | 402 CFM |
| Inline Fan Noise Level | 32 dB(A) |
| Carbon Filter | RC412 Australian Virgin Activated Carbon |
| Clip Fan Speed | 0 to 2500 RPM (7 customizable speeds) |
| Item Weight | 73.8 pounds |


9. Warranty and Support
Spider Farmer provides a 5-year service warranty for this product. We maintain a dedicated maintenance center in the USA to assist with any issues. For support, please contact Spider Farmer customer service through the official website or your purchase platform.
For further assistance or to report any issues, please visit the Spider Farmer Store on Amazon.