
Introduction
This manual provides comprehensive instructions for the installation, operation, and maintenance of your Natec Cabassu G2 Midi Tower PC Case. Please read this manual thoroughly before beginning installation to ensure proper setup and optimal performance.
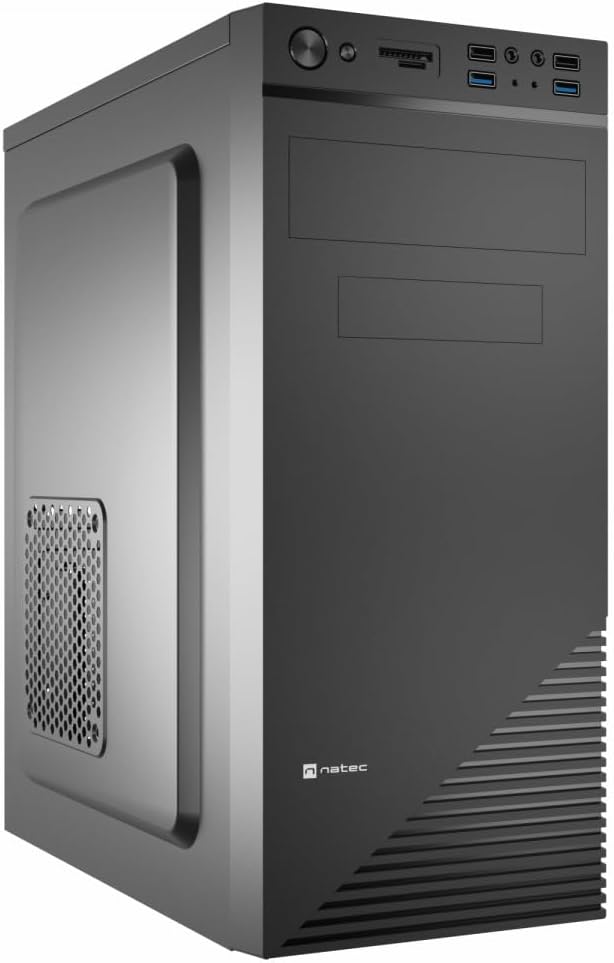
Figure 1: Natec Cabassu G2 Midi Tower PC Case. This image shows the front and left side of the black PC case, highlighting its sleek design and front panel layout.
Safety Information
- Always disconnect the power supply from the wall outlet before installing or removing any components.
- Handle components with care to prevent damage from static electricity.
- Keep the case away from water, moisture, and extreme temperatures.
- Ensure proper ventilation to prevent overheating.
- Do not attempt to open the power supply unit.
Package Contents
Verify that all items are present in the package:
- Natec Cabassu G2 Midi Tower PC Case
- Accessory kit (screws, standoffs, cable ties)
- User Manual (this document)
Setup and Component Installation
1. Preparing the Case
- Place the case on a flat, stable surface.
- Remove the side panels by unscrewing the thumbscrews at the rear and sliding the panels backward.

Figure 2: Interior view of the Natec Cabassu G2 case with the side panel removed, illustrating the internal layout for component installation.
2. Motherboard Installation
- Install the I/O shield into the rear opening of the case.
- Align the motherboard with the pre-installed standoffs. The Cabassu G2 supports Mini ITX, Micro ATX, and ATX motherboards.
- Secure the motherboard with the provided screws.
3. Power Supply Installation
- The power supply mounts at the bottom of the case.
- Slide the power supply into its designated bay from the rear of the case.
- Secure it with screws from the rear.
4. Storage Drive Installation
- 2.5" Drives (SSDs/HDDs): The case features 3 x 2.5" drive bays. Mount drives using the provided screws in the designated locations.
- 3.5" Drives (HDDs): The case also supports 3.5" drives.
5. Expansion Card Installation
- Remove the necessary expansion slot covers from the rear of the case (7 expansion slots available).
- Insert your graphics card or other expansion cards into the motherboard's PCIe slots.
- Secure the cards with screws.

Figure 3: Rear view of the Natec Cabassu G2 case, detailing the I/O shield cutout, power supply opening, and seven expansion slots.
6. Cable Management
Route cables behind the motherboard tray where possible to improve airflow and aesthetics. Use the included cable ties to secure bundles.
7. Connecting Front Panel Cables
Connect the front panel cables (USB 2.0, USB 3.0, audio, power switch, reset switch, HDD LED, power LED) to the corresponding headers on your motherboard. Refer to your motherboard manual for exact pin assignments.

Figure 4: Close-up of the Natec Cabassu G2 front panel, showing 2x USB 2.0 ports, 2x USB 3.0 ports, audio jacks, and power/reset buttons.
Operating Instructions
Powering On/Off
- Power On: Press the power button located on the front panel.
- Power Off: Initiate shutdown through your operating system. For a forced shutdown, press and hold the power button for several seconds.
- Reset: Press the reset button on the front panel to restart the system.
Using Front Panel Ports
The front panel provides convenient access to:
- 2 x USB 2.0 ports
- 2 x USB 3.0 ports
- Audio input (microphone) and output (headphone) jacks
Connect compatible devices to these ports as needed.
Maintenance
Cleaning
- Regularly clean the exterior of the case with a soft, damp cloth. Avoid abrasive cleaners.
- Use compressed air to remove dust from fan filters and internal components. Ensure the system is powered off and unplugged before cleaning.
Dust Filters
The case may include removable dust filters. Periodically remove and clean these filters to maintain optimal airflow and cooling performance.
Troubleshooting
| Problem | Possible Cause | Solution |
|---|---|---|
| System does not power on. | Power cables not connected properly. Faulty power supply. | Check all power connections (motherboard, CPU, GPU, power supply to wall). Ensure power supply switch is ON. |
| Front panel USB ports not working. | Front panel USB cables not connected to motherboard. | Verify that the USB 2.0 and USB 3.0 headers are correctly connected to the motherboard. |
| Excessive fan noise. | Dust accumulation. Loose fan. | Clean dust from fans and filters. Ensure all fans are securely mounted. |
Specifications
| Feature | Detail |
|---|---|
| Model Name | Cabassu G2 |
| Item Model Number | S5624687 |
| Case Type | Midi Tower |
| Dimensions (LxWxH) | 19.69 x 19.69 x 11.02 inches (50 x 50 x 28 cm) |
| Weight | 7.04 pounds (3.19 kg) |
| Material | Acrylonitrile Butadiene Styrene (ABS), Alloy Steel |
| Motherboard Compatibility | Mini ITX, Micro ATX, ATX |
| 2.5" Drive Bays | 3 |
| Expansion Slots | 7 |
| Front I/O Ports | 2 x USB 2.0, 2 x USB 3.0, Audio In/Out |
| Fan Support | 120mm (rear, pre-installed if applicable) |
| Cooling Method | Air |
| Power Supply Mounting | Bottom Mount |
Warranty Information
Natec products are covered by a manufacturer's warranty. Specific warranty terms and conditions may vary by region and retailer. Please refer to the warranty card included with your product or visit the official Natec website for detailed information regarding warranty coverage and claims.
Support
For technical assistance, troubleshooting, or further inquiries, please visit the official Natec support website or contact their customer service department. Contact information can typically be found on the product packaging or the official brand website.
Website: www.natec-zone.com (Example link, actual link may vary)


