1. Introduction
This manual provides comprehensive instructions for the setup, operation, and maintenance of your Andonstar AD249S-M Digital Microscope. Please read this manual thoroughly before using the device to ensure proper functionality and longevity.

Figure 1: Overview of the Andonstar AD249S-M Digital Microscope system, including the main unit with 10.1-inch LCD, adjustable metal stand, three interchangeable lenses (A, D, L), a 32GB Micro SD card, and a wireless remote control. The image highlights the primary components and accessories included with the microscope.
2. Package Contents
Verify that all items listed below are included in your package:
- 1x AD249S-M Microscope host
- 1x Pro Metal stand set
- 1x Lens A (18-720x magnification)
- 1x Lens D (1800-2040x magnification)
- 1x Lens L (60-240x magnification)
- 1x Endoscope adjustable arm
- 1x Endoscope
- 5x Endoscope accessories
- 1x Slide holder
- 1x 32GB Micro SD card
- 1x USB cable
- 1x Switch cable
- 1x HDMI cable
- 1x Remote control
- 5x Prepared Slides
- 1x Observation box
- 1x Tweezers
- 1x Instruction Manual (this document)

Figure 2: A comprehensive display of all components and accessories included with the Andonstar AD249S-M Digital Microscope, arranged neatly for identification. This includes the main microscope unit, various lenses, the metal stand, cables, remote control, and other tools.
3. Setup
3.1 Assembling the Stand and Microscope
Assemble the Pro Metal stand according to the included instructions. Securely attach the microscope host to the stand. Ensure all connections are firm to prevent instability during observation.

Figure 3: The Andonstar AD249S-M Digital Microscope fully assembled on its robust metal stand, positioned over a circuit board. This image demonstrates the microscope's setup for detailed electronic inspection.
3.2 Connecting Power and Peripherals
Connect the power adapter to the microscope and a power outlet. Insert the 32GB Micro SD card into the designated slot on the back of the monitor. For external display, connect an HDMI cable from the microscope to a larger monitor or TV. For PC connection, use the provided USB cable.

Figure 4: The rear panel of the Andonstar AD249S-M microscope monitor, illustrating the HDMI output connected to a large screen and the USB output connected to a laptop. This setup allows for viewing and analysis on external devices.
4. Operating Instructions
4.1 Lens Installation and Usage
The microscope comes with three interchangeable lenses (A, D, L) designed for different magnification ranges and applications. To swap lenses, simply install or uninstall the screws. Ensure the lens is securely attached before use.
- Lens L (60-240x): Ideal for soldering and repairing circuit boards or mobile phones.
- Lens A (18-720x): Suitable for observing whole coins, plants, or stones.
- Lens D (1800-2040x): Designed for detailed observation of biological slides.
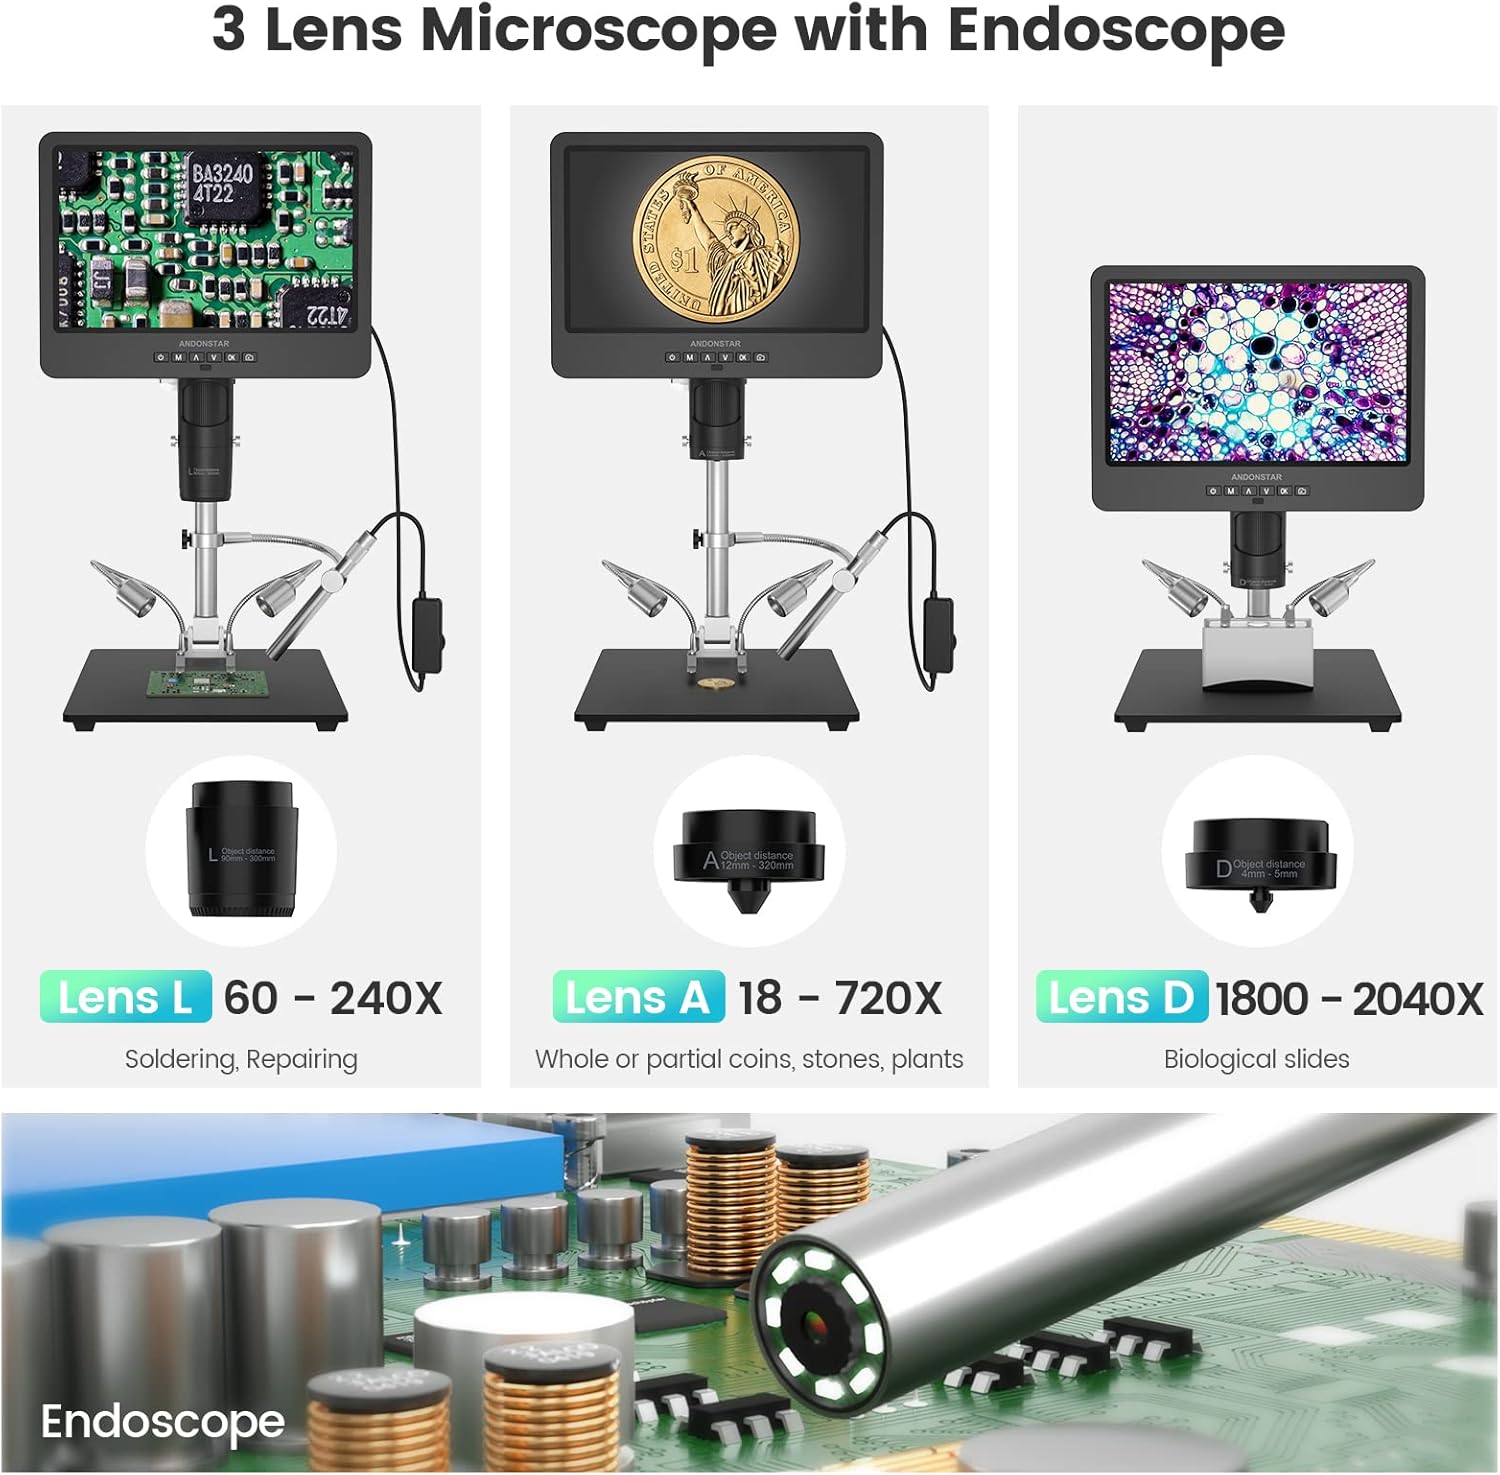
Figure 5: A visual representation of the three distinct lenses (L, A, D) provided with the Andonstar AD249S-M microscope. Each lens is paired with an example of its intended use, such as soldering, coin inspection, or biological slide observation, demonstrating the microscope's versatility.
4.2 Focusing and Magnification Adjustment
Focus the image by rotating the focusing wheel on the microscope body. Adjust the observation distance using the bracket knob on the metal stand. The 10.1-inch LCD provides a clear 2160P UHD display. Digital zoom can be controlled via the monitor buttons or the wireless remote control.

Figure 6: An illustrative diagram detailing the digital magnification range of the Andonstar AD249S-M microscope. It shows examples of 50x magnification for larger objects and 2000x magnification for microscopic details, highlighting the varying object distances for different lenses.
4.3 Endoscope Usage
The included endoscope allows for 360° observation without dead angles, useful for inspecting sides of components or inside pipes. Plug the endoscope into the designated port and use the 'NTL/PAL' button to switch between microscope and endoscope images.

Figure 7: A visual guide demonstrating the connection of the endoscope to the Andonstar AD249S-M microscope and how to toggle between the endoscope and microscope views using the 'NTL/PAL' button. It also shows examples of two-lens, microscope, and endoscope images.
4.4 Capturing Photos and Videos
The microscope supports capturing images and recording videos directly to the Micro SD card. Use the camera button on the monitor or remote control to take photos, and the OK button to record video. The 2160P UHD video recording ensures high-quality captures.

Figure 8: The Andonstar AD249S-M microscope's 10.1-inch LCD screen actively displaying a 2160P video recording. This image emphasizes the high-resolution video capture capability of the device.
4.5 Wireless Remote Control
The wireless remote control provides convenient operation from a distance, supporting functions like image discoloration and digital zoom. This is particularly useful for demonstrations or presentations.

Figure 9: A hand holding the wireless remote control for the Andonstar AD249S-M microscope, demonstrating its use to control the device while observing a magnified biological sample on the screen. The remote allows for functions like digital zoom.
4.6 PC Software for Measurement
Connect the microscope to a Windows PC via USB to utilize the professional measurement software. This software enables accurate measurements of lengths and areas, as well as capturing photos and videos directly from your computer.
4.7 LED Lighting
The microscope features eight adjustable LED lights. Use the controls to fine-tune the brightness to achieve optimal illumination for your observation needs.

Figure 10: A detailed view of the adjustable LED lighting system on the Andonstar AD249S-M microscope, showing how the irradiation direction and brightness can be controlled. The image also highlights the LED lights on the endoscope for internal inspections.
Video 1: This video provides a comprehensive guide to using the Andonstar AD249S-M microscope for microsoldering tasks. It demonstrates the setup, lens changes, and practical application of the microscope's features for detailed electronic work.
5. Maintenance
5.1 Cleaning
Regularly clean the lenses and display screen with a soft, lint-free cloth. For stubborn smudges, use a specialized lens cleaning solution. Avoid abrasive materials or harsh chemicals that could damage the optical components or surfaces.
5.2 Storage
When not in use, store the microscope in a dry, dust-free environment. Use the observation box and slide holder to protect delicate accessories. Avoid exposing the device to extreme temperatures or direct sunlight.
6. Troubleshooting
6.1 No Image on Screen
- Ensure the power adapter is securely connected and the device is turned on.
- Check the lens installation; ensure it is properly screwed in and clean.
- If using an external monitor, verify the HDMI cable connection and input selection on the monitor.
6.2 Blurry Image
- Adjust the focusing wheel until the image is clear.
- Ensure the object distance is appropriate for the installed lens. Refer to lens specifications for optimal working distances.
- Clean the lens surface if smudges or dust are present.
6.3 Remote Control Not Responding
- Check the batteries in the remote control and replace if necessary.
- Ensure there are no obstructions between the remote control and the microscope's IR receiver.
7. Specifications
| Feature | Specification |
|---|---|
| Model | AD249S-M ES |
| Display | 10.1-inch LCD |
| Video Resolution | 2160P UHD |
| Magnification (Lens A) | 18-720x |
| Magnification (Lens D) | 1800-2040x |
| Magnification (Lens L) | 60-240x |
| Light Source | 8 Adjustable LED Lights |
| Storage | Micro SD card (up to 32GB included) |
| Outputs | HDMI, USB (for Windows PC) |
| Product Dimensions | 7.8 x 7.01 x 12.99 inches |
| Item Weight | 5.88 pounds (2.67 kg) |
| Material | Metal stand, 10.1'' LCD display |
| Compatible Devices | Television (via HDMI), Windows PC (via USB) |
8. Warranty and Support
Andonstar products are designed for reliability and performance. For warranty information and technical support, please refer to the documentation included with your purchase or visit the official Andonstar website. Keep your proof of purchase for warranty claims.
For further assistance, you may contact Andonstar Technology Co., Ltd directly.


