1. Introduction
This user manual provides detailed instructions for the installation, operation, and maintenance of the ISEEVY 8ch HDMI 1080P H.265 H.264 Video Encoder. This device is designed to convert HDMI video signals into IP streams, supporting various protocols for live streaming, IPTV, and broadcast applications. Please read this manual thoroughly before using the product to ensure proper functionality and to prevent damage.
2. Product Overview
2.1 Key Features
- Supports 8 channels of 1080P HDMI video input.
- Advanced H.265 and H.264 video encoding (high/main/baseline profile).
- AAC/MP3 audio encoding.
- Supports multiple streaming protocols: RTMP, RTMPS, RTSP, UDP, RTP, HTTP, FLV, HLS, TS, Multicast, Unicast, SRT.
- Each channel supports up to 2 streams, with resolutions up to 1920x1080P at 60fps.
- Customizable logo, text, or fly text watermark for each channel.
2.2 Product Appearance
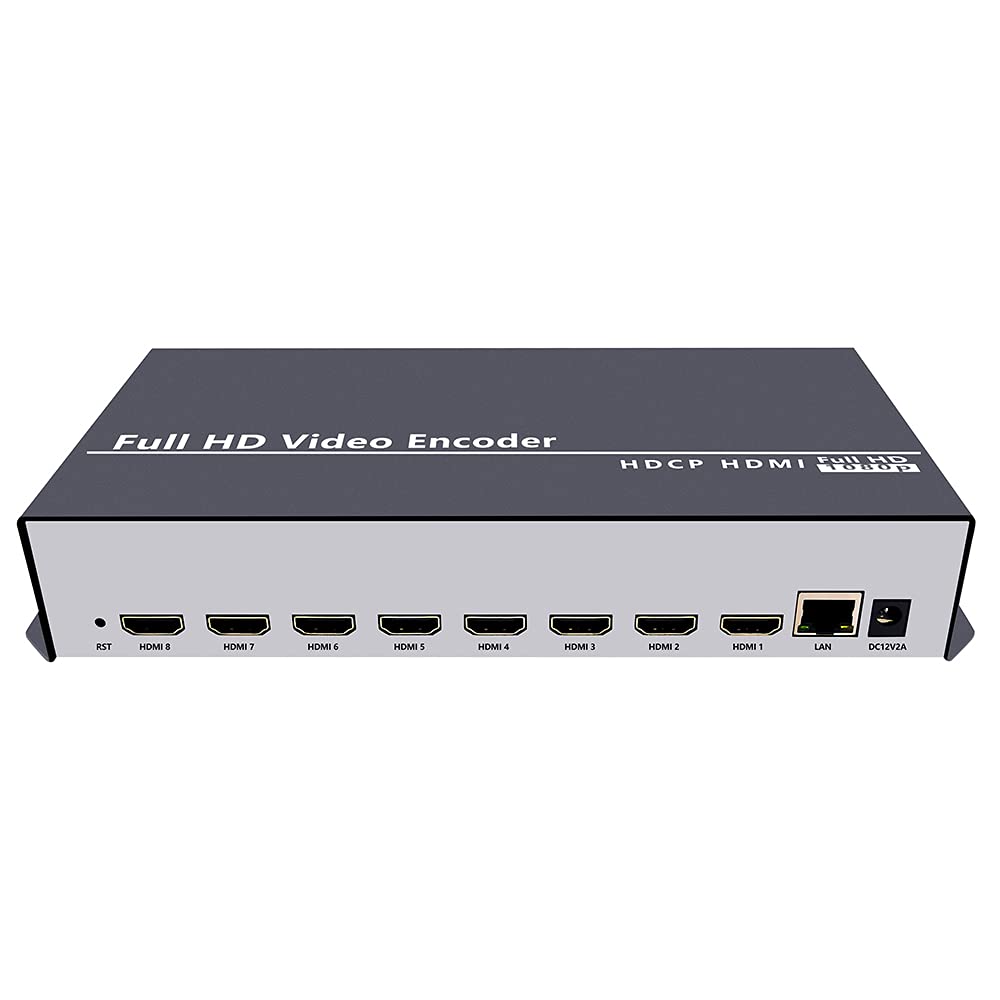
Figure 2.2.1: Front view of the ISEEVY 8ch HDMI Video Encoder, showing the 'Full HD Video Encoder' label and the HDMI input ports.

Figure 2.2.2: Rear view of the ISEEVY 8ch HDMI Video Encoder, displaying eight HDMI input ports, a LAN port, and a DC 12V power input.
2.3 Package Contents
- ISEEVY 8ch HDMI Video Encoder Unit
- Power Adapter (DC 12V)
- User Manual (this document)
- Ethernet Cable
3. Setup
3.1 Physical Connections
- Connect HDMI Sources: Connect up to eight HDMI video sources (e.g., cameras, DVD players, computers) to the HDMI input ports on the rear of the encoder using standard HDMI cables.
- Connect to Network: Connect the encoder's LAN port to your network router or switch using the provided Ethernet cable. Ensure your network provides DHCP or assign a static IP address later.
- Connect Power: Plug the DC 12V power adapter into the encoder's DC 12V input port and then into a power outlet. The device will power on automatically.
3.2 Network Configuration Overview
The encoder requires a network connection to stream video. It can obtain an IP address automatically via DHCP or be configured with a static IP. For initial setup, it is recommended to connect it to a network with DHCP enabled.

Figure 3.2.1: Typical network setup for the ISEEVY HDMI Encoder, illustrating its connection to a router and various playback devices and platforms.
4. Operating Instructions
4.1 Web Interface Access
- Find IP Address: If your network has DHCP, the encoder will automatically obtain an IP address. You can find this IP address using an IP scanner tool on your network or by checking your router's connected devices list. The default IP address is often 192.168.1.169 if DHCP is not available.
- Access Web Interface: Open a web browser (e.g., Chrome, Firefox) on a computer connected to the same network as the encoder. Enter the encoder's IP address into the browser's address bar and press Enter.
- Login: The default username is admin and the default password is admin. It is highly recommended to change the password after the first login for security.
4.2 Configuring Input and Stream Settings
Once logged into the web interface, you can configure each HDMI input and its corresponding output streams.
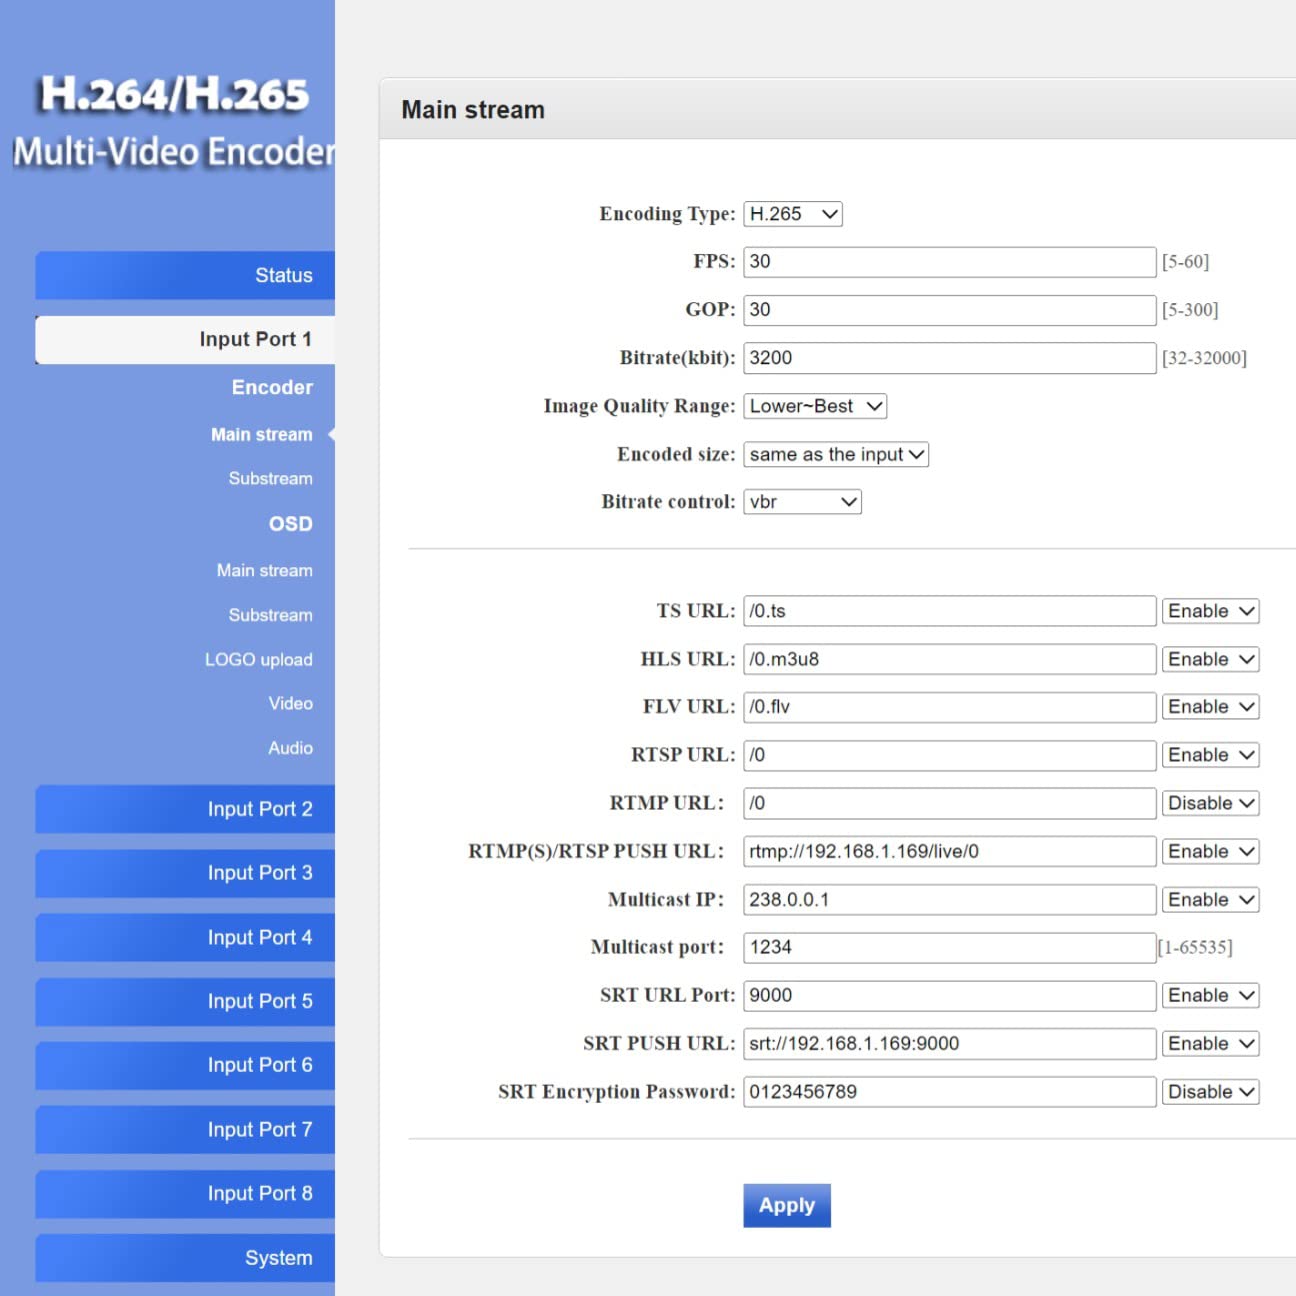
Figure 4.2.1: Web interface 'Status' page for Input Port 1, displaying current input resolution, frame rate, and stream URLs.
- Select Input: On the left navigation panel, select the desired input port (e.g., "Input Port 1").
- Encoder Settings: Navigate to the "Encoder" or "Main stream" section for the selected input. Here you can adjust:
- Encoding Type: H.265 or H.264.
- FPS (Frames Per Second): Typically 30 or 60.
- Bitrate (kbit/s): Adjust based on desired quality and network bandwidth.
- Resolution: Output resolution for the stream.
- Protocol URLs: Configure RTMP, RTSP, HLS, FLV, TS, and SRT URLs for streaming.

Figure 4.2.2: Web interface 'Main stream' configuration page, allowing adjustment of encoding parameters like FPS, Bitrate, and various protocol URLs.
- Audio Settings: Navigate to the "Audio" section to configure audio input, sampling rate, encoder type (AAC/MP3), and bitrate.
- OSD (On-Screen Display): In the "OSD" section, you can enable and configure text or image overlays (watermarks) for your streams.
- Advanced Settings: The "System" > "Advanced" section provides fine-tuning options for video processing, network settings, and more.
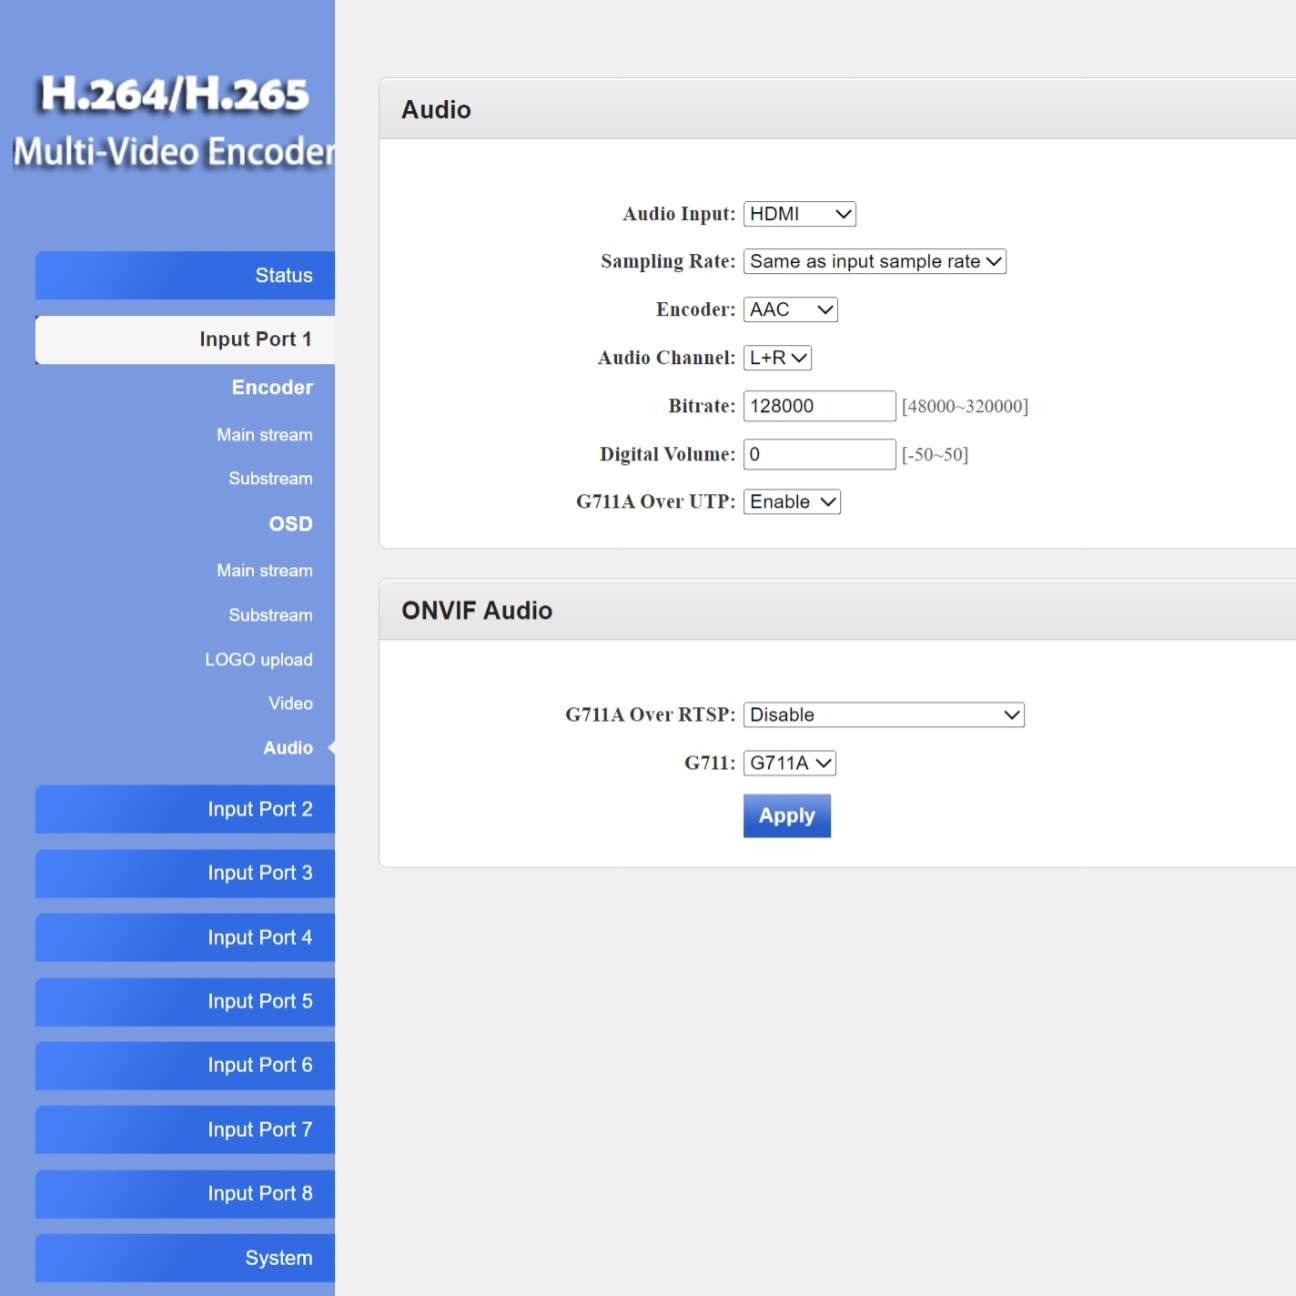
Figure 4.2.3: Web interface 'Advanced' settings page, offering detailed configuration options for video, network, and system parameters.
4.3 Live Streaming Platforms and Software Compatibility
The encoder supports various protocols, making it compatible with a wide range of streaming platforms and playback software.

Figure 4.3.1: Examples of compatible live streaming platforms, including Twitch, Facebook Live, YouTube, and Vimeo.

Figure 4.3.2: Examples of compatible playback and streaming software, such as OBS, VLC Player, and FFmpeg.
5. Maintenance
5.1 Cleaning
- Ensure the device is powered off and unplugged before cleaning.
- Use a soft, dry cloth to wipe the exterior of the encoder.
- Do not use liquid cleaners, aerosols, or solvents, as they may damage the device.
5.2 Firmware Updates
Periodically check the manufacturer's website for firmware updates. Firmware updates can provide new features, performance improvements, and bug fixes. Follow the instructions provided with the firmware update package carefully to avoid damaging the device.
5.3 Storage
When not in use for extended periods, store the encoder in a cool, dry place away from direct sunlight and extreme temperatures. Keep it in its original packaging or a protective case to prevent dust accumulation and physical damage.
6. Troubleshooting
This section addresses common issues you might encounter with the ISEEVY 8ch HDMI Video Encoder.
| Problem | Possible Cause | Solution |
|---|---|---|
| No video output/stream | No HDMI input signal | Check HDMI cable connections and ensure the source device is powered on and outputting video. |
| No video output/stream | Incorrect stream settings | Verify encoding type, resolution, and bitrate settings in the web interface. Ensure protocol URLs are correct. |
| Cannot access web interface | Incorrect IP address or network issue | Ensure the encoder is connected to the network. Verify the IP address using an IP scanner. Check network cable. Try resetting the encoder. |
| Stream buffering or poor quality | Insufficient network bandwidth or high bitrate | Reduce the stream bitrate in the web interface. Check your network's upload speed. Ensure no other devices are saturating the network. |
| Audio issues (no audio, distorted audio) | Incorrect audio settings or source issue | Verify audio input and encoding settings in the web interface. Ensure the HDMI source is providing audio. |
7. Specifications
Detailed technical specifications for the ISEEVY 8ch HDMI Video Encoder.
| Feature | Detail |
|---|---|
| Brand | iseevy |
| Model | 8ch HDMI 1080P H.265 H.264 Video Encoder |
| Input | 8 x HDMI (1080P) |
| Video Encoding | H.265, H.264 (High/Main/Baseline Profile) |
| Audio Encoding | AAC, MP3 |
| Output Resolution | Up to 1920x1080P @ 60fps |
| Streaming Protocols | RTMP, RTMPS, RTSP, UDP, RTP, HTTP, FLV, HLS, TS, Multicast, Unicast, SRT |
| Network Interface | 1 x RJ45 Ethernet Port |
| Power Supply | DC 12V |
| Product Dimensions | 9.06 x 5.91 x 1.73 inches (23 x 15 x 4.4 cm) |
| Weight | 1.72 Pounds (0.78 kg) |
| Manufacturer | ISEEVY Limited |
8. Warranty and Support
ISEEVY products are designed for reliability and performance. For warranty information and technical support, please refer to the official ISEEVY website or contact your authorized reseller. Keep your purchase receipt as proof of purchase for warranty claims.
For the latest drivers, firmware, and support resources, please visit the official ISEEVY support page.


