
FOKEY Q7-US
Contents
FOKEY Weather Station Q7-US User Manual
Model: Q7-US | Brand: FOKEY
Introduction
Welcome to the user manual for your FOKEY Weather Station Q7-US. This advanced wireless indoor/outdoor weather station provides comprehensive weather information at a glance, featuring a large 7.6-inch ultra-bright color display. Designed for accuracy and ease of use, it monitors indoor and outdoor temperature and humidity, offers a 12-24 hour weather forecast, and includes an atomic clock with moon phase display. This manual will guide you through the setup, operation, maintenance, and troubleshooting of your new weather station to ensure optimal performance.

Figure 1: FOKEY Weather Station Q7-US Main Unit and Outdoor Sensor
The FOKEY Weather Station Q7-US provides essential weather data for your home, including indoor and outdoor temperature and humidity, and a future weather forecast.
What's in the Box
Please check the package contents to ensure all items are present:
- 1 x Weather Station Main Unit
- 1 x Outdoor Sensor
- 1 x User Manual

Figure 2: Package Contents
The image above shows the main weather station unit, the wireless outdoor sensor, and the power adapter included in your package.
Setup
1. Powering the Main Unit
- Insert 3 AA batteries (not included) into the battery compartment on the back of the main unit. These serve as backup power.
- Connect the included AC adapter to the main unit's power input and plug it into a standard electrical outlet. The display will light up.
Note: The main unit is designed to be primarily powered by the AC adapter for continuous display. When running on batteries alone, the display will turn off after 10 seconds to conserve power and will only light up when the top button is pressed.
2. Setting Up the Outdoor Sensor
- Open the battery compartment of the outdoor sensor and insert 2 AA batteries (not included), observing polarity.
- Select a channel (1, 2, or 3) on the sensor using the small switch inside the battery compartment. Ensure this matches the channel selected on the main unit (default is Channel 1).
- Close the battery compartment securely.
- Place the outdoor sensor in a shaded, protected location away from direct sunlight and rain for accurate readings.
3. Initial Synchronization and Atomic Clock Setup
Upon initial power-up, the main unit will begin searching for the outdoor sensor signal and the WWVB atomic clock signal. This process can take several minutes. The display may go blank for about 7 minutes while it searches for the atomic clock signal.
- Within the first 3 minutes of powering on, use the "MODE" button on the back of the main unit to set your correct time zone.
- Once the atomic clock signal is received, the time and date will automatically synchronize. If it doesn't sync immediately, the unit will continue to check hourly. You can also manually set the time if desired.
- To set the barometer and forecast, look up your current local atmospheric pressure and weather conditions. Use the appropriate buttons on the back of the unit to match these settings.
Video 1: FOKEY Weather Station with 330 View
This video demonstrates the wide viewing angle of the FOKEY Weather Station display, highlighting its clarity from various positions, which is beneficial during setup and daily use.
Operating Instructions
1. Understanding the Display
The FOKEY Weather Station features a large, easy-to-read color LCD display with a reasonable layout, making important information clear for users of all ages. The display is divided into several sections:
- Outdoor Temperature & Humidity: Displays current readings from the wireless outdoor sensor.
- Indoor Temperature & Humidity: Shows current readings from the main unit.
- 12-24 Hour Forecast: Provides a predicted weather outlook using intuitive icons.
- Calendar & Time: Displays the current time, date, and day of the week, synchronized by the atomic clock.
- Moon Phase: Indicates the current phase of the moon.

Figure 3: Display Layout Overview
This diagram illustrates the clear and organized layout of the weather station's display, making it easy to read all relevant information at a glance.
2. Multi-Sensor Connectivity
The weather station supports connection with up to three outdoor sensors (one included, additional sensors sold separately) for comprehensive monitoring of different locations. This "Triple Protection" allows you to monitor various areas like your garden, attic, or basement.
- To switch between sensor channels, press the "CHANNEL" button on the back of the main unit.
- Ensure each additional sensor is set to a unique channel (1, 2, or 3) to avoid interference.
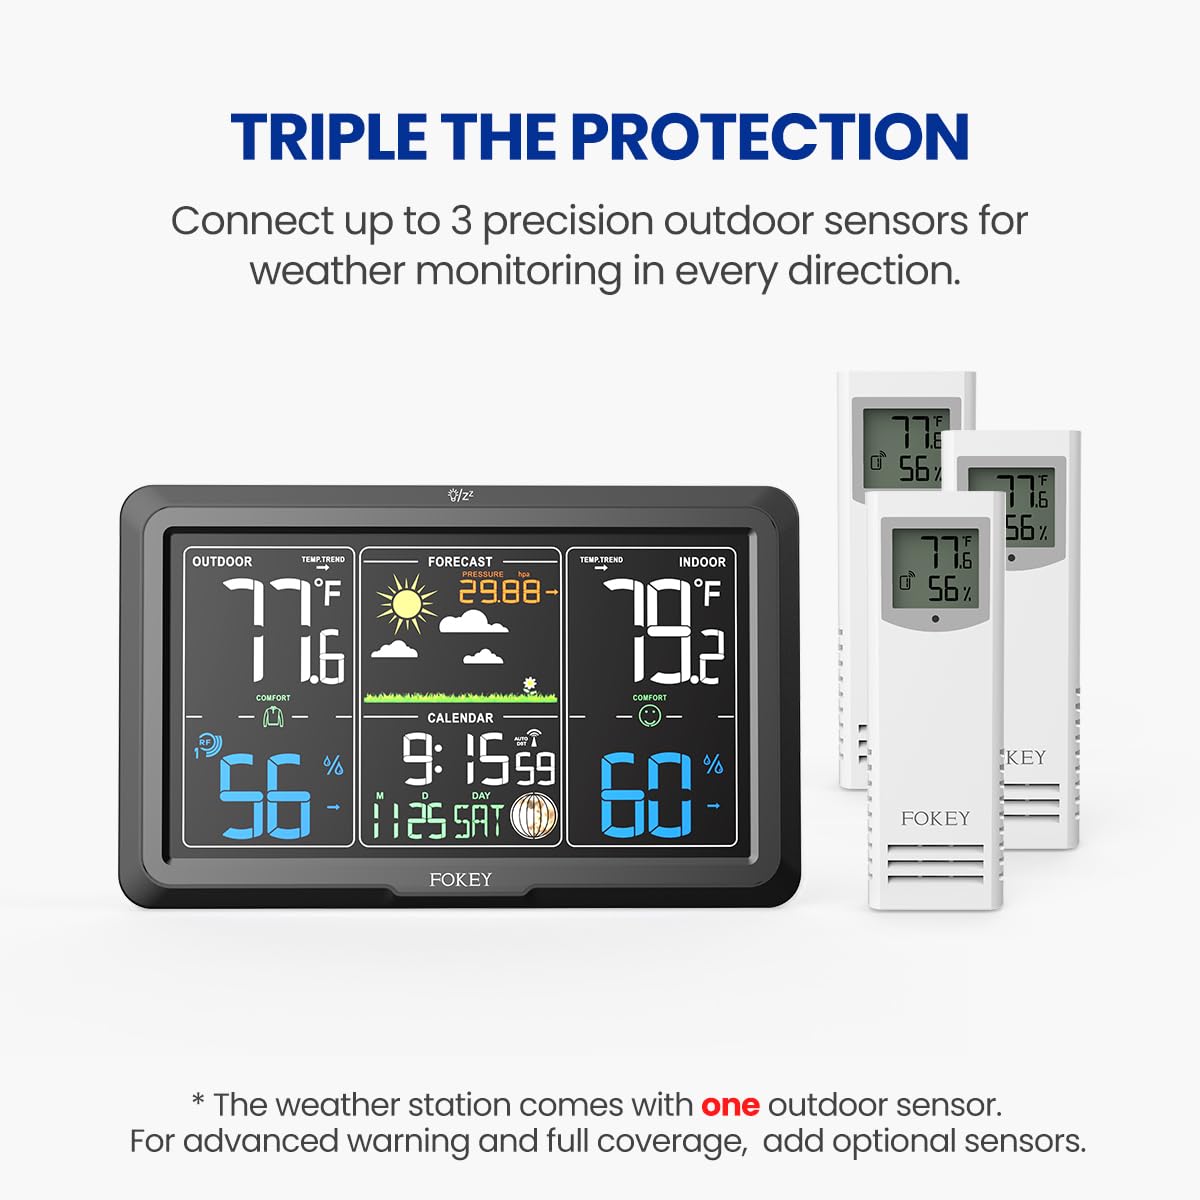
Figure 4: Triple Protection with Multiple Sensors
The weather station can connect to up to three outdoor sensors, providing expanded monitoring capabilities for different areas around your home.
3. Wireless Range
The outdoor sensor communicates wirelessly with the main unit, offering a range of up to 350 feet in open air. Factors such as walls, electronic interference, and large metal objects can affect the transmission range.

Figure 5: 350 Feet of Weather Freedom
The wireless sensor allows for flexible placement up to 350 feet from the main unit, providing accurate outdoor readings.
Maintenance
- Cleaning: Wipe the main unit and sensor with a soft, damp cloth. Do not use abrasive cleaners or solvents.
- Battery Replacement: Replace batteries in both the main unit (backup) and outdoor sensor annually, or when the low battery indicator appears on the display. Ensure proper battery type and polarity.
- Sensor Placement: Periodically check the outdoor sensor's location to ensure it remains protected from direct elements and is providing accurate readings.
Troubleshooting
| Problem | Possible Cause | Solution |
|---|---|---|
| Outdoor temperature/humidity not displayed or inaccurate. | Sensor out of range, low sensor battery, interference, incorrect channel. | Move sensor closer to main unit. Replace sensor batteries. Ensure sensor and main unit are on the same channel. Avoid placing near large metal objects or electronics. Perform a manual re-sync (refer to manual for specific steps). |
| Main unit display is blank or dim. | AC adapter unplugged, power outage, low backup batteries. | Ensure AC adapter is securely plugged in. Check power outlet. Replace backup batteries in the main unit. Remember, on battery power alone, the display turns off after 10 seconds. |
| Atomic clock not synchronizing. | Weak WWVB signal, incorrect time zone setting, interference. | Place the main unit near a window, away from electronic devices that may cause interference. Ensure the correct time zone is selected. Allow up to 24 hours for initial synchronization. You can also set the time manually. |
| Weather forecast is inaccurate. | Initial barometer setting incorrect, local weather patterns. | Ensure the initial barometer setting matches your local current atmospheric pressure. The forecast is based on barometric pressure changes and may not always perfectly match local TV forecasts due to microclimates. |
If you continue to experience issues, please refer to the full user guide (PDF link provided in product details) or contact FOKEY customer support.
Specifications
| Feature | Detail |
|---|---|
| Product Dimensions | 3.94 x 3.94 x 3.94 inches; 8 ounces |
| Item Model Number | Q7-US |
| Power Source | AC/DC Adapter (Main Unit), Batteries (Backup & Sensor) |
| Batteries Required | Main Unit: 3 AA (backup); Sensor: 2 AA |
| Display Type | 7.6-inch Large Color LCD |
| Connectivity Technology | Wireless (SHTC3 sensor from Sensirion) |
| Special Features | Mold indicator, dew point display, heat index, up to 3 channels, atomic clock (WWVB), 330° view angle |
| Material | Plastic |
| Color | Black |
Warranty and Support
FOKEY stands behind the quality of its products. Based on customer feedback, the product is supported by a strong warranty. For specific warranty details and to register your product, please visit the official FOKEY website or refer to the warranty card included with your purchase.
If you require technical assistance, have questions about your weather station, or need to claim warranty service (e.g., for a replacement sensor as noted by other users), please contact FOKEY customer support. Contact information can typically be found on the manufacturer's website or in the included user guide.
For additional resources, you can also refer to the official User Manual (PDF) available at: https://manuals.plus/m/e4270a07be50e5541c27e7a0caef8f73fb8bef5e2fd2b04b4e775b1dce90c710
Ask a question about this manual
Ask about setup, troubleshooting, compatibility, parts, safety, or missing instructions. Manuals+ will review the question and use this page’s manual context to help answer it.