1. Introduction
Thank you for choosing the Bodywel A275 Electric Bicycle. This manual provides essential information for the safe assembly, operation, maintenance, and troubleshooting of your e-bike. Please read this manual thoroughly before your first ride and keep it for future reference. Proper assembly and maintenance are crucial for your safety and the longevity of your bicycle.
2. Safety Information
Your safety is paramount. Always wear a helmet and appropriate safety gear when riding. Familiarize yourself with local traffic laws and regulations for electric bicycles. Regular maintenance checks are essential to ensure all components are in good working order.
2.1 General Safety Guidelines
- Always wear a certified helmet.
- Perform a pre-ride inspection before each use.
- Ensure tires are properly inflated and brakes are functioning correctly.
- Be aware of your surroundings and ride defensively.
- Do not ride under the influence of alcohol or drugs.
- Avoid riding in adverse weather conditions.
2.2 Battery Safety
- Only use the charger provided with your Bodywel A275.
- Do not expose the battery to extreme temperatures or direct sunlight.
- Avoid puncturing or damaging the battery.
- Charge the battery in a well-ventilated area, away from flammable materials.
- If the battery is damaged or leaking, contact customer support immediately.
3. Package Contents
Upon unpacking, please verify that all items listed below are present and undamaged:
- 1 x Bodywel A275 Electric Bicycle (partially assembled)
- 1 x User Manual
- 1 x Allen Key Set (4/5/6 mm)
- 1 x Wrench
- 1 x Charger
- 1 x Key set for battery
- Front and Rear Fenders
- Front Light
- Rear Rack
- Pedals
4. Assembly Instructions
Your Bodywel A275 e-bike comes 85% pre-assembled. Follow these steps carefully to complete the assembly. For visual guidance, please refer to the assembly video below.
Video: Bodywel A275 E-Bike Assembly Guide. This video demonstrates the complete assembly process for your electric bicycle.
4.1 Unpacking and Initial Inspection
- Carefully remove the bicycle and all components from the packaging.
- Remove all protective wrapping and zip ties.
- Inspect for any visible damage during shipping.
4.2 Installing the Kickstand
Attach the kickstand to the designated mounting points on the bicycle frame using the provided bolts and Allen key. Ensure it is securely tightened.
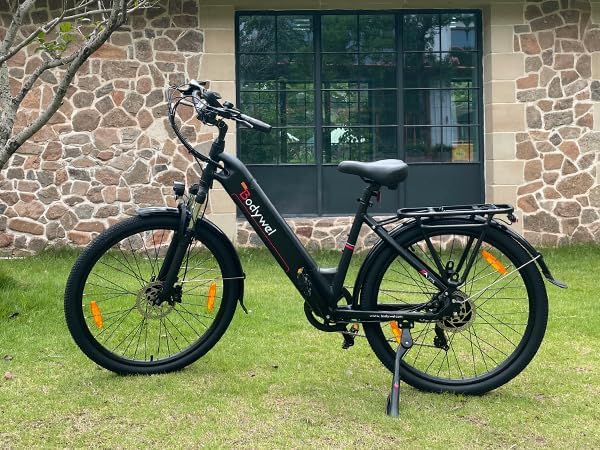
Image: The Bodywel A275 Electric Bicycle with its kickstand deployed, showcasing the stable upright position.
4.3 Installing the Rear Fender
Secure the rear fender to the frame above the rear wheel. Use the provided screws and tools to fasten it firmly. Ensure there is adequate clearance between the fender and the tire.
4.4 Installing the Handlebar and Stem
Insert the handlebar stem into the fork tube. Adjust the height to your preference and tighten the stem bolt. Attach the handlebar to the stem, ensuring it is centered and the brake levers and shifters are in a comfortable position before tightening the handlebar clamp bolts.

Image: Close-up of the adjustable multi-angle handlebar and aluminum suspension fork, highlighting ergonomic features.
4.5 Installing the Front Fender and Front Light
Attach the front fender to the front fork. Then, mount the front light to the designated bracket on the front fork or handlebar. Connect any necessary wiring for the light, ensuring it is neatly routed and secured.
4.6 Installing the Front Wheel
Remove the protective spacer from the front fork. Carefully align the front wheel with the fork dropouts, ensuring the brake rotor slides correctly into the brake caliper. Insert the quick-release skewer through the hub and tighten it securely. Ensure the wheel spins freely without rubbing against the brake pads.
4.7 Installing the Rear Rack
Mount the rear rack to the designated attachment points on the rear frame of the bicycle. Use the provided bolts and tools to secure it firmly. Ensure all connections are tight for stability.
4.8 Installing the Pedals
Identify the left (L) and right (R) pedals. The left pedal tightens counter-clockwise, and the right pedal tightens clockwise. Apply a small amount of grease to the pedal threads before screwing them into the crank arms. Tighten them firmly with the wrench.
4.9 Installing the Rear Light
Attach the rear light to the rear rack or seat post, depending on the design. Ensure it is visible from behind and securely fastened. Connect any necessary wiring.
4.10 Final Checks
- Double-check all bolts and fasteners for tightness.
- Ensure the quick-release levers are properly closed.
- Verify that the brakes are functioning correctly.
- Check tire pressure.
- Adjust the seat height for comfortable riding.
5. Operating Instructions
Learn how to operate your Bodywel A275 Electric Bicycle for an optimal riding experience.
5.1 Powering On/Off and Display Functions
To power on the e-bike, ensure the battery is inserted and locked, then press the power button on the battery. The LED display will illuminate, showing battery status, speed, distance (DST/ODO), and pedal-assist level. Use the '+' and '-' buttons on the handlebar control to adjust the pedal-assist level (0-3). Press and hold the power button on the display to turn the system off.
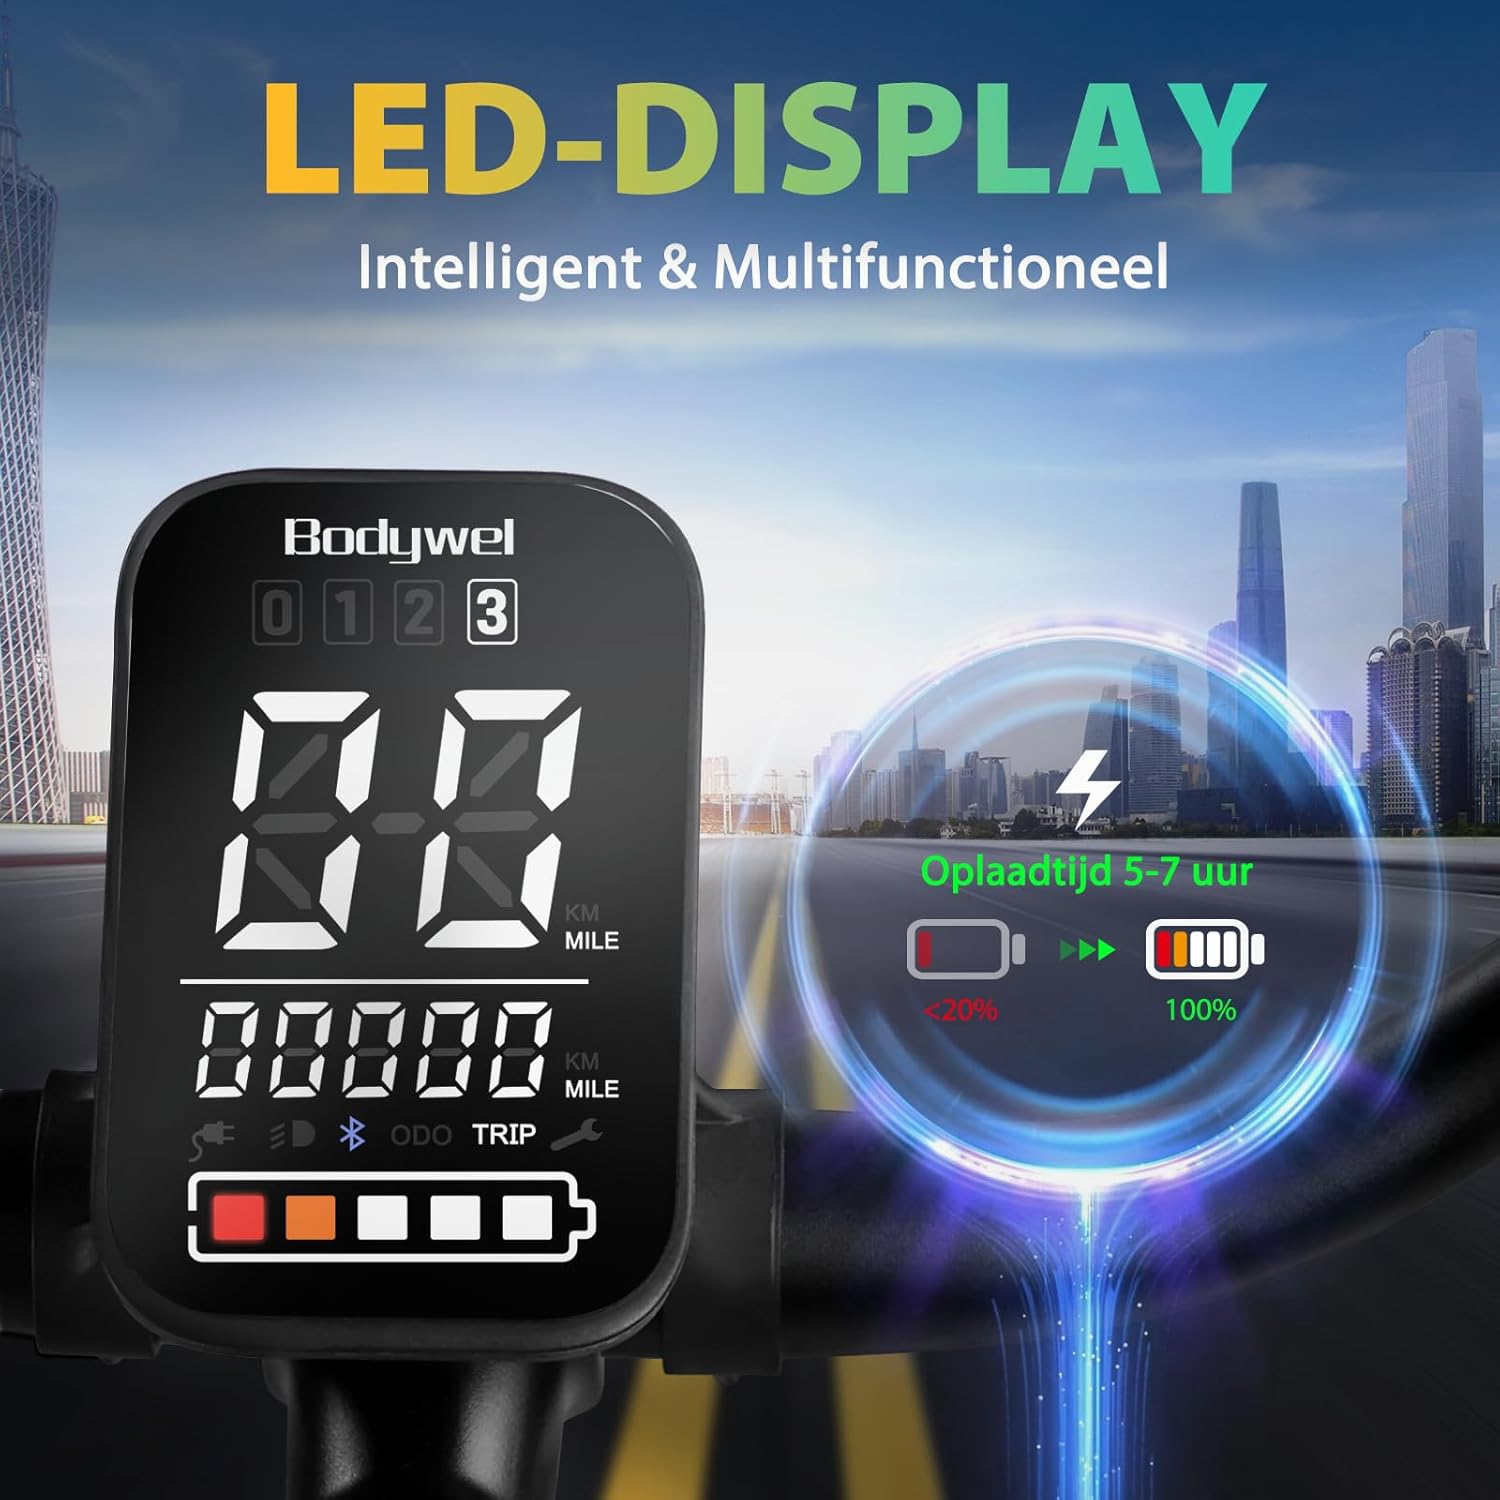
Image: The intelligent and multifunctional LED display, providing real-time information such as battery status, speed, and trip data.
5.2 Battery Removal and Charging
The 36V 15.6Ah (540Wh) battery is removable for convenient charging. Use the provided key to unlock and remove the battery. Connect the charger to the battery and a power outlet. The charging time is typically 5-7 hours. A full charge provides a range of up to 100 km under optimal conditions (70 kg rider, flat road, assist level 2).

Image: The removable 15.6Ah battery, designed for flexible charging options.
5.3 Using the APP Function (Bluetooth Connection)
Your Bodywel A275 features an APP function for enhanced control and ride tracking. Download the "Tuya" app (or specified Bodywel app) on your smartphone. Enable Bluetooth on your phone and pair it with your e-bike. The app allows you to view GPS tracks, adjust settings, and monitor ride data.
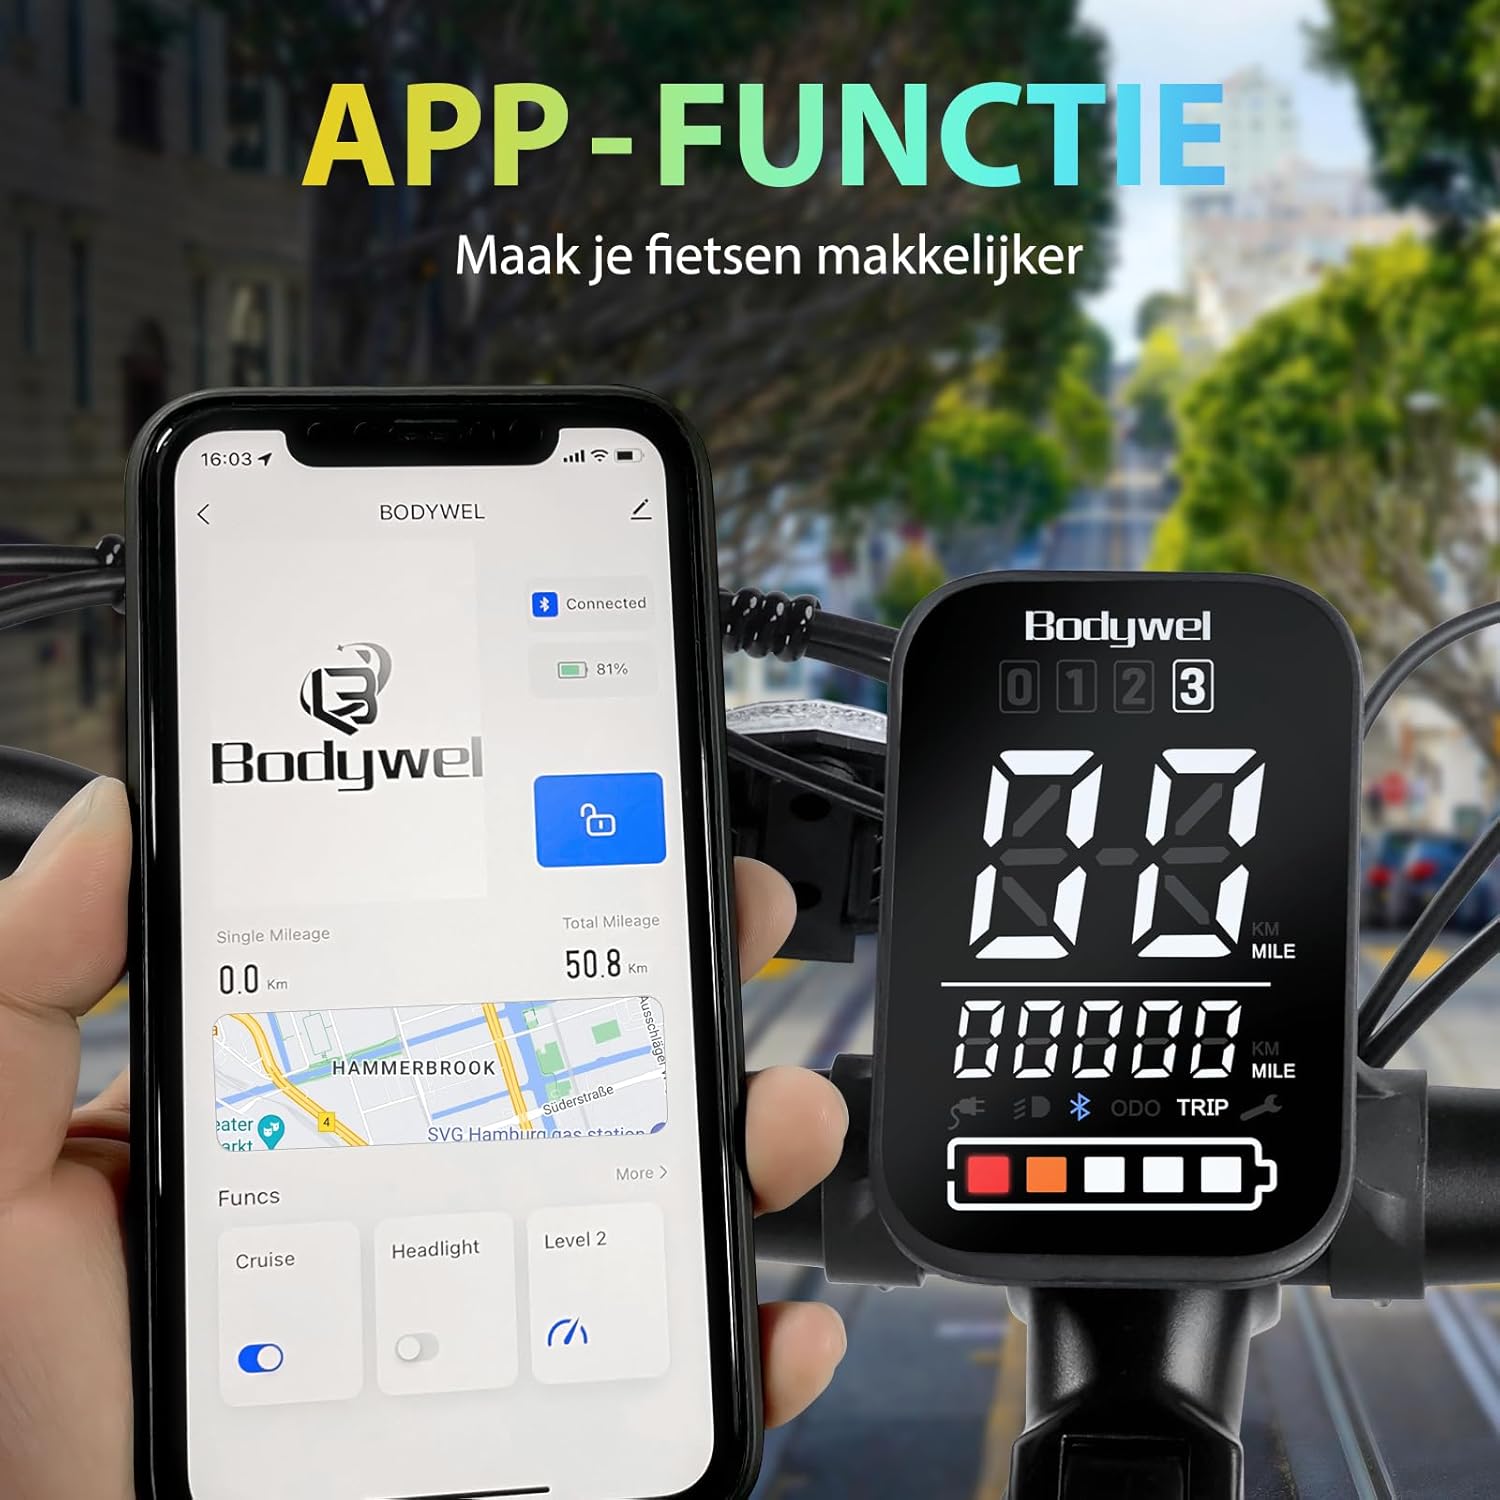
Image: The e-bike's display alongside a smartphone connected via Bluetooth, demonstrating the app's interface for managing ride functions.
6. Maintenance
Regular maintenance ensures the safety and longevity of your Bodywel A275 e-bike.
6.1 General Cleaning
- Clean the bike regularly with a damp cloth and mild soap. Avoid high-pressure washing, especially near electrical components.
- Dry the bike thoroughly after cleaning.
6.2 Brake System
The Bodywel A275 is equipped with dual hydraulic disc brakes for effective stopping power. Regularly check brake pads for wear and replace them when necessary. Ensure brake levers have proper tension and the braking action is smooth and responsive.

Image: Detailed view of the hydraulic disc brakes, emphasizing their safety and effectiveness.
6.3 Tires and Wheels
- Check tire pressure before each ride. Recommended pressure is usually indicated on the tire sidewall.
- Inspect tires for cuts, punctures, or excessive wear.
- Ensure wheel spokes are tight and wheels run true.
6.4 Chain and Drivetrain
- Keep the chain clean and lubricated to prevent rust and ensure smooth gear changes.
- Regularly check the chain for wear and tension.
6.5 Battery Care
- Store the battery in a cool, dry place when not in use.
- If storing for extended periods, charge the battery to 50-70% every 2-3 months.
7. Troubleshooting
This section addresses common issues you might encounter with your Bodywel A275 e-bike.
7.1 Motor Not Providing Assistance
- Check Battery: Ensure the battery is fully charged and securely seated in its compartment.
- Check Power: Verify the e-bike is powered on and the display is active.
- Check Pedal-Assist Level: Make sure the pedal-assist level is set above 0.
- Check Connections: Inspect all electrical connections for looseness or damage.
7.2 Battery Not Charging
- Check Charger: Ensure the charger is properly connected to both the battery and a working power outlet.
- Charger Indicator: Observe the charger's indicator light (usually red for charging, green for full).
- Battery Temperature: The battery might not charge if it's too hot or too cold. Allow it to reach room temperature.
7.3 Brakes Squealing or Ineffective
- Brake Pads: Check brake pads for wear. Worn pads need replacement.
- Rotor Contamination: Clean brake rotors with a clean cloth and isopropyl alcohol to remove any oil or grease.
- Adjustment: Brake cables or hydraulic lines may need adjustment. If unsure, consult a professional bike mechanic.
If you encounter issues not covered here or require further assistance, please contact Bodywel customer support.
8. Specifications
Key technical specifications for the Bodywel A275 Electric Bicycle:
| Feature | Specification |
|---|---|
| Brand | Bodywel |
| Model Number | A275 |
| Wheel Size | 27.5 Inch |
| Motor | 250W Brushless Motor (Ananda) |
| Battery | 36V 15.6Ah (540Wh) Removable Lithium-ion |
| Max Range | Up to 100 km (under optimal conditions) |
| Max Speed | 25 km/h (EU compliant) |
| Brakes | Dual Hydraulic Disc Brakes |
| Gears | 7 Speeds |
| Frame Material | Aluminum |
| Suspension | Front Fork Suspension |
| Display | 4.5-inch LED Display with APP connectivity |
| Weight | Approx. 29.94 kg (66 lbs) |
| Dimensions | 191.26 x 115.82 x 24.38 cm |
| Recommended Rider Height | 160-195 cm |
| Certifications | CE-15194 |
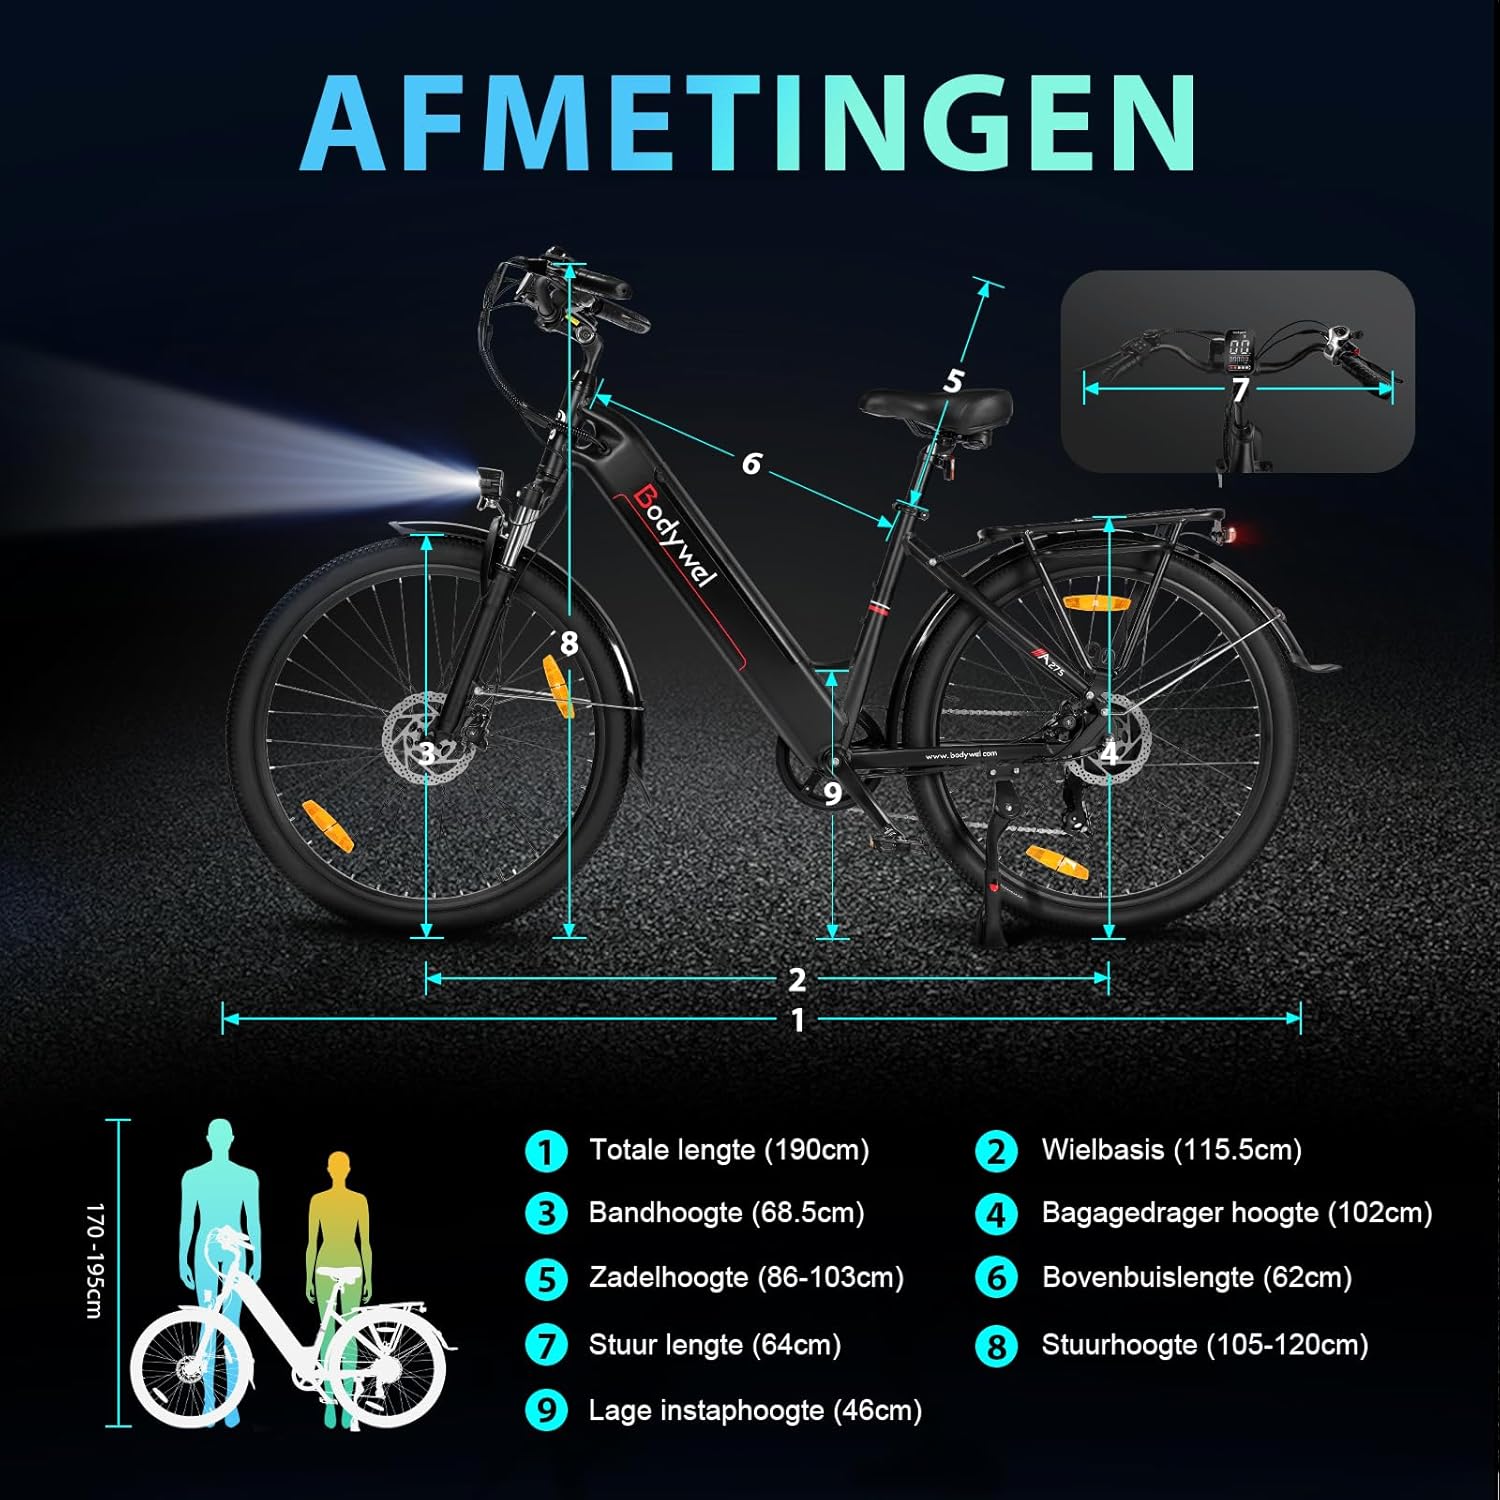
Image: Diagram illustrating the key dimensions of the Bodywel A275 Electric Bicycle.
9. Warranty and Support
Bodywel electric bicycles comply with European regulations and hold CE-15194 certification. For warranty information, technical support, or any questions regarding your Bodywel A275, please refer to the warranty card included with your purchase or contact Bodywel customer service directly. Contact details can typically be found on the official Bodywel website or through your retailer.


