1. Introduction
This manual provides essential information for the safe and effective operation, maintenance, and troubleshooting of your SHIJING 48-inch Manual Tile Cutter, Model E302-1200A. This tool is designed for precise cutting of various tile and stone materials, including ceramic, porcelain, marble, and granite, with a thickness range of 0.23-0.67 inches and a width of 0.6 inches. Please read this manual thoroughly before initial use to ensure proper handling and to maximize the lifespan of your equipment.
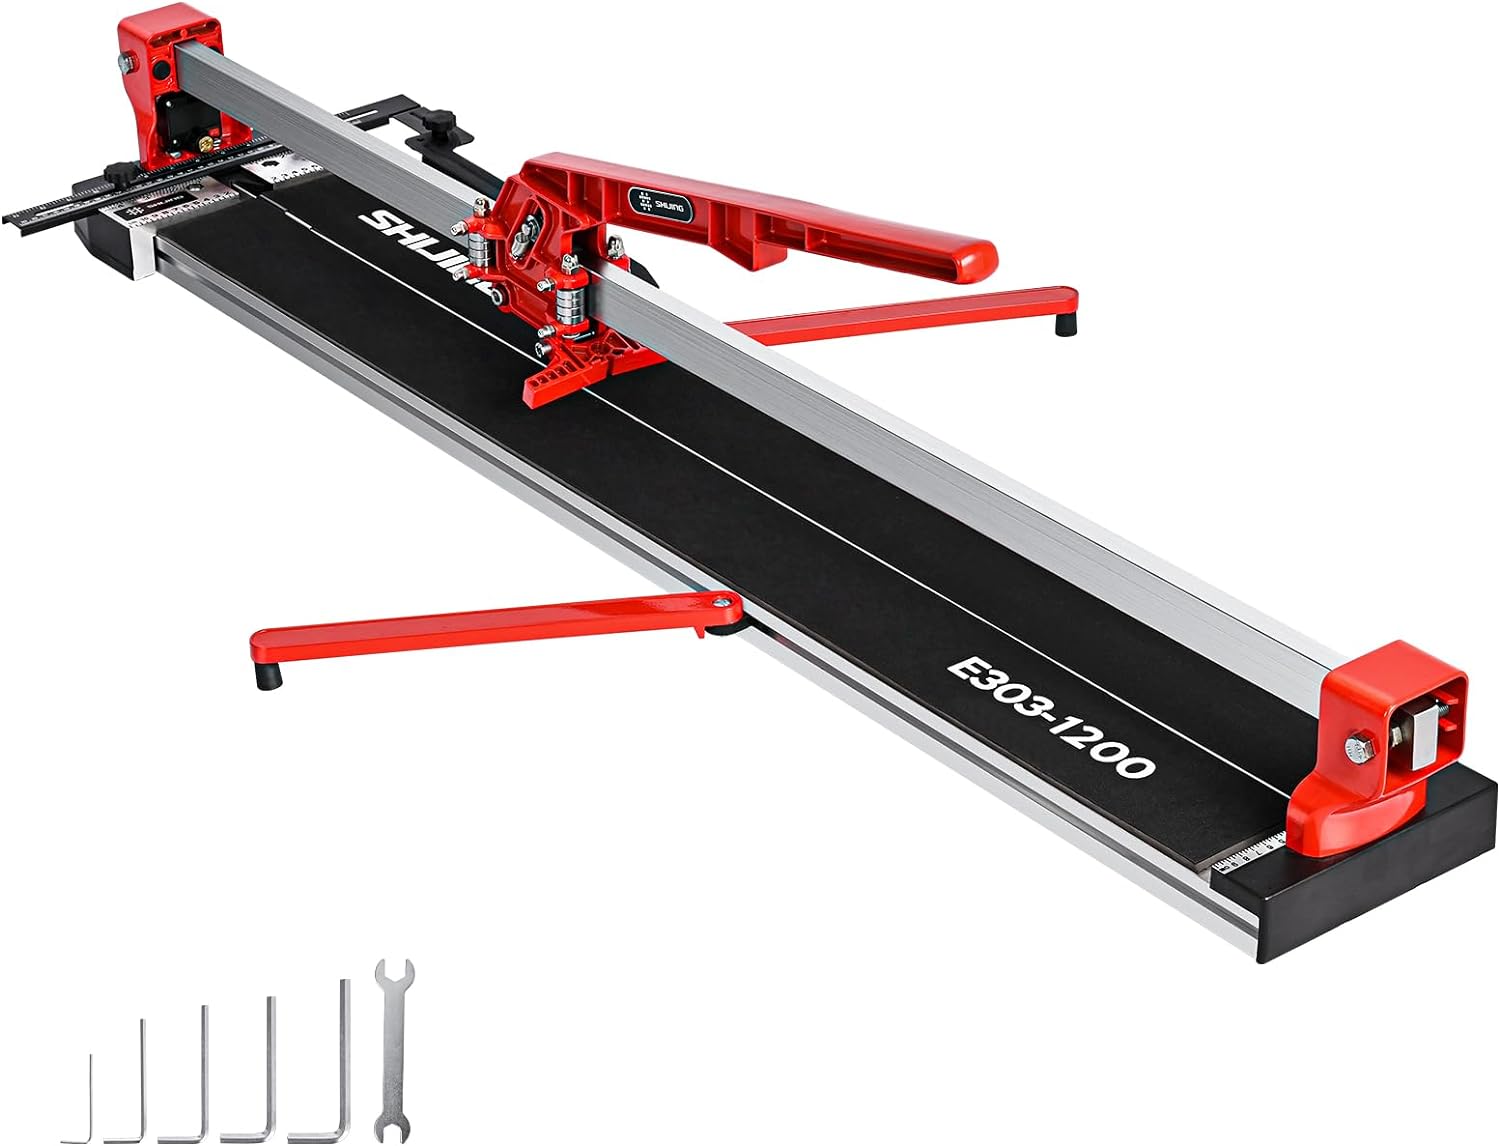
Figure 1.1: Overview of the SHIJING 48-inch Manual Tile Cutter (Model E302-1200A). This image displays the complete assembly of the tile cutter, including the main rail, cutting head, handle, and support feet, along with included accessories like hex keys and a wrench.
2. Safety Instructions
Always adhere to the following safety precautions to prevent injury and damage to the tool.
- Wear Personal Protective Equipment (PPE): Always wear safety glasses to protect against flying debris. Gloves are recommended to protect hands.
- Stable Work Surface: Ensure the tile cutter is placed on a flat, stable, and non-slip surface before operation.
- Inspect Before Use: Before each use, check the cutting wheel for damage and ensure all components are securely fastened.
- Proper Tile Placement: Always position the tile securely on the platen, ensuring it is stable and will not shift during cutting.
- Controlled Pressure: Apply steady, controlled pressure when scoring and breaking tiles. Avoid excessive force, which can lead to uncontrolled breaks or damage to the tool.
- Keep Hands Clear: Keep hands and fingers away from the cutting wheel and the path of the scoring line during operation.
- Laser Safety: Do not stare directly into the laser beam. Avoid pointing the laser at people or animals.
- Storage: Store the tile cutter in a dry, safe place, out of reach of children and unauthorized users.
3. Components and Features
The SHIJING 48-inch Manual Tile Cutter is engineered with several key components for optimal performance and durability.
- Double-Layer Aluminum Plate Structure: Provides enhanced stability, prevents deformation, and extends the tool's lifespan.
- Unique Laser Guidance System: Projects a clear cutting line for precise alignment and reduced errors.
- High-Hardness Tungsten Carbide Cutting Wheel: Durable blade designed for effortless cutting through various hard materials. Has a lifespan of 30,000 meters or more.
- Split-Handle Platen: Movable handle platen allows for shrinking and cutting thinner tiles effectively.
- Solid Aluminum Adjustable Feet: Offers superior support and stability, accommodating tiles of varying sizes.
- Precision Imported Bearings: Ensures smooth and accurate movement of the cutting head.
- Special Steel Slide Rail: Contributes to the smooth operation and precision of the cutting mechanism.
- Rubber Buffer Pad: Provides cushioning and protection during the breaking process.
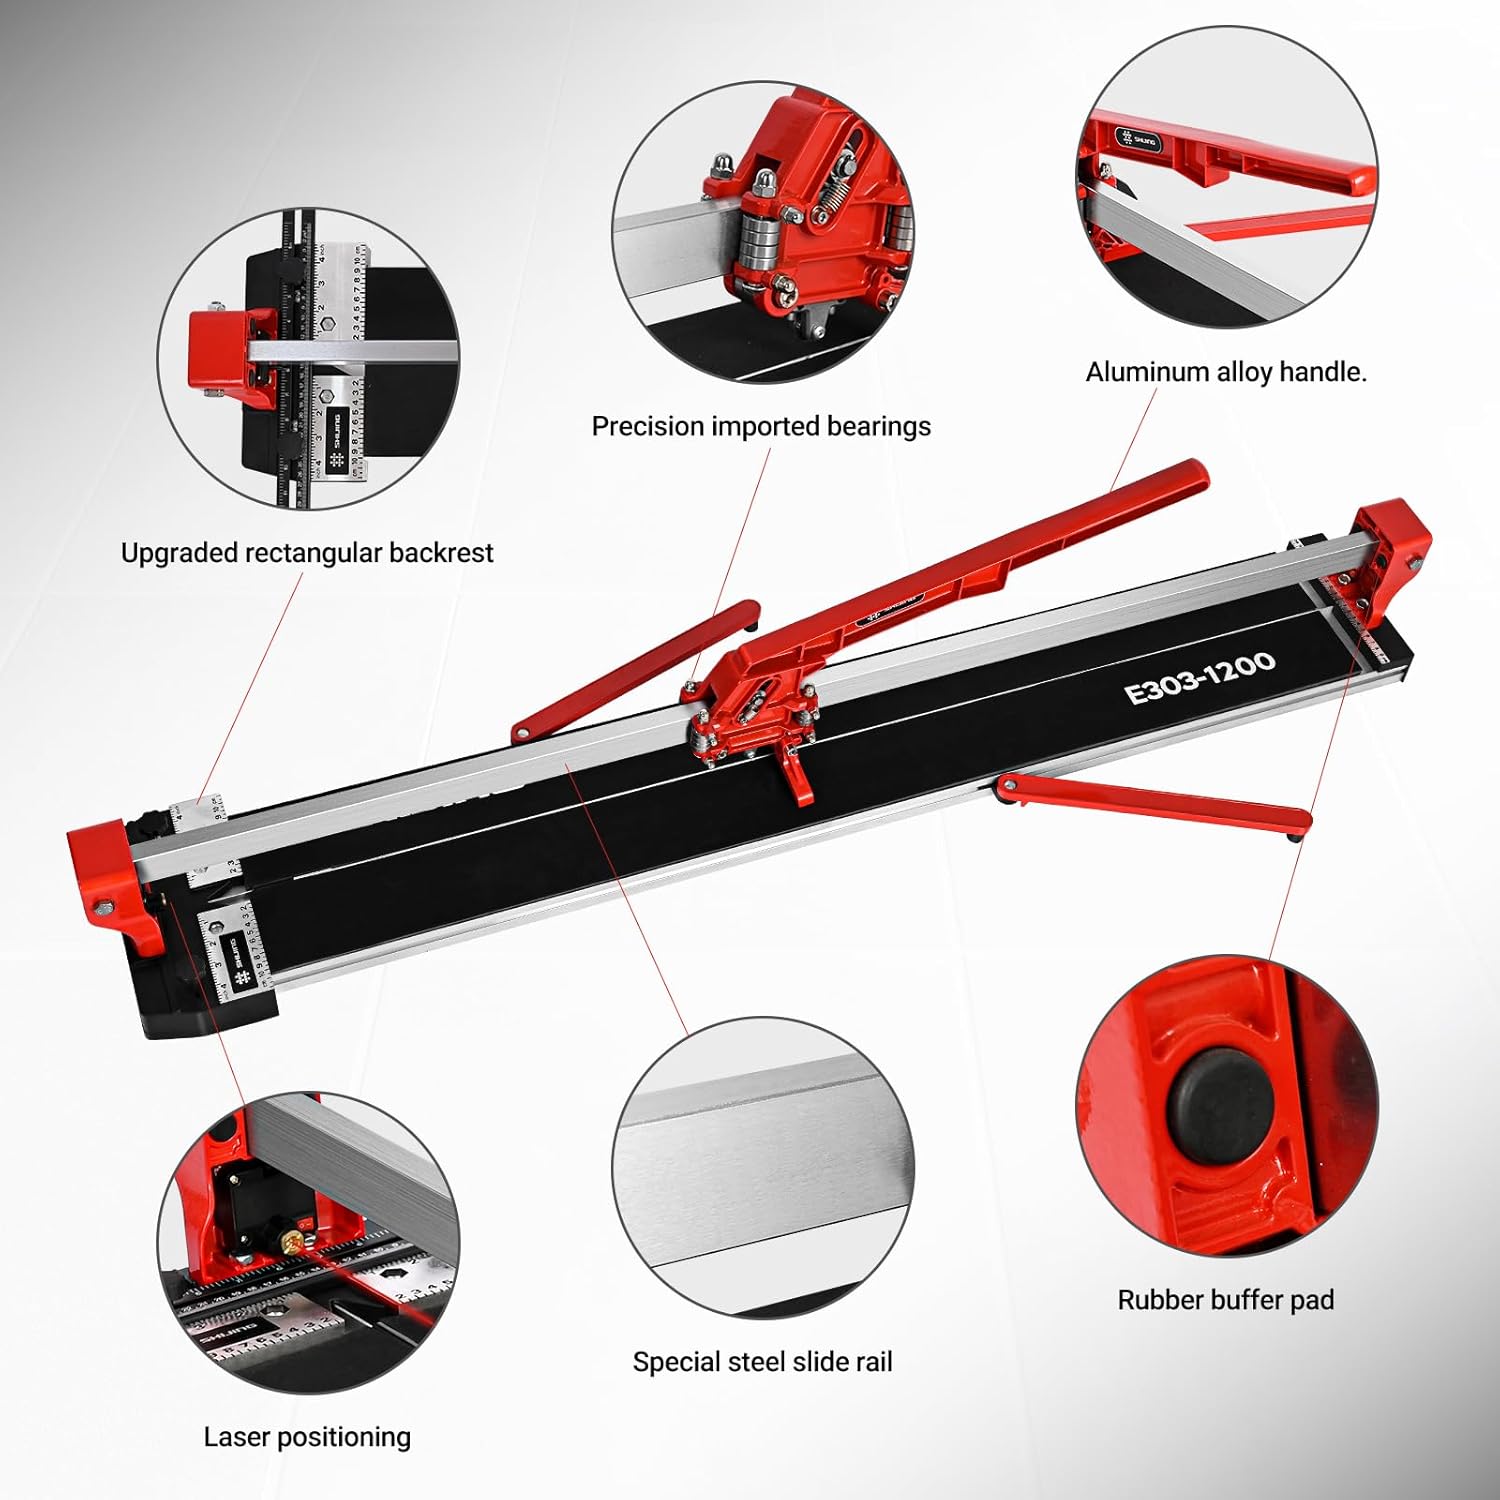
Figure 3.1: Key components of the SHIJING tile cutter. This image highlights the aluminum alloy handle, precision imported bearings, upgraded rectangular backrest, laser positioning system, special steel slide rail, and rubber buffer pad, illustrating their positions on the tool.

Figure 3.2: High-quality construction details. This image shows the double-layer aluminum non-deformable base, the alloy steel head for efficient cutting, and the 180° rotation feature of the two extension brackets, along with the stable base plus cross steel design.
4. Setup
Before using the tile cutter, ensure it is properly set up and adjusted for your specific cutting needs.
- Unpack and Inspect: Carefully remove all components from the packaging. Inspect for any shipping damage.
- Assemble Support Feet: Attach the solid aluminum adjustable feet to the main base of the tile cutter. Ensure they are securely tightened.
- Position the Cutter: Place the tile cutter on a flat, stable, and level work surface.
- Adjust Side Supports: Extend or retract the adjustable side supports as needed to accommodate the size of the tile you intend to cut. These supports help stabilize larger tiles.
- Laser Alignment: The laser guidance system assists in precise cutting. Ensure the laser is aligned with the intended cutting path. If adjustment is needed, refer to the laser alignment instructions (usually a small screw near the laser module).


Figure 4.1: Details of setup components. From left to right: the laser guidance system for precise cutting lines, the adjustable side support arm for stabilizing tiles, and the adjustable ruler for accurate measurements.
5. Operating Instructions
Follow these steps for effective and safe tile cutting.
- Prepare the Tile: Clean the tile surface. Mark your desired cut line if not using the laser guide.
- Position the Tile: Place the tile firmly on the platen, aligning your cut line with the laser guide or the cutting wheel's path. Ensure the tile is stable and does not wobble.
- Adjust Laser (if needed): Adjust the laser to align precisely with the cutter wheel's path and your desired cut line.
- Score the Tile:
- Lower the cutting handle so the tungsten carbide wheel makes contact with the tile surface.
- Apply firm, consistent pressure and push the handle forward along the tile, creating a single, continuous score line from one end to the other. Avoid multiple passes, as this can lead to uneven breaks.
- Break the Tile:
- Once the score line is complete, position the breaking foot (or split-handle platen) directly over the scored line, typically near the edge of the tile closest to you.
- Apply downward pressure on the handle. The split-handle platen will exert pressure on both sides of the score line, causing the tile to snap cleanly along the score.
- Remove Cut Pieces: Carefully remove the cut tile pieces.

Figure 5.1: Step-by-step operation guide. This diagram illustrates the four main steps: 1. Adjusting the laser to align the cutter wheel, 2. Placing the tile and lowering the bracket, 3. Pushing the handle forward to score the tile, and 4. Pressing the handle to complete the cut.
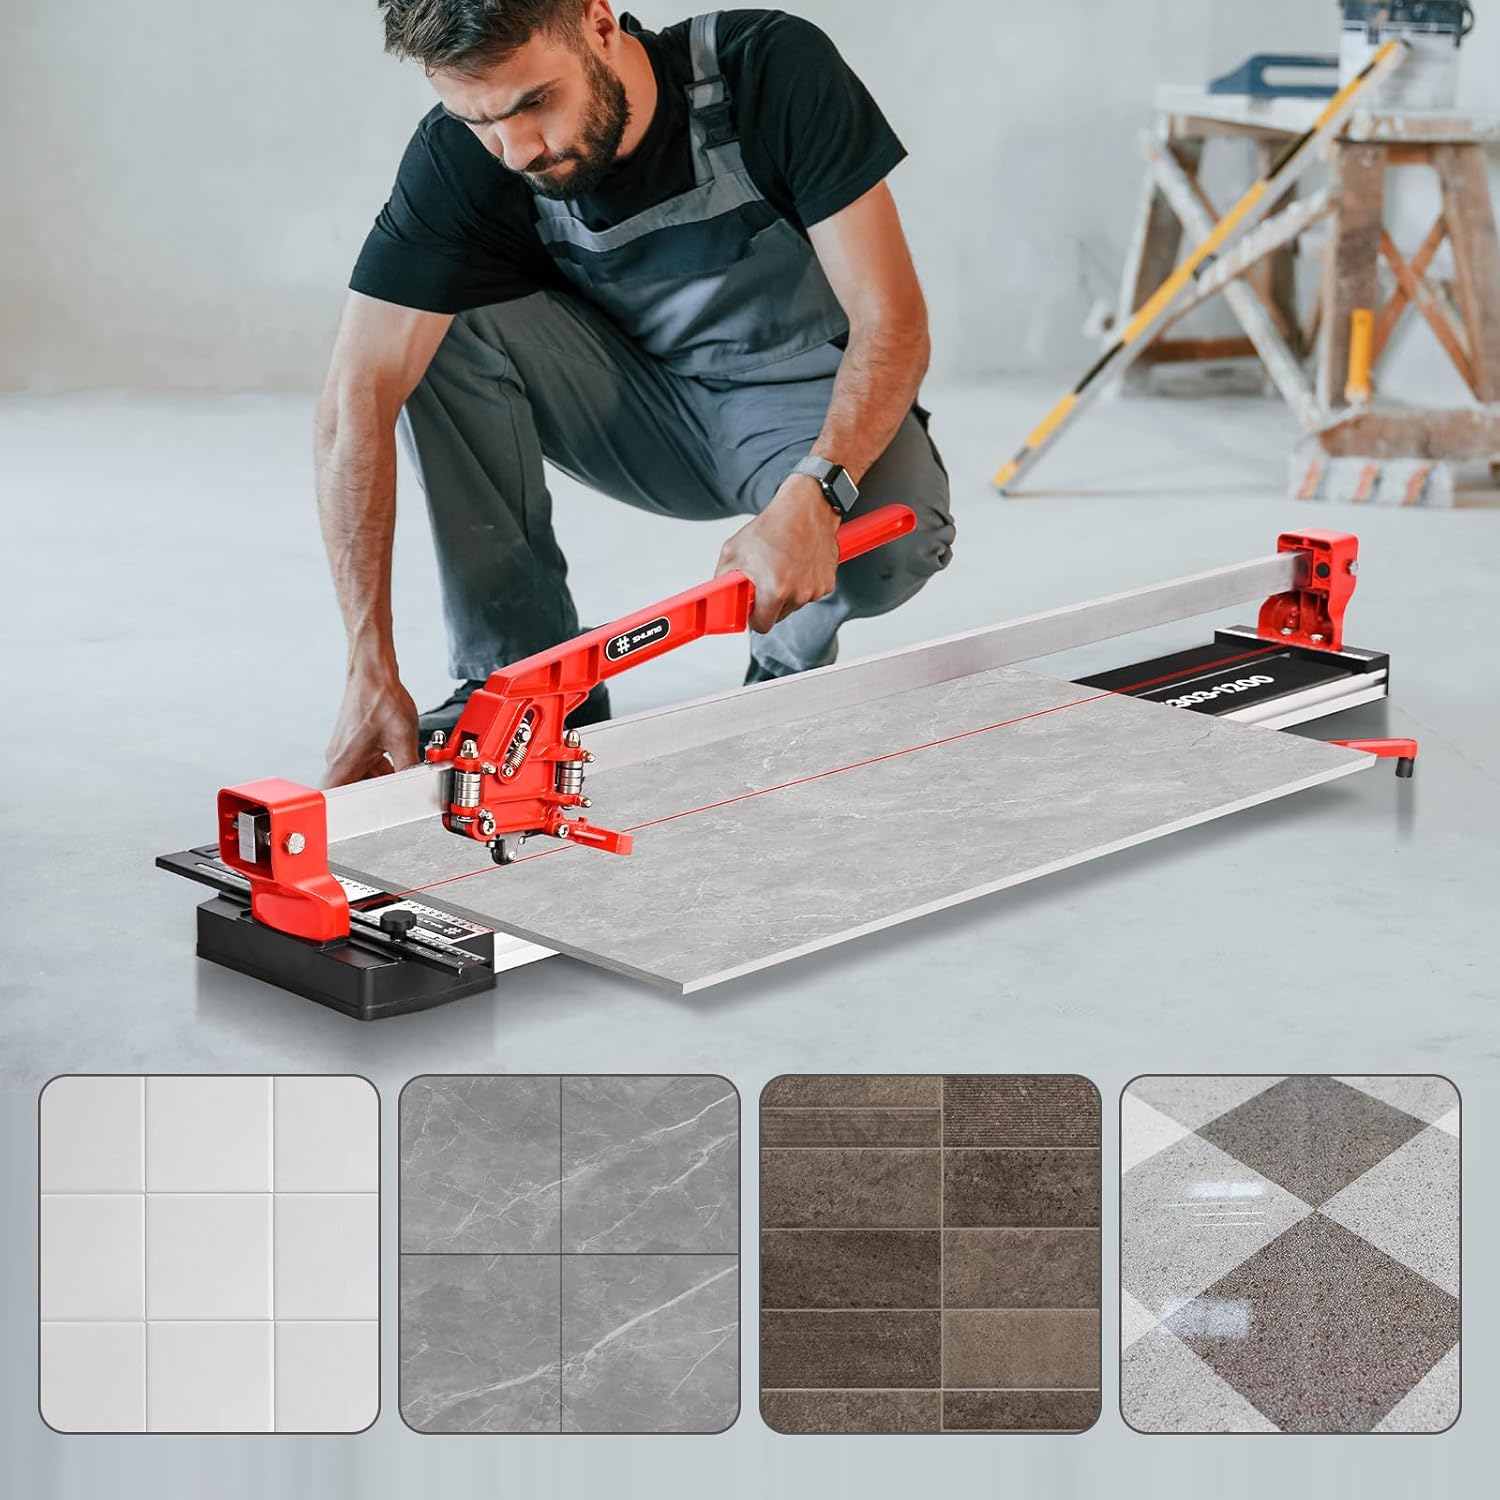
Figure 5.2: Practical application of the tile cutter. A user is shown operating the SHIJING tile cutter on a large format tile, demonstrating its use for different tile materials such as ceramic, marble, and mosaic tiles.
6. Maintenance
Regular maintenance ensures the longevity and optimal performance of your tile cutter.
- Cleaning: After each use, wipe down the main rail, platen, and cutting head with a clean, dry cloth to remove dust and tile debris. For stubborn residue, a damp cloth can be used, followed by immediate drying.
- Lubrication: Periodically apply a light machine oil to the slide rail and moving parts of the cutting head to ensure smooth operation. Avoid over-lubrication.
- Cutting Wheel Inspection: Regularly inspect the tungsten carbide cutting wheel for chips, cracks, or excessive wear. A dull or damaged wheel will result in poor cuts and can damage tiles. Replace the wheel when necessary.
- Fastener Check: Periodically check all screws and bolts to ensure they are tight. Re-tighten any loose fasteners.
- Storage: Store the tile cutter in a clean, dry environment, protected from moisture and extreme temperatures.
7. Troubleshooting
This section addresses common issues you might encounter and their potential solutions.
| Problem | Possible Cause | Solution |
|---|---|---|
| Tile not breaking cleanly or uneven breaks. |
|
|
| Cutting head sticks or moves roughly. |
|
|
| Laser guide is dim or not working. |
|
|
8. Specifications
Key technical specifications for the SHIJING 48-inch Manual Tile Cutter (Model E302-1200A).
| Attribute | Detail |
|---|---|
| Model Number | E302-1200A |
| Size | 48 inch |
| Cutting Thickness Range | 0.23 - 0.67 inches (6mm - 17mm) |
| Cutting Width | 0.6 inches |
| Material | Aluminum Alloy |
| Cutting Wheel Material | Tungsten Carbide |
| Item Weight | 41.4 pounds |
| Product Dimensions | 60.8 x 10 x 9.45 inches |
| Power Source | Hand-powered |
| Included Components | Manual tile cutter |

Figure 8.1: Detailed dimensions and cutting capabilities. This image provides a visual representation of the tile cutter's overall dimensions and highlights key cutting specifications such as cutting width and thickness, along with details about the tungsten steel alloy knife wheel.

Figure 8.2: Summary of product specifications. This graphic presents a concise table of specifications including material, cutting range, cutting thickness, die of solid chromed rod, gross weight, and package dimensions for the SHIJING Manual Cutting Machine.
9. Warranty and Customer Support
For warranty information, product support, or to purchase replacement parts, please contact SHIJING customer service. Refer to your purchase documentation for specific warranty terms and conditions.
You can visit the official SHIJING store for more information and product offerings: SHIJING Store on Amazon.


