
X-IMVNLEI X9
X-IMVNLEI X9 GPS Drone User Manual
Model: X9
1. Introduction
Thank you for purchasing the X-IMVNLEI X9 GPS Drone. This advanced RC Quadcopter is designed for adults, featuring a 4K camera, GPS auto-return, Follow Me mode, and powerful brushless motors for stable and extended flight. Please read this manual thoroughly before operating the drone to ensure safe and optimal performance.
2. Safety Precautions
- Read the Manual: Always read the entire instruction manual before operating the drone.
- Age Restriction: This product is intended for adult use.
- Flight Environment: Fly in open areas, away from people, animals, buildings, and obstacles. Avoid flying near airports or restricted airspace.
- Weather Conditions: Do not fly in strong winds, rain, snow, or fog.
- Battery Safety: Use only the provided batteries and charger. Do not overcharge or short-circuit batteries. Store batteries in a cool, dry place.
- Propeller Safety: Keep hands, face, and loose clothing away from rotating propellers.
- Line of Sight: Always maintain visual line of sight with the drone during flight.
- Legal Compliance: Be aware of and comply with local drone regulations and laws.
3. Package Contents
- X-IMVNLEI X9 GPS Drone
- Remote Controller
- 2 x Lithium Ion Batteries
- USB Charging Cable
- Spare Propellers
- Screwdriver
- User Manual
- Carrying Bag
4. Product Overview
Familiarize yourself with the main components of your X9 GPS Drone.
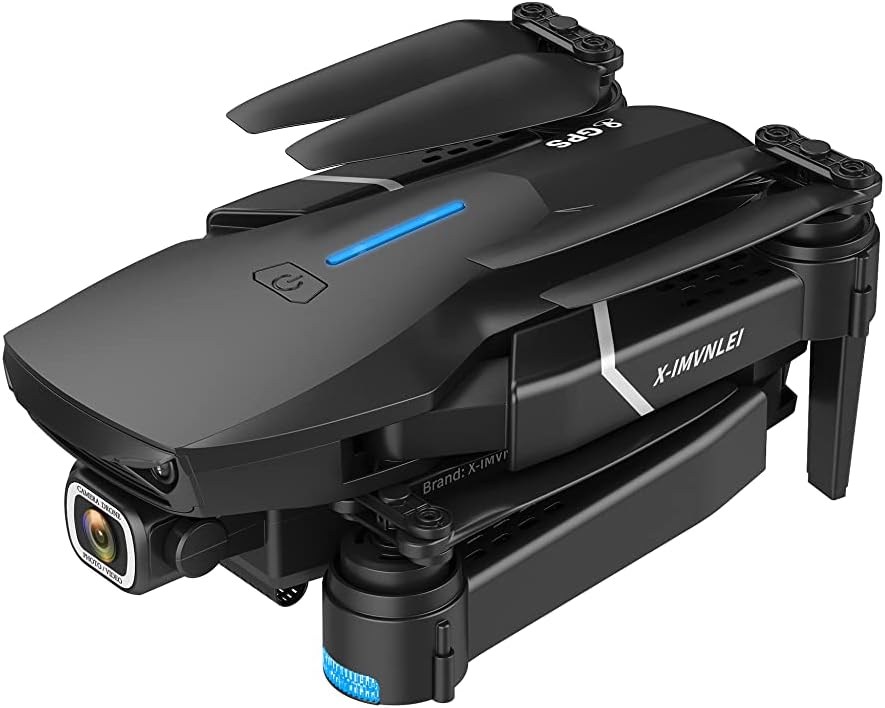
Figure 4.1: X-IMVNLEI X9 GPS Drone. This image shows the drone in its folded state, highlighting the main body, propellers, and the front-facing 4K camera. The power button and LED indicator are visible on the top surface.
- 4K UHD Camera: Front-mounted camera for high-resolution photo and video capture (3840 x 2160). Features 90° adjustable lens.
- Brushless Motors: Provides stable flight, increased wind resistance, and quieter operation.
- Foldable Arms: Allows for compact storage and portability.
- GPS Module: Enables precise positioning, auto-return, and intelligent flight modes.
- LED Indicators: Provide status information (e.g., power, GPS signal).
- Battery Compartment: Located at the rear of the drone for easy battery insertion.
5. Setup
5.1. Battery Installation and Charging
- Drone Battery: Insert the fully charged Lithium Ion battery into the drone's battery compartment until it clicks into place.
- Charging: Connect the USB charging cable to the drone battery (or external charger if provided) and a 5V/2A USB power adapter. The charging indicator will show charging status and turn off when fully charged. Charging time is approximately 120-180 minutes.
- Remote Controller Battery: The remote controller typically uses internal rechargeable batteries or standard AA batteries. Ensure it is charged or new batteries are installed.
5.2. Unfolding the Drone
Gently unfold the drone arms one by one until they are fully extended and locked into position. Ensure all arms are securely locked before flight.
5.3. Remote Controller Setup
- Power On: Press and hold the power button on the remote controller until it powers on.
- Pairing: Power on the drone. Place the drone on a flat, level surface. Push the left joystick up then down to pair the drone with the controller. The drone's indicator lights will stop flashing and become solid when paired.
- GPS Calibration: After pairing, perform GPS calibration as instructed by the drone's LED indicators or app prompts. This usually involves rotating the drone horizontally and vertically.
5.4. App Installation (Optional but Recommended)
Download the official X-IMVNLEI drone app from your smartphone's app store. Connect your phone to the drone's Wi-Fi network (usually named "X9-XXXXXX") to enable FPV (First Person View) and access advanced flight features.
6. Operating the Drone
6.1. Pre-Flight Checklist
- Ensure drone and controller batteries are fully charged.
- Check that propellers are securely attached and undamaged.
- Confirm drone arms are fully unfolded and locked.
- Verify GPS signal is strong (at least 7-8 satellites locked for stable GPS flight).
- Choose a safe, open flying area.
6.2. Take-off and Landing
- One-Key Take-off: Press the one-key take-off button on the remote controller or in the app. The drone will automatically ascend to a safe altitude.
- Manual Take-off: Push both joysticks down and out to start the motors. Slowly push the left joystick up to ascend.
- One-Key Landing: Press the one-key landing button. The drone will slowly descend and land automatically.
- Manual Landing: Slowly pull the left joystick down to descend. Once landed, pull both joysticks down and in to stop the motors.
6.3. Flight Controls
| Joystick/Button | Function |
|---|---|
| Left Joystick (Up/Down) | Ascend/Descend (Throttle) |
| Left Joystick (Left/Right) | Rotate Left/Right (Yaw) |
| Right Joystick (Up/Down) | Move Forward/Backward (Pitch) |
| Right Joystick (Left/Right) | Move Left/Right (Roll) |
| One-Key Return | Drone returns to take-off point using GPS. |
| Photo/Video Button | Capture photos or start/stop video recording. |
6.4. GPS Functions
- GPS Auto Return: When the drone loses signal, is out of range, or has low power, it will automatically return to its take-off point. This function requires a strong GPS signal at the take-off point.
- Follow Me Mode: The drone will automatically follow the remote controller or your smartphone (if using the app) at a set distance and altitude.
- Waypoint Flight: (Via App) Draw a path on the map in the app, and the drone will fly along the specified route.
- Point of Interest: (Via App) Select a central point, and the drone will circle around it at a set radius and altitude, capturing footage.
6.5. Camera Operation
- Photo Capture: Press the dedicated photo button on the remote controller or tap the photo icon in the app.
- Video Recording: Press the dedicated video button on the remote controller or tap the video icon in the app to start/stop recording.
- Adjusting Camera Angle: Use the camera tilt dial/button on the remote controller or the app interface to adjust the 90° adjustable lens.
- Storage: Photos and videos are typically saved to a microSD card inserted into the drone (not included) or directly to your connected smartphone via the app.
7. Maintenance
- Cleaning: Use a soft, dry cloth to clean the drone body and camera lens. Do not use harsh chemicals.
- Propeller Inspection: Regularly check propellers for cracks, bends, or damage. Replace damaged propellers immediately using the provided spares.
- Battery Care: Store batteries at approximately 50% charge if not used for extended periods. Do not expose batteries to extreme temperatures.
- Storage: Store the drone in its carrying bag in a cool, dry place, away from direct sunlight and moisture.
8. Troubleshooting
| Problem | Possible Cause | Solution |
|---|---|---|
| Drone does not power on. | Battery not charged or not inserted correctly. | Ensure battery is fully charged and securely inserted. |
| Drone cannot pair with controller. | Incorrect pairing procedure; interference. | Repeat pairing steps (power on drone, then controller, perform joystick sequence). Move away from other wireless devices. |
| Unstable flight/Drifting. | Improper calibration; strong wind; damaged propeller. | Perform gyroscope calibration. Fly in calm conditions. Check and replace damaged propellers. |
| GPS Auto Return not working. | Weak GPS signal; no GPS lock at take-off. | Ensure drone has acquired sufficient GPS satellites (at least 7-8) before take-off. Fly in an open area. |
| No FPV feed in app. | Not connected to drone's Wi-Fi; app issue. | Connect your smartphone to the drone's Wi-Fi network. Restart the app and drone. |
9. Specifications
- Brand: X-IMVNLEI
- Model Name: X9
- Color: BLACK
- Item Weight: 190 Grams (6.7 ounces)
- Product Dimensions: 9.5"L x 7.9"W x 2.8"H
- Video Capture Resolution: 4K (3840 x 2160)
- Video Output Resolution: 1920x1080 Pixels
- Connectivity Technology: Wi-Fi (5GHz FPV transmission)
- Control Type: Remote Control
- Motor Type: Brushless
- Battery Type: Lithium Ion (2 included)
- Age Range (Description): Adult
10. Warranty and Support
For warranty information and technical support, please refer to the contact details provided on the product packaging or the official X-IMVNLEI website. Keep your purchase receipt as proof of purchase for any warranty claims.
For further assistance, please contact X-IMVNLEI customer service.
Ask a question about this manual
Ask about setup, troubleshooting, compatibility, parts, safety, or missing instructions. Manuals+ will review the question and use this page’s manual context to help answer it.