
Introduction
Thank you for choosing the SHARP ES-NFB214CWDA-DE Front Loader Washing Machine. This manual provides essential information for the safe and efficient operation, installation, and maintenance of your appliance. Please read it thoroughly before first use and keep it for future reference.

Figure 1: Front view of the SHARP ES-NFB214CWDA-DE Washing Machine with the door closed.
Key Features:
- Energy Efficiency Class A: Designed for optimal energy savings.
- 12 kg Capacity: Ideal for large households and heavy laundry loads.
- Max. Spin Speed 1400 rpm: Ensures efficient water extraction for faster drying.
- Advanced Inverter Motor: Provides powerful yet quiet operation with enhanced durability.
- SoftTouch Control Panel with LED Display: Intuitive and easy-to-use interface.
- AquaStop: Integrated system for protection against water damage.
- 15 Programs: A wide selection of washing programs to suit various fabric types and needs.
- Hygiene Steam Function: For deep cleaning and sanitization.
- AllergySmart: Special program certified by Allergy UK to remove allergens and bacteria.
- DoubleJet Technology: Sprays water and detergent directly into the laundry for improved washing performance and reduced consumption.

Figure 2: Overview of key features including 15 programs, AllergySmart, DoubleJet, Advanced Inverter Motor, and Steam function.
Setup and Installation
1. Unpacking and Transport Bolt Removal
Carefully remove all packaging materials. Before operating the washing machine, it is crucial to remove the transport bolts located at the rear of the appliance. These bolts secure the drum during transit and must be removed to prevent damage during operation. Store the bolts for future transport if needed.

Figure 3: Rear view of the washing machine, indicating the positions of the transport bolts that must be removed before use.
2. Placement
Place the washing machine on a firm, level surface. Ensure there is adequate space around the appliance for ventilation and access.
Dimensions (Depth x Width x Height): 63.2 x 59.7 x 84.5 cm.
3. Water Connection
Connect the water inlet hose to a cold water tap with a 3/4-inch thread. Ensure all connections are tight to prevent leaks. The AquaStop feature provides additional protection against water damage. Position the drain hose into a standpipe or sink, ensuring it is securely fixed and not kinked.
4. Electrical Connection
Plug the power cord into a grounded 220 Volt electrical outlet. Ensure the outlet is easily accessible. Do not use extension cords or adapters.
5. Leveling
Adjust the leveling feet at the bottom of the washing machine until the appliance is perfectly level. This is crucial to minimize vibration and noise during operation, especially during the spin cycle.
6. Initial Wash Cycle
Before washing clothes, run an empty wash cycle (e.g., Cotton 60°C) with a small amount of detergent to clean the drum and remove any manufacturing residues.
Operating Instructions
1. Control Panel Overview

Figure 4: Detailed view of the control panel, showing the program dial, LED display, and function buttons.
- Program Dial: Turn to select one of the 15 available wash programs.
- LED Display: Shows remaining time, selected temperature, spin speed, and error codes.
- Function Buttons (SoftTouch):
- Start/Pause: To start, pause, or resume a wash cycle.
- Delayed Start: To set a delayed start time for the wash cycle.
- Steam: Activates the steam function for selected programs.
- Spin: Adjusts the spin speed.
- Temp: Adjusts the wash temperature.
2. Loading Laundry
Open the washing machine door and load your laundry. Do not overload the machine; ensure there is enough space for the clothes to tumble freely. The maximum capacity is 12 kg.

Figure 5: Front view of the washing machine with the door open, revealing the spacious drum for laundry loading.
3. Adding Detergent
Pull out the detergent drawer and add the appropriate amount of detergent and fabric softener to the designated compartments. Refer to your detergent packaging for recommended dosages.
4. Program Selection
Turn the program dial to select the desired wash program. The available programs include:
- Cotton
- Eco 40-60
- Cotton Prewash
- Coloreds
- Quick 12'
- Quick 60'
- Jeans/Dark Clothes
- Duvets 40°C
- Easy Care
- Hand-/Delicate Wash
- Spin
- Rinse
- Allergy Smart
- Wool
- Off (Aus)
5. Adjusting Settings
After selecting a program, you can adjust the temperature, spin speed, or activate special functions like Steam or Delayed Start using the SoftTouch buttons on the control panel.
6. Starting the Cycle
Close the washing machine door firmly. Press the Start/Pause button to begin the wash cycle. The LED display will show the remaining time.
Maintenance
Regular maintenance ensures the longevity and optimal performance of your washing machine. Always unplug the appliance before performing any cleaning or maintenance.
1. Cleaning the Exterior
Wipe the exterior surfaces with a soft, damp cloth. Do not use abrasive cleaners or solvents.
2. Cleaning the Detergent Drawer
Periodically remove the detergent drawer and rinse it under running water to remove any detergent residue. Clean the housing of the drawer with a brush.
3. Cleaning the Drum
Run a maintenance wash cycle (e.g., Cotton 90°C) with no laundry and a descaling agent or washing machine cleaner every few months to prevent odor and limescale buildup.
4. Cleaning the Pump Filter
The pump filter should be cleaned regularly to prevent blockages. Locate the filter at the bottom front of the machine, open the cover, drain any residual water, and then unscrew and clean the filter.
Troubleshooting
Before contacting customer service, please refer to the following common issues and their solutions.
| Problem | Possible Cause | Solution |
|---|---|---|
| Washing machine does not start. | Power cord not plugged in; door not closed properly; program not selected; Start/Pause button not pressed. | Check power connection; ensure door is securely closed; select a program; press Start/Pause. |
| Excessive vibration during spin cycle. | Transport bolts not removed; machine not level; uneven laundry load. | Ensure transport bolts are removed; adjust leveling feet; redistribute laundry inside the drum. |
| Water leakage. | Hoses not properly connected; detergent drawer overflowing; pump filter clogged. | Check hose connections; do not overfill detergent drawer; clean pump filter. |
| No water intake. | Water tap closed; inlet hose kinked; water pressure too low. | Open water tap; straighten inlet hose; check household water pressure. |
Specifications
Detailed technical specifications for the SHARP ES-NFB214CWDA-DE Washing Machine.
| Specification | Value |
|---|---|
| Model Number | ES-NFB214CWDA-DE |
| Brand | SHARP |
| Capacity | 12 kg |
| Maximum Spin Speed | 1400 rpm |
| Energy Efficiency Class | A (A to G scale) |
| Annual Energy Consumption | 43 kWh |
| Annual Water Consumption | 51 L (per 100 cycles for Eco 40-60 program) |
| Noise Emission (Spin) | 77 dB |
| Dimensions (D x W x H) | 63.2 x 59.7 x 84.5 cm |
| Installation Type | Freestanding |
| Number of Programs | 15 |
| Special Features | Hygiene Steam, Advanced Inverter Motor, AllergySmart, AquaStop, DoubleJet |
| Voltage | 220 Volt |
| Color | White |

Figure 6: Energy Label for the SHARP ES-NFB214CWDA-DE, highlighting its energy efficiency and consumption data.
For more detailed product information, please refer to the EPREL database.
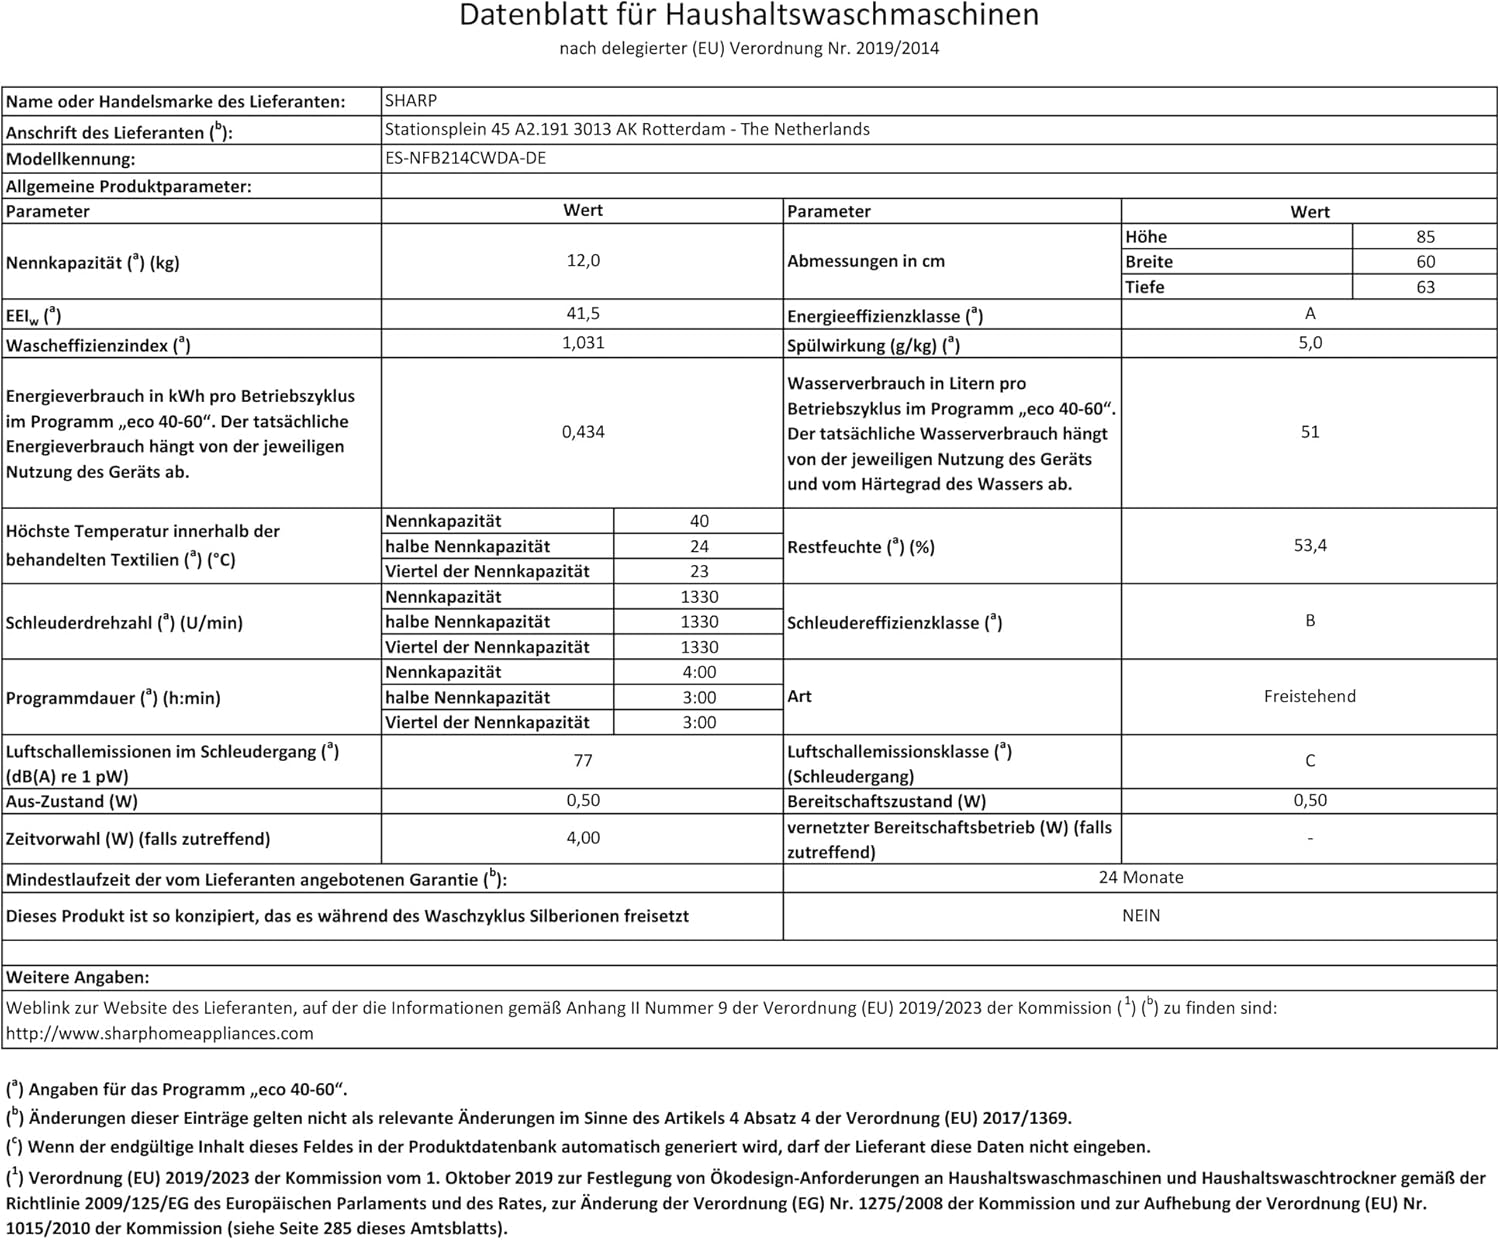
Figure 7: Product data sheet providing comprehensive technical parameters and compliance information.
Warranty and Support
Warranty Information
Your SHARP ES-NFB214CWDA-DE Washing Machine comes with a standard manufacturer's warranty of 24 months from the date of purchase. This warranty covers defects in materials and workmanship under normal use. Please retain your proof of purchase for warranty claims.
Customer Support
For technical assistance, spare parts, or warranty claims, please contact SHARP customer support. You can find more information and contact details on the official SHARP website or through the SHARP Brand Store on Amazon.


