
GATEXPERT GT2200
GATEXPERT Sliding Automatic Gate Opener Kit Instruction Manual
Model: GT2200
Brand: GATEXPERT
1. Introduction
This manual provides comprehensive instructions for the installation, operation, and maintenance of your GATEXPERT GT2200 Sliding Automatic Gate Opener Kit. This system is designed for enhancing security and convenience for sliding gates up to 40 feet long and weighing up to 2200 lbs. Please read this manual thoroughly before installation and operation to ensure proper function and safety.
2. Safety Information
WARNING: Improper installation or use can lead to serious injury or property damage. Always follow all safety precautions and instructions.
- Ensure all electrical connections comply with local codes and regulations.
- Keep hands and feet clear of the gate and opener mechanism during operation.
- Do not allow children to play with or operate the gate opener or its remote controls.
- Regularly inspect the gate and opener for signs of wear, damage, or misalignment.
- The infrared photocell sensor is a critical safety feature; ensure it is installed and functioning correctly to prevent the gate from closing on obstructions.
- In case of power failure, use the manual release key to operate the gate.

3. Product Overview and Components
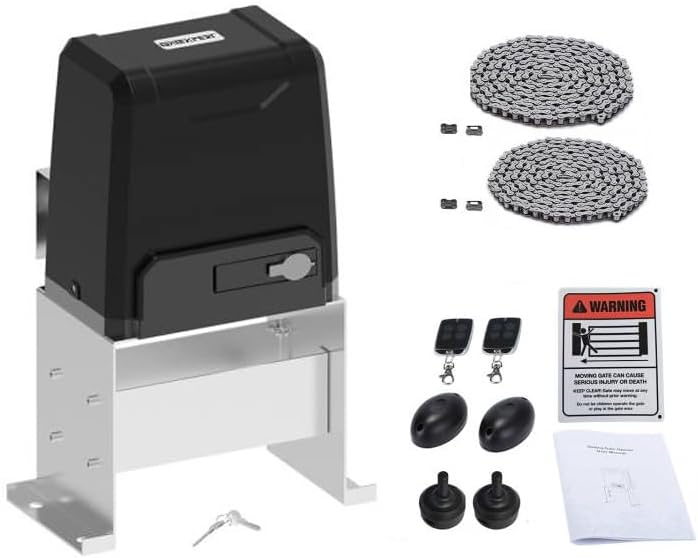
The GATEXPERT GT2200 kit includes the main gate opener unit and essential accessories for installation and operation.
Main Components:
- Gate Opener Unit: The primary motor and control housing.
- Remote Controls (x2): For wireless operation of the gate.
- Infrared Photocell Sensor: Safety device to detect obstructions.
- Drive Chain (20ft): Connects the opener to the gate. Can be shortened or lengthened with compatible chain.
- Mounting Hardware: Bolts, nuts, and brackets for installation.
- Warning Sign: For placement near the gate to alert users of automatic operation.


4. Specifications
| Feature | Specification |
|---|---|
| Max Gate Weight | 2200 lbs (1000 kg) |
| Max Gate Length | 40 feet (12 meters) |
| Chain Length Included | 20 feet (6 meters) |
| Remote Control Mode | Single button (OPEN/STOP/CLOSE/STOP cycle), Pedestrian mode |
| Max Remotes Supported | 25 |
| Automatic Close Function | Adjustable (12, 24, 36 seconds) or disabled |
| Control Board Features | Soft start and slow stop |
| Item Weight | 48 pounds |
| Product Dimensions | 13.4 x 9.3 x 20.1 inches (340mm x 237mm x 510mm) |
| Color | Black |

5. Setup and Installation
Careful installation is crucial for the safe and efficient operation of your gate opener. Professional installation is recommended.
5.1 Site Preparation
- Ensure the gate slides smoothly and is properly aligned before installing the opener.
- Prepare a stable, level concrete pad or foundation for mounting the opener unit.
- Ensure access to a suitable power supply (AC 110V/60Hz or as per local requirements).
5.2 Mounting the Opener Unit
- Position the opener unit on the prepared foundation, ensuring the drive sprocket aligns with the gate's chain path.
- Secure the unit firmly using the provided mounting hardware.
5.3 Installing the Drive Chain
- Attach the drive chain to the gate, ensuring it is taut but not overly tight, allowing for smooth movement.
- The included chain is 20ft long. If your gate requires a longer chain, ensure to use the same type of chain for extension. If shorter, remove excess links.
5.4 Wiring and Electrical Connections
- Connect the power supply to the control board inside the opener unit. Refer to the wiring diagram provided in the separate detailed wiring manual (if applicable).
- Install the infrared photocell sensor on both sides of the gate opening, ensuring they are aligned and connected to the control board as per instructions. This is a crucial safety device.
5.5 Limit Switch Adjustment
- Adjust the limit switches to define the gate's fully open and fully closed positions. This prevents the gate from over-traveling.
6. Operating Instructions
Your GATEXPERT GT2200 gate opener offers convenient and secure operation.
6.1 Remote Control Operation
- The remote control operates in a single-button mode for the main gate function. Pressing the same button cycles through OPEN → STOP → CLOSE → STOP.
- The remote also features a dedicated button for pedestrian mode, allowing the gate to open partially for foot traffic.
- Up to 25 remote controls can be programmed to the system. Refer to the programming section in the detailed manual for adding or removing remotes.
6.2 Automatic Close Function
- The gate can be configured to close automatically after a set period.
- Auto-close times can be set to 12, 24, or 36 seconds. This function can also be disabled.
- Consult the control board settings section in the detailed manual to adjust this feature.
6.3 Infrared Photocell Sensor Function
- During the closing process, if the infrared beam of the photocell sensor is interrupted by an obstruction, the gate will immediately reverse and open.
- This feature is designed to protect users and property from being struck by the moving gate. Ensure the sensors are clean and unobstructed.
6.4 Soft Start and Slow Stop
- The intelligent control board incorporates soft start and slow stop functions. This means the gate begins and ends its movement gradually, reducing wear and tear on the motor and extending the life of the gate opener.
7. Maintenance
Regular maintenance ensures the longevity and reliable operation of your gate opener.
- Monthly: Inspect the gate for smooth movement, ensuring no binding or excessive friction. Check the drive chain for proper tension and lubricate if necessary.
- Quarterly: Clean the infrared photocell sensors to ensure their beams are not obstructed by dirt, dust, or spiderwebs. Test the safety reversal mechanism by intentionally breaking the beam during closing.
- Annually: Check all mounting hardware for tightness. Inspect electrical wiring for any signs of wear or damage. Lubricate all moving parts of the gate and opener as recommended by the gate manufacturer.
- Keep the area around the gate opener clear of debris and vegetation.
8. Troubleshooting
Refer to the table below for common issues and their potential solutions.
| Problem | Possible Cause | Solution |
|---|---|---|
| Gate does not respond to remote. | Dead remote battery, remote out of range, remote not programmed, power outage. | Replace remote battery, move closer to opener, reprogram remote, check power supply. |
| Gate opens but does not close. | Photocell sensor obstructed or misaligned, limit switch issue. | Clear and align photocell sensors, check limit switch settings. |
| Gate stops unexpectedly during operation. | Obstruction detected by safety sensor, motor overheating, mechanical binding. | Check for obstructions, allow motor to cool, inspect gate for smooth movement. |
| Gate moves slowly or with difficulty. | Insufficient lubrication, worn chain, gate binding. | Lubricate chain and gate rollers, inspect chain for wear, check gate alignment. |
| No power to the unit. | Circuit breaker tripped, power cord disconnected. | Check circuit breaker, ensure power cord is securely plugged in. |
If you encounter issues not listed here or if solutions do not resolve the problem, please contact customer support.
9. Warranty and Support
GATEXPERT products are manufactured to high-quality standards and are backed by a manufacturer's warranty. Please refer to the warranty card included with your product for specific terms and conditions.
For technical assistance, troubleshooting, or parts inquiries, please contact GATEXPERT customer support through the retailer where you purchased the product or visit the official GATEXPERT website for contact information.
Online Resources: Visit the GATEXPERT Store on Amazon
Related documentsGT2200


Ask a question about this manual
Ask about setup, troubleshooting, compatibility, parts, safety, or missing instructions. Manuals+ will review the question and use this page’s manual context to help answer it.