1. Introduction
Thank you for choosing the CHAOKE Magnetic Resistance Stationary Exercise Bike, Model 8704-2. This manual contains important information regarding the safe assembly, operation, and maintenance of your exercise bike. Please read it thoroughly before first use and retain it for future reference.
This exercise bike is designed for indoor use to provide a full-body cardio workout with magnetic resistance, a silent belt drive, and an LCD monitor for tracking progress.

Image 1.1: Overview of the CHAOKE Magnetic Resistance Stationary Exercise Bike.
2. Safety Information
Please observe the following safety precautions before using the exercise bike:
- Consult a physician before starting any new exercise program.
- Ensure all bolts and nuts are securely tightened before each use.
- Place the exercise bike on a flat, stable surface. Use a mat underneath to protect flooring.
- Keep children and pets away from the equipment during operation.
- Wear appropriate exercise attire and footwear. Avoid loose clothing that could get caught in moving parts.
- The maximum user weight capacity for this bike is 330 pounds (approximately 150 kg).
- Use the emergency brake knob to stop the flywheel immediately if necessary.
- Stop exercising immediately if you feel faint, dizzy, or experience pain.

Image 2.1: The exercise bike features a robust frame designed to support up to 330 lbs, ensuring stability during use.
3. Package Contents
The CHAOKE Exercise Bike is approximately 70% pre-assembled. Please verify that all components are present before beginning assembly. Tools required for assembly are included.
- Main Frame (pre-assembled with flywheel and belt drive)
- Front Stabilizer
- Rear Stabilizer
- Seat Post and Seat
- Handlebar Post and Handlebars
- Left and Right Pedals
- LCD Monitor
- Tablet Holder
- Hardware Kit (bolts, washers, nuts, tools)
- User Manual
4. Assembly Instructions
Assembly typically takes around 30 minutes. Follow these steps carefully:
- Attach Stabilizers: Secure the front and rear stabilizers to the main frame using the provided bolts and washers. Ensure they are firmly attached for stability.
- Install Pedals: Identify the left (L) and right (R) pedals. The left pedal screws counter-clockwise, and the right pedal screws clockwise. Ensure they are tightened securely to prevent loosening during use.
- Mount Seat: Insert the seat post into the main frame and adjust to your desired height. Secure with the adjustment knob. Attach the seat to the seat post.
- Attach Handlebars: Insert the handlebar post into the main frame. Attach the handlebars to the post and secure them.
- Connect LCD Monitor: Attach the LCD monitor to the handlebar assembly. Connect the sensor wires from the main frame to the monitor.
- Insert Batteries: The LCD monitor requires 2 AA batteries (included). Insert them into the battery compartment.
- Final Check: Double-check all connections and ensure all bolts are tightened.
5. Operating Instructions
5.1. Using the LCD Monitor
The digital monitor tracks and displays your exercise data in real-time:
- Time: Duration of your workout.
- Speed: Current cycling speed.
- Distance: Total distance covered during the workout.
- Calories: Estimated calories burned.
- Pulse: Heart rate (if equipped with pulse sensors).
- Odometer: Total accumulated distance.
Press the MODE button to cycle through display functions. Hold the MODE button to reset values (except Odometer).

Image 5.1: The multi-grip handlebar design and integrated LCD monitor for tracking workout data.
5.2. Adjusting Resistance
The bike features magnetic resistance, which is adjusted via a knob located on the main frame. Turn the knob clockwise to increase resistance and counter-clockwise to decrease it. This allows for a range of intensity from 0% (warm-up) to 100% (muscle stabilization).
To engage the emergency brake, press the resistance knob down firmly. This will bring the flywheel to an immediate stop.

Image 5.2: The resistance knob allows for micro-adjustments and functions as an emergency stop when pressed down.
5.3. Tablet Mount
A tablet mount is integrated into the handlebar assembly, allowing you to place your device for entertainment or guided workouts during your session.
6. Adjustments
Proper adjustment of the bike ensures comfort and effectiveness during your workout.
- Seat Height: Loosen the adjustment knob on the seat post, raise or lower the seat to the desired height, and re-tighten the knob. Your knees should have a slight bend at the bottom of the pedal stroke.
- Seat Position (Forward/Backward): Loosen the horizontal adjustment knob beneath the seat, slide the seat forward or backward, and re-tighten.
- Handlebar Height: Loosen the adjustment knob on the handlebar post, raise or lower the handlebars, and re-tighten.
- Pedal Straps: Adjust the straps on the toe-caged pedals to secure your feet firmly.
Recommended User Height: 4.9 ft - 6.4 ft (150 cm - 195 cm).

Image 6.1: Illustration of adjustable seat and handlebar heights to accommodate various user sizes.
7. Maintenance
Regular maintenance helps ensure the longevity and safe operation of your exercise bike.
- Cleaning: Wipe down the bike with a damp cloth after each use to remove sweat and dust. Avoid abrasive cleaners.
- Check Connections: Periodically check all bolts, nuts, and adjustment knobs to ensure they are tight.
- Belt Drive: The belt drive system is designed to be maintenance-free and quiet. No lubrication or adjustment is typically required.
- Lubrication: No regular lubrication is needed for the magnetic resistance or belt drive system.
- Storage: Store the bike in a dry, cool place away from direct sunlight and extreme temperatures. The integrated transport wheels allow for easy relocation.
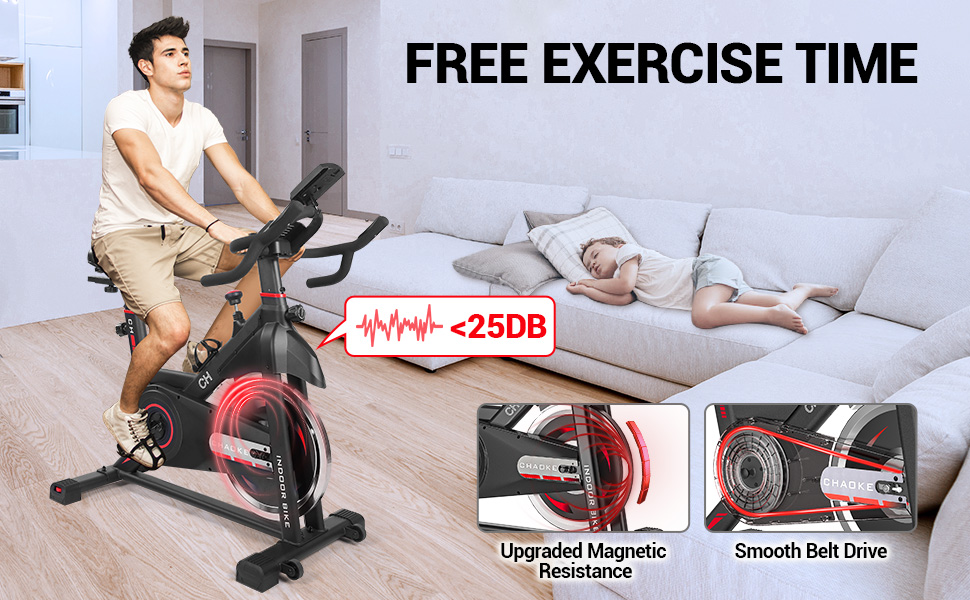
Image 7.1: The bike features an upgraded magnetic resistance system and a smooth, quiet belt drive for minimal noise during operation.

Image 7.2: Detailed view of the durable and smooth belt drive system, designed for quiet operation and minimal maintenance.
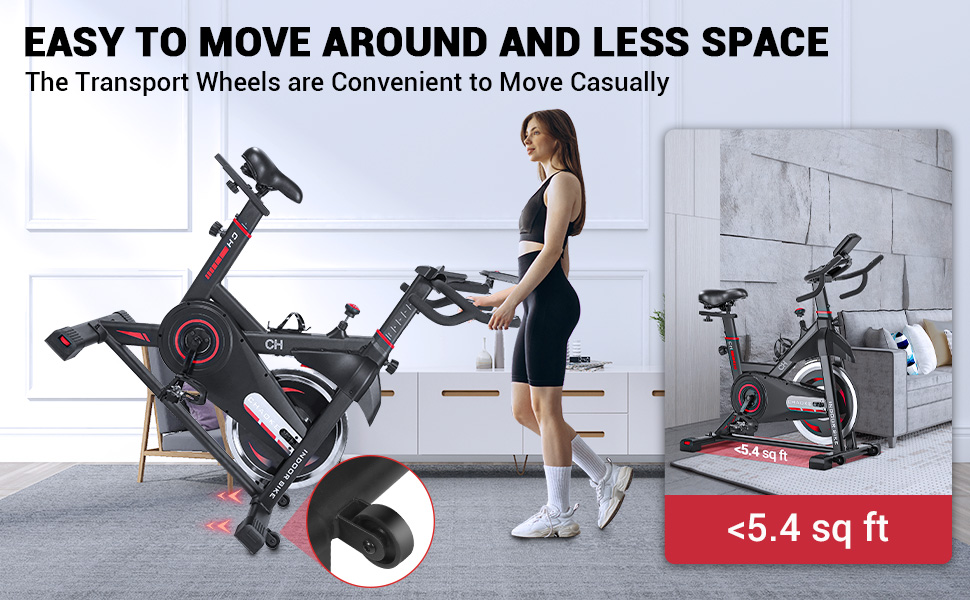
Image 7.3: The exercise bike is equipped with transport wheels for convenient movement and storage, requiring less than 5.4 sq ft of space.
8. Troubleshooting
If you encounter any issues with your CHAOKE Exercise Bike, refer to the following common problems and solutions:
| Problem | Possible Cause | Solution |
|---|---|---|
| LCD Monitor not displaying data | Batteries are dead or incorrectly installed; Sensor wire disconnected. | Replace batteries (2 AA). Check battery orientation. Ensure sensor wire is securely connected to the monitor and main frame. |
| Bike feels unstable or wobbles | Stabilizers not tightened; Bike on uneven surface. | Ensure all bolts on stabilizers are tight. Adjust the leveling feet on the stabilizers. Move the bike to a flat surface. |
| Pedals feel loose or make noise | Pedals not tightened correctly. | Re-tighten pedals. Remember the left pedal tightens counter-clockwise, and the right pedal tightens clockwise. |
| Resistance not changing | Resistance mechanism issue. | Ensure the resistance knob is turning freely. If the issue persists, contact customer service. |
For issues not listed here or if troubleshooting steps do not resolve the problem, please contact CHAOKE customer service.
9. Specifications
| Feature | Specification |
|---|---|
| Model Name | 8704-2 |
| Brand | CHAOKE |
| Resistance Mechanism | Magnetic |
| Drive System | Belt |
| Material | Alloy Steel |
| Product Dimensions (L x W x H) | 90 x 50 x 115 cm (35.4 x 19.7 x 45.3 inches) |
| Item Weight | 30 kg (66 lbs) |
| Maximum Weight Capacity | 330 Pounds (150 kg) |
| Recommended User Height | 4.9 ft - 6.4 ft (150 cm - 195 cm) |
| Display Type | LCD |
| Monitor Metrics | Calories Burned, Distance, Heart Rate, Speed, Time, Odometer |
| Power Source (Monitor) | Battery Powered (2 AA batteries included) |
| Special Features | Adjustable Seat, Adjustable Handlebars, Tablet Holder, Transport Wheels |
10. Warranty and Support
CHAOKE provides a 12-month warranty for this exercise bike. If you have any questions, concerns, or require assistance with your product, please contact CHAOKE customer service. All inquiries typically receive a response within 12 hours.
Please retain your proof of purchase for warranty claims.


