1. Introduction
This manual provides detailed instructions for the installation, operation, and maintenance of your AVATTO Smart WiFi Programmable Thermostat. This device is designed to regulate room temperature for water-based underfloor heating systems, offering smart control via a mobile application and voice commands. Please read this manual thoroughly before installation and use.
2. Product Overview
The AVATTO Smart WiFi Programmable Thermostat is an advanced device for managing your underfloor heating system. It offers a range of features for comfort and energy efficiency:
- Smart Control: Remote operation via the "Smart Life" or "Tuya Smart" mobile applications.
- Voice Assistant Compatibility: Supports voice commands through Amazon Alexa and Google Home.
- Programmable Modes: Features Manual mode and a flexible Programming mode (5+2, 6+1, or 7-day settings with 6 different temperature periods per day, and 2 for weekends).
- Temperature Calibration: Allows adjustment for precise temperature readings.
- Adjustable Display: Three levels of screen brightness for optimal visibility.
- Accurate Sensing: Integrated NTC temperature sensors ensure precise room temperature regulation.
- Safety Features: Includes Child Safety Lock, Power-off Memory, and Anti-freeze Function.
- Technical Specifications: Operates within a 5°C to 70°C temperature range with ±0.5°C accuracy. Power supply is 100-240 VAC, 50/60 Hz, 3A, 1200W. Connects via 2.4 GHz Wi-Fi.

Image 2.1: The AVATTO Smart WiFi Thermostat display alongside a smartphone showing the control app and miniature voice assistant devices.

Image 2.2: Overview of the AVATTO Smart WLAN Water Underfloor Heating Thermostat's key features, including APP Control, Voice Control, High-efficiency, Flame Retardant Material, and 2.4G WiFi connectivity.

Image 2.3: Detailed view of the intelligent digital LCD touchscreen, with labels indicating Time, Room Temperature, Heating Display, Child Lock, Set Temperature, Automatic Mode, Weekday, Mode Setting, and temperature adjustment buttons.
3. Setup
3.1 Physical Installation
The thermostat is designed for wall mounting. Ensure you have a suitable wall mounting box for installation.

Image 3.1: Dimensions of the AVATTO Thermostat (86mm x 86mm front, 50mm x 50mm rear mounting) and examples of compatible round and square wall mounting boxes.
3.2 Wiring Instructions
Warning: Electrical installation should be performed by a qualified professional. Ensure power is disconnected before wiring.
Connect the thermostat according to the diagrams below. The WT300-WH-3A model is designed for 3A water underfloor heating systems.

Image 3.2: The AVATTO Thermostat display with an inset diagram illustrating its connection to an underfloor heating manifold and a 3A actuator.

Image 3.3: Wiring diagram for the WT300-WH-3A model, showing connections for Neutral (N), Live (L), and Normally Closed (NC) or Normally Open (NO) actuators. An accompanying app screenshot demonstrates how to switch between NC and NO output modes.
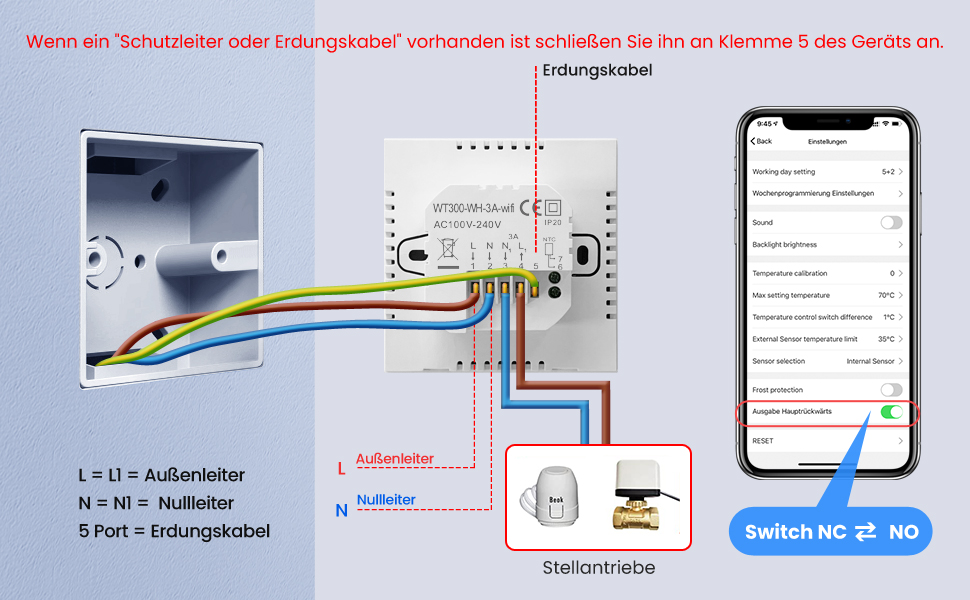
Image 3.4: Comprehensive wiring diagram for the thermostat, indicating Live (L), Neutral (N), and Ground (Port 5) connections. It also shows the connection points for actuators.
3.3 App Connection (Smart Life / Tuya Smart)
- Download the "Smart Life" or "Tuya Smart" app from your mobile device's app store.
- Register or log in to your account.
- On the thermostat, press and hold the '-' button for 5-10 seconds to activate the Wi-Fi signal. The Wi-Fi icon on the display will flash.
- In the app, follow the instructions to add a new device. Select "Thermostat" or a similar heating control device.
- Ensure your phone is connected to a 2.4 GHz Wi-Fi network.
- Follow the in-app prompts to connect the thermostat to your Wi-Fi network.
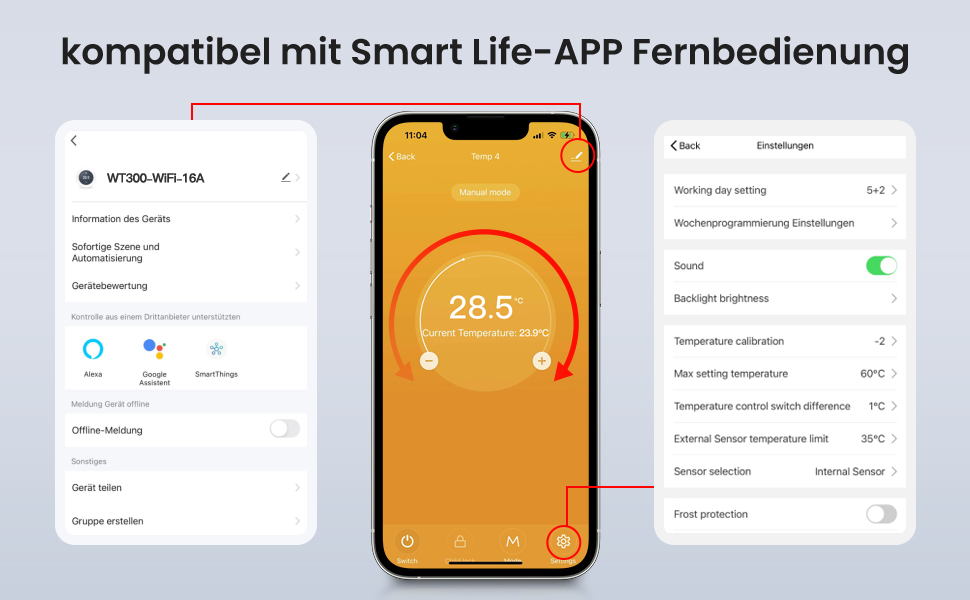
Image 3.5: Screenshots of the Smart Life app interface, demonstrating device information, settings, and options for third-party control like Alexa and Google Assistant.
4. Operating Instructions
4.1 Basic Operation
- Power On/Off: Press the power button (U) to turn the thermostat on or off.
- Temperature Adjustment: Use the '+' and '-' buttons to manually increase or decrease the set temperature.
4.2 Mode Selection
Press the 'M' button to switch between Manual Mode and Programming Mode.
- Manual Mode: The thermostat maintains the set temperature until manually changed.
- Programming Mode: The thermostat follows a pre-set schedule.
4.3 Programming Schedule
In Programming Mode, you can set a schedule for 5+2 days (weekdays + weekend), 6+1 days (Mon-Sat + Sunday), or 7 days (individual days). Each day allows for 6 different temperature settings, with weekends typically having 2 settings.
Refer to the Smart Life/Tuya Smart app for detailed instructions on setting up your personalized heating schedule.
4.4 Advanced Settings
- Temperature Calibration: If there is a difference between the actual room temperature and the thermostat's display, you can adjust it via the app settings (e.g., -2°C to +2°C).
- Screen Brightness: Adjust the display brightness through the app.
- Child Lock: Activate the child safety lock to prevent unauthorized changes to settings.
- Frost Protection: This function prevents the temperature from dropping below a certain threshold, protecting pipes from freezing.
- Temperature Hysteresis: Set the temperature difference (0.5°C to 10°C) before the heating activates or deactivates.
- Temperature Limits: Configure upper and lower temperature limits (15°C to 95°C).

Image 4.1: The AVATTO Thermostat display illustrating precise temperature control settings, including minimum temperature setting (0.5°C), temperature hysteresis (0.5~10°C), and upper/lower temperature limits (15°C~95°C).
4.5 Voice Control
The thermostat is compatible with Amazon Alexa and Google Home for convenient voice control.
- Ensure your thermostat is linked to your Alexa or Google Home account via the Smart Life/Tuya Smart app.
- Use commands such as:
- "Alexa, set the thermostat to 23 degrees."
- "Hey Google, what is the temperature in the living room?"
- "Alexa, turn on the heating."

Image 4.2: The AVATTO Thermostat display alongside logos for Amazon Alexa and Google Home, demonstrating a voice command example: "Alexa, Please set the thermostat to 23°F" and the response "OK".

Image 4.3: The AVATTO Thermostat display with a person using the Smart Life app on a phone in a snowy outdoor setting, illustrating remote control capabilities.
5. Maintenance
To ensure optimal performance and longevity of your AVATTO Thermostat, follow these general maintenance guidelines:
- Cleaning: Regularly wipe the screen and exterior with a soft, dry cloth. Avoid using abrasive cleaners or solvents, as these can damage the display and casing.
- Avoid Obstructions: Ensure that the thermostat's sensors are not covered or obstructed by furniture, curtains, or other objects, as this can affect temperature readings.
- Environmental Conditions: Keep the thermostat away from direct sunlight, drafts, and heat sources that could interfere with its temperature sensing.
No specific user-serviceable parts are inside. Do not attempt to disassemble the unit.
6. Troubleshooting
If you encounter issues with your AVATTO Smart WiFi Programmable Thermostat, please refer to the following common problems and solutions:
| Problem | Possible Cause | Solution |
|---|---|---|
| Thermostat does not power on. | No power supply; incorrect wiring. | Check the main power supply. Verify wiring connections according to Section 3.2. Consult a qualified electrician if unsure. |
| Wi-Fi connection fails or is unstable. | Incorrect Wi-Fi password; 5GHz network used; thermostat too far from router; Wi-Fi signal not activated. | Ensure correct 2.4 GHz Wi-Fi network and password. Move thermostat closer to router. Activate Wi-Fi signal by holding '-' button for 5-10 seconds. |
| Heating does not turn on/off as expected. | Incorrect mode (Manual/Program); schedule not set correctly; actuator wiring issue; temperature calibration needed. | Check the operating mode. Review your programmed schedule in the app. Verify actuator wiring. Adjust temperature calibration in app settings. |
| Inaccurate room temperature reading. | Sensor obstruction; thermostat placed in a draft or near a heat source; calibration needed. | Ensure sensors are clear. Relocate thermostat if necessary. Use the temperature calibration feature in the app. |
| Voice control not responding. | Thermostat not linked to Alexa/Google Home; incorrect commands; internet connectivity issue. | Verify thermostat is linked in the Smart Life/Tuya Smart app and then in Alexa/Google Home app. Use correct voice commands. Check internet connection. |
If the problem persists after attempting these solutions, please contact AVATTO customer support for further assistance.
7. Specifications
| Feature | Detail |
|---|---|
| Brand | AVATTO |
| Model Number | WT300-WH-3A |
| Color | Silver |
| Dimensions (L x W x H) | 10 x 8 x 6 cm |
| Weight | 170 g |
| Power | 1200 Watts |
| Voltage | 100-240 VAC, 50/60 Hz |
| Current | 3A |
| Material | Plastic |
| Connectivity Technology | Wi-Fi 2.4 GHz |
| Temperature Control Type | Heating |
| Temperature Range | 5°C ~ 70°C |
| Temperature Accuracy | ±0.5°C |
| Controller Type | Amazon Alexa, Google Home |
| Special Features | Voice control, App control, Programmable, Child lock, Anti-freeze function, Temperature compensation, Temperature difference control |
| Components Included | 1 thermostat, 2 mounting screws, user manual |
8. Warranty and Support
AVATTO provides customer support for its products. If you encounter any issues with the device, such as unavailability or difficulties with cable connection, please contact AVATTO for assistance.
For support, please refer to the contact information provided with your product packaging or visit the official AVATTO website.


