
AsperX AX4500
ASPERX AX4500 Jump Starter User Manual
Model: AX4500 | Brand: AsperX
1. Introduction
This manual provides essential information for the safe and effective operation, maintenance, and troubleshooting of your ASPERX AX4500 Jump Starter. Please read this manual thoroughly before using the device to ensure proper function and to prevent damage or injury.

Figure 1.1: The ASPERX AX4500 Jump Starter, including the main unit, jumper cables, and protective carrying case.
2. Safety Information
Always observe the following safety precautions to avoid electric shock, explosion, fire, or damage to the device or vehicle.
- Do not disassemble, modify, or repair the unit.
- Do not expose the unit to rain or water.
- Do not operate the unit if it has been dropped or damaged.
- Ensure proper polarity when connecting to a vehicle battery. Incorrect connection can cause sparks or damage.
- Keep out of reach of children.
- Use the device in a well-ventilated area.
- Avoid short-circuiting the jumper clamps.
- The device is designed to operate within a temperature range of -4°F to 140°F (-20°C to 60°C).

Figure 2.1: The AX4500 incorporates multiple intelligent protection features to ensure safe operation, including spark-proof technology and reverse polarity protection.
3. Package Contents
Verify that all items are present in the package:
- ASPERX AX4500 Jump Starter Unit
- Heavy-Duty Jumper Cables with Smart Clamps
- Type-C Charging Cable
- Cigarette Lighter Adapter
- Protective EVA Carrying Case
- User Manual (this document)

Figure 3.1: The durable EVA carrying case provides protection and organized storage for the jump starter and its accessories.
4. Product Overview
The ASPERX AX4500 is a versatile device integrating multiple functions:
- Car Emergency Start: Provides 4500A peak current to start 12V vehicles, including all gas engines and diesel engines up to 10.0L.
- Flashlight: Built-in LED light for illumination.
- Mobile Device Charging: USB output ports for charging smartphones, tablets, and other portable electronics.
- DC Output Power Supply: For powering 12V devices.
- Type-C PD30W Input/Output: Fast charging for the unit and other devices.
- 4-inch LCD Display: Provides clear indication of operation status and power level.
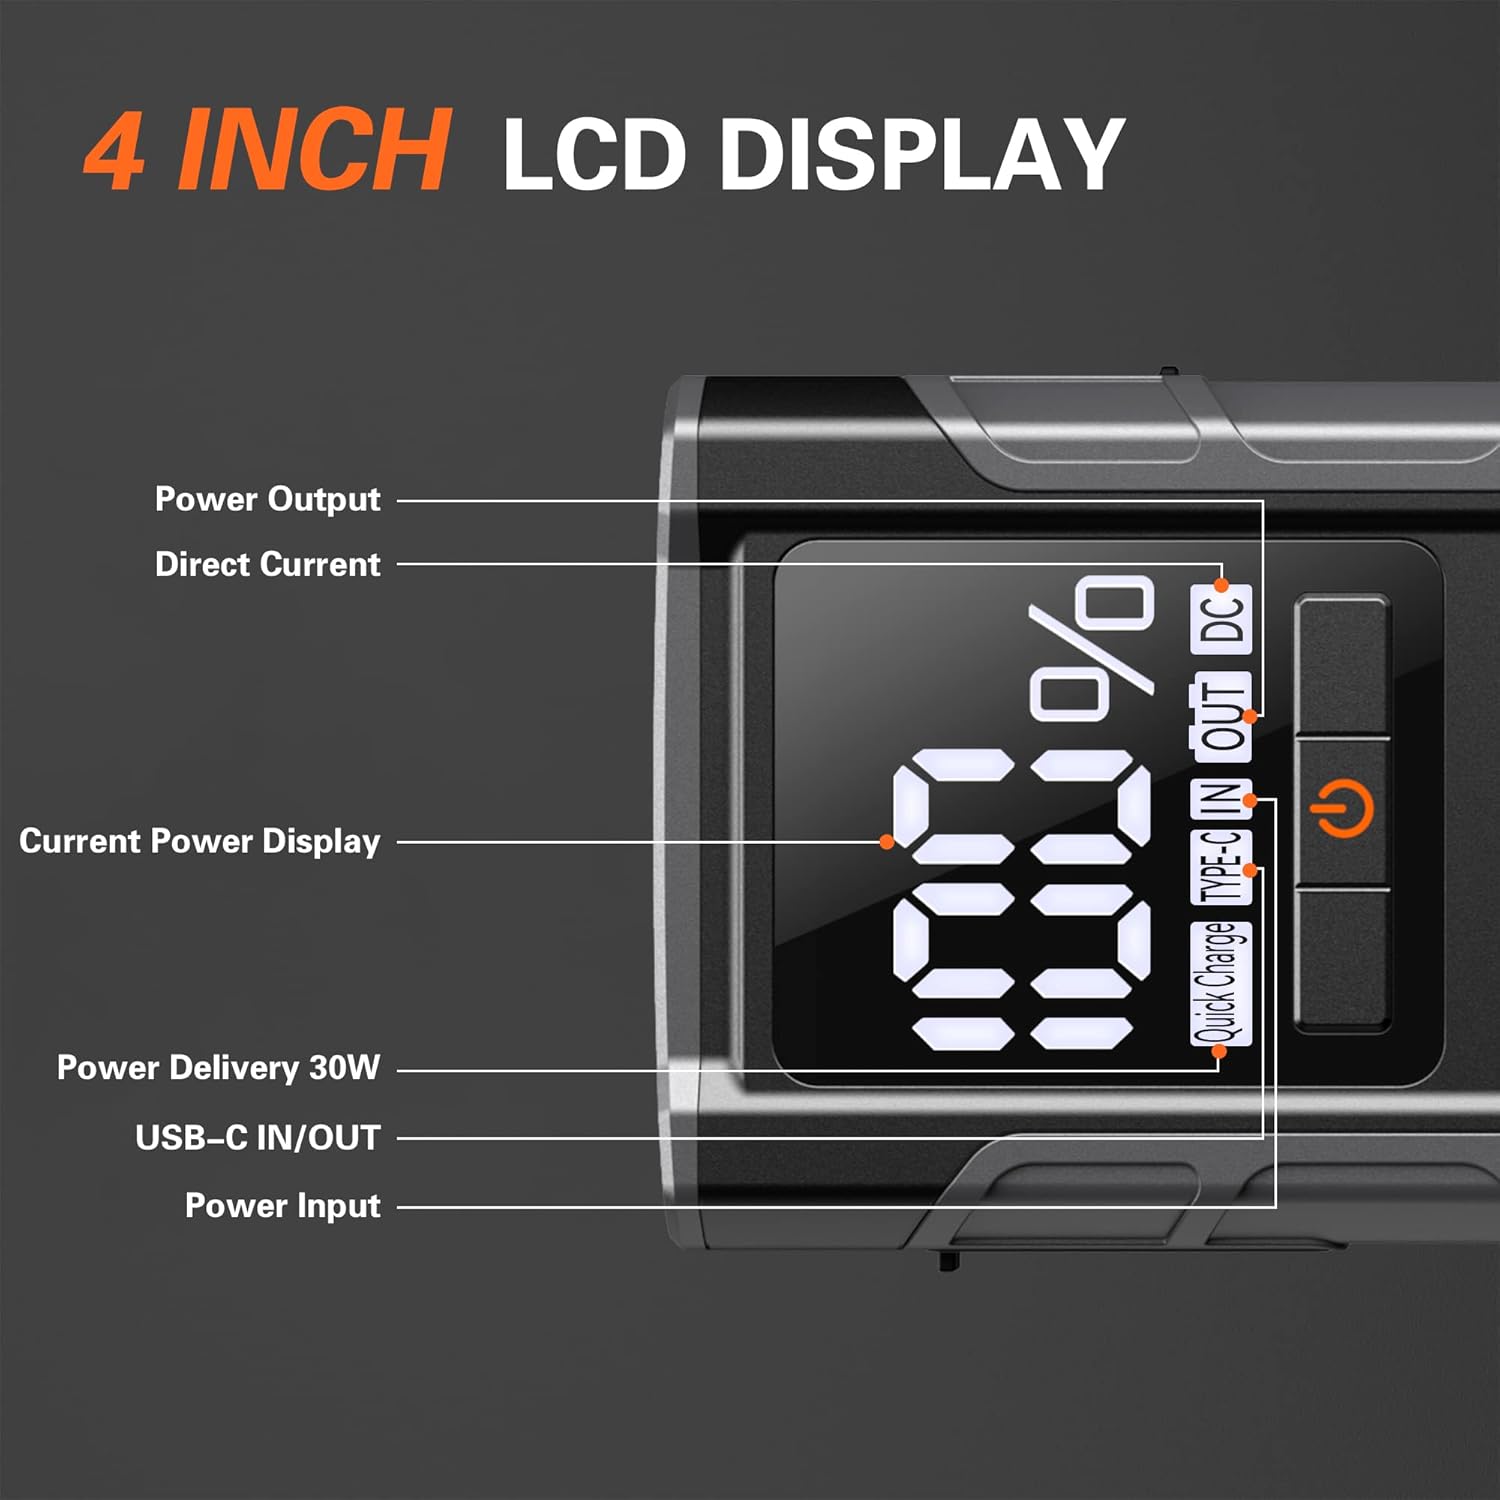
Figure 4.1: The 4-inch LCD display shows the current power level and operational status. The unit features various input/output ports for versatile use.
5. Setup
Before first use, ensure the jump starter is fully charged.
- Charge the Jump Starter: Connect the Type-C charging cable to the unit's Type-C input port and a suitable USB power adapter (not included). The LCD display will show the charging progress. Charge until the display indicates 100%.
- Inspect Components: Before each use, inspect the jump starter unit, jumper cables, and clamps for any damage, corrosion, or wear. Do not use if any damage is observed.
6. Operating Instructions: Jump Starting a Vehicle
Follow these steps carefully to jump start a 12V vehicle:
- Prepare the Vehicle: Ensure the vehicle's ignition is off and all accessories (lights, radio, A/C) are turned off. Engage the parking brake.
- Connect Jumper Cables to Jump Starter: Insert the blue plug of the smart jumper cables into the 12V jump start output port on the ASPERX AX4500 unit. Ensure a firm connection.
- Connect Clamps to Vehicle Battery:
- Connect the red (+) clamp to the positive (+) terminal of the vehicle's battery.
- Connect the black (-) clamp to the negative (-) terminal of the vehicle's battery.
- Initiate Jump Start: Once connected correctly, the jump starter is ready. If the vehicle battery is extremely low (below 0V), press the "BOOST" button on the jump starter to force a restart.
- Start the Vehicle: Turn the vehicle's ignition key to start the engine. If the engine does not start immediately, wait 30 seconds before attempting again. Do not crank for more than 3 seconds per attempt.
- Disconnect Clamps: Once the vehicle starts, immediately disconnect the black (-) clamp from the vehicle battery, followed by the red (+) clamp. Then, disconnect the jumper cable plug from the jump starter unit.
Allow the vehicle's engine to run for a few minutes to recharge its battery.

Figure 6.1: Proper connection of the ASPERX AX4500 to a vehicle battery for jump starting. The unit provides sufficient power for a wide range of vehicles.
7. Charging the ASPERX AX4500 Unit
To ensure optimal performance, keep your AX4500 unit charged, especially before long periods of storage or before anticipated use.
- Connect the provided Type-C charging cable to the Type-C IN/OUT port on the jump starter.
- Connect the other end of the Type-C cable to a USB wall adapter (not included) or a car charger. The unit supports PD30W fast charging.
- The LCD display will show the charging status and current battery percentage. Charge until the display reads 100%.
- The unit can also charge mobile devices via its USB output ports.

Figure 7.1: The AX4500 can serve as a power bank, capable of quickly charging various mobile devices through its USB output ports.
8. Maintenance and Storage
Proper maintenance ensures the longevity and reliability of your jump starter.
- Recharge Regularly: Recharge the unit every 3-6 months, even if not used, to maintain battery health.
- Clean the Unit: Wipe the unit and clamps with a dry, soft cloth after each use. Do not use harsh chemicals or abrasives.
- Storage: Store the jump starter in its protective EVA carrying case in a cool, dry place, away from direct sunlight and extreme temperatures.
- Temperature Range: Avoid storing or operating the unit outside its recommended temperature range of -4°F to 140°F (-20°C to 60°C).
9. Troubleshooting
If you encounter issues with your ASPERX AX4500, refer to the table below:
| Problem | Possible Cause | Solution |
|---|---|---|
| Unit does not turn on. | Battery is depleted. | Charge the unit fully. |
| Vehicle does not start. | Incorrect clamp connection. | Ensure clamps are connected to correct battery terminals (red to +, black to -). Check for secure connection. |
| Vehicle does not start. | Vehicle battery is severely discharged (below 0V). | Press the "BOOST" button on the jump starter. |
| Unit displays an error. | Reverse polarity, short circuit, or over-temperature. | Disconnect clamps, check connections, allow unit to cool if hot. Refer to safety features. |
10. Specifications
| Feature | Detail |
|---|---|
| Model | AX4500 |
| Peak Current | 4500A |
| Start Voltage | 12V |
| Engine Compatibility | All Gas Engines, up to 10.0L Diesel Engines |
| Number of Starts (approx.) | Up to 70 jump starts on a full charge |
| Input/Output (Type-C) | PD30W (Power Delivery 30W) |
| Display | 4-inch LCD |
| Operating Temperature | -4°F to 140°F (-20°C to 60°C) |
| Safety Protections | Over 10 types, including spark-proof, reverse polarity, over-current, over-temperature. |
11. Warranty and Support
For warranty information or technical support, please refer to the contact details provided with your product packaging or visit the official AsperX website. Keep your purchase receipt as proof of purchase for warranty claims.
Note: Product specifications and features are subject to change without prior notice.
Related documentsAX4500


Ask a question about this manual
Ask about setup, troubleshooting, compatibility, parts, safety, or missing instructions. Manuals+ will review the question and use this page’s manual context to help answer it.