
1. Product Overview
The DeWin MPPT Solar Charge Controller is designed to efficiently manage power flow from your solar panels to your battery bank. Utilizing advanced Maximum Power Point Tracking (MPPT) technology, it ensures your solar array operates at its peak efficiency, maximizing energy harvest. This controller supports 12V/24V automatic system voltage identification and is compatible with various battery types, including GEL, Sealed, Flooded, and Lithium batteries.

Figure 1: Front view of the DeWin MPPT Solar Charge Controller, showing the LCD display and control buttons.
Key features include intelligent control, multiple protection mechanisms, real-time monitoring of system parameters, and temperature sensitivity for optimized charging.

Figure 2: Overview of the controller's main features, including intelligent control, multiple protection, real-time monitoring, and temperature sensitivity.
2. Component Identification
Familiarize yourself with the various components and indicators of the MPPT solar charge controller for proper operation and troubleshooting.
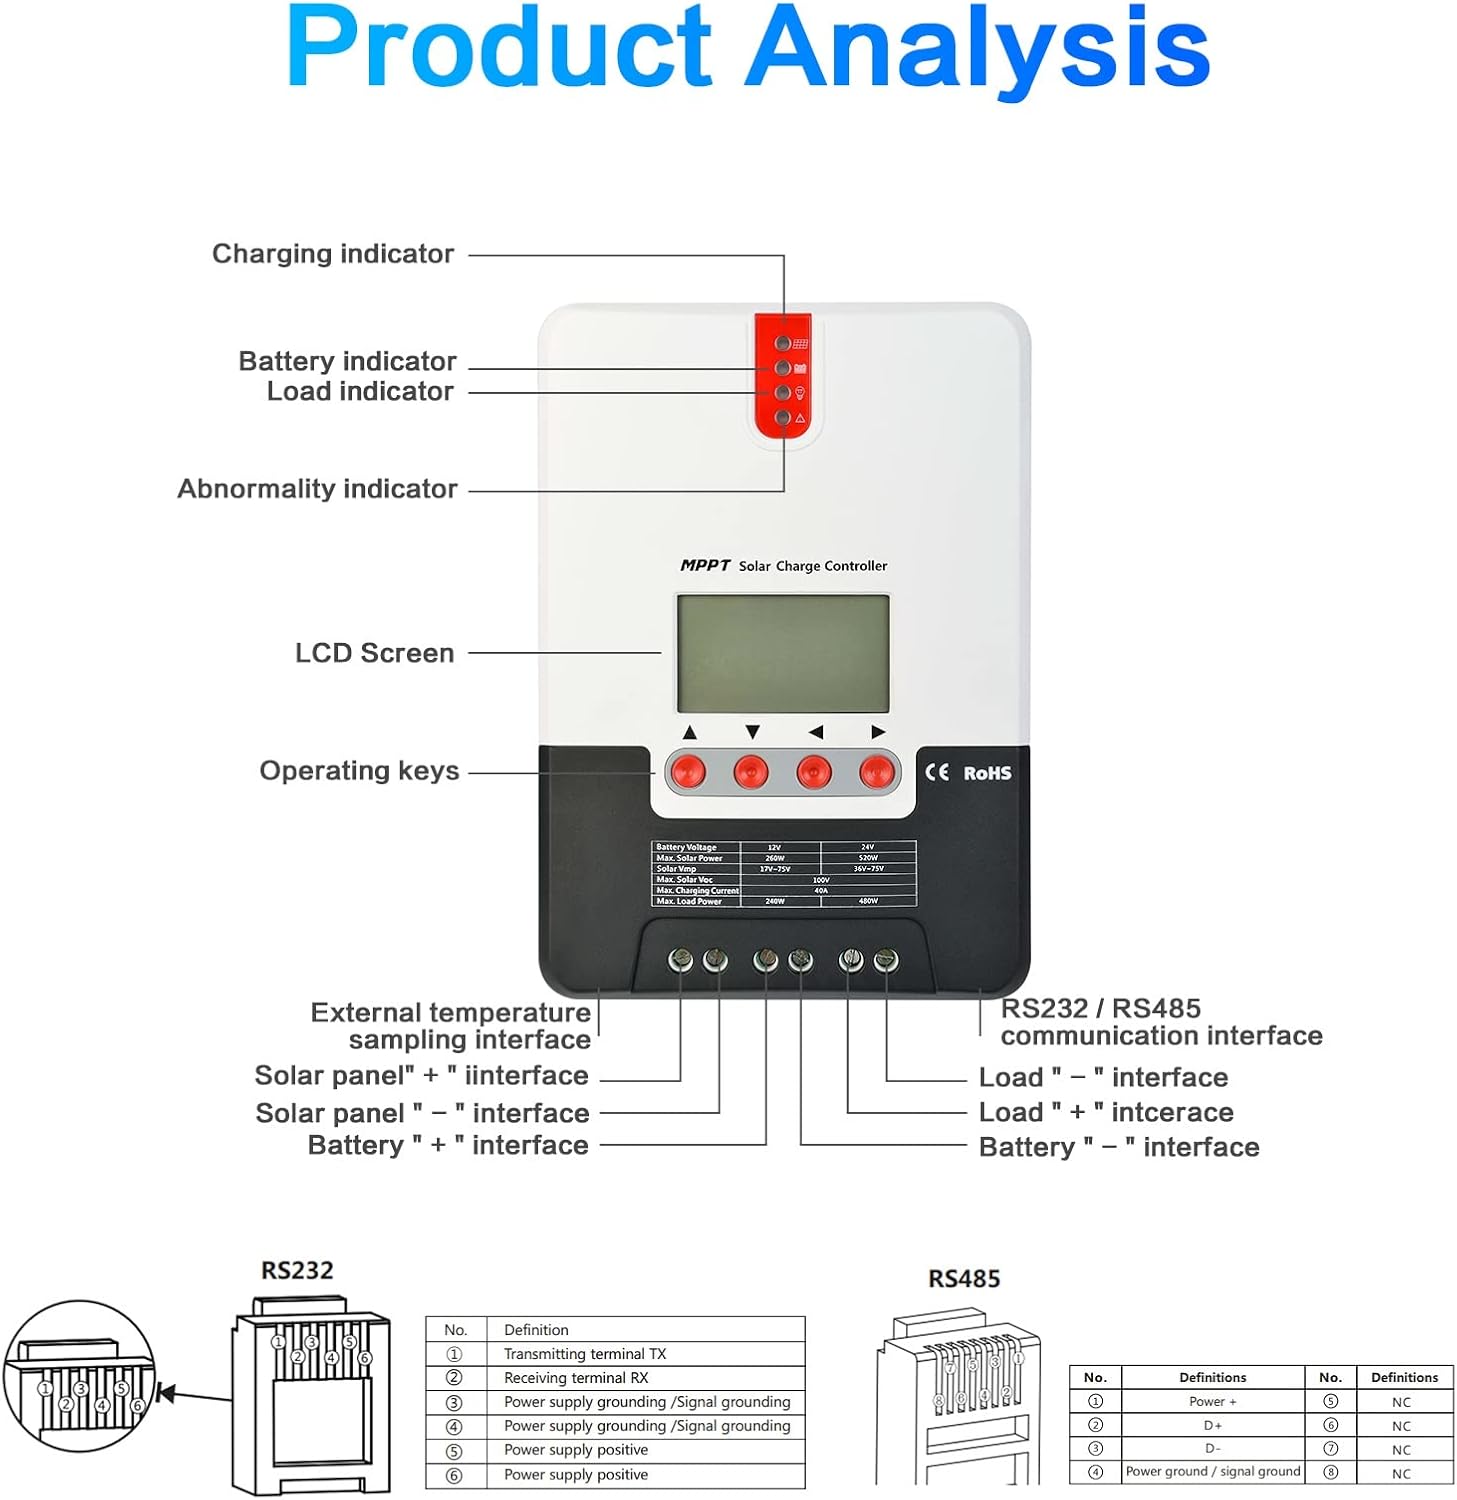
Figure 3: Detailed diagram showing the charging indicator, battery indicator, load indicator, abnormality indicator, LCD screen, operating keys, external temperature sampling interface, solar panel interfaces, battery interfaces, load interfaces, and RS232/RS485 communication interfaces.
- Charging Indicator: Shows the status of solar charging.
- Battery Indicator: Displays battery charge level.
- Load Indicator: Indicates the status of the connected load.
- Abnormality Indicator: Lights up to signal system errors or warnings.
- LCD Screen: Dynamically displays operating status, parameters, controller logs, and control settings.
- Operating Keys: Used to navigate menus and adjust parameters.
- External Temperature Sampling Interface: Connects the temperature sensor for accurate battery temperature compensation.
- Solar Panel Interface (+/-): Connects to the solar panel array.
- Battery Interface (+/-): Connects to the battery bank.
- Load Interface (+/-): Connects to the DC load.
- RS232/RS485 Communication Interface: For data communication and system expansion using the Modbus protocol.
3. Setup and Installation
Proper installation is crucial for the safe and efficient operation of your solar charge controller. Please follow these steps carefully.
Step 1: Choose Installation Location
Select a suitable location for the controller. Avoid direct sunlight, high temperatures, and areas prone to water ingress. Ensure there is good ventilation around the controller to prevent overheating.
Step 2: Wiring Sequence
Before wiring, remove the two screws on the upper panel of the controller. For safety, adhere strictly to the following wiring sequence:
- Connect the battery first.
- Then, connect the solar panel.
- Finally, connect the load (if applicable).
When disconnecting, reverse the sequence:
- Disconnect the solar panel first.
- Then, disconnect the battery.
- Finally, disconnect the load.

Figure 4: Wiring diagram illustrating the connection points for the battery, solar panel, load, and temperature sensor. Ensure correct polarity for all connections.
Important Safety Notice: Always ensure all power sources are disconnected before making or breaking any connections to prevent electrical shock or damage to the controller and other components.
4. Operating Instructions
Once installed, the controller will automatically begin operation. The LCD screen provides real-time information about your solar power system.
4.1. LCD Display and Navigation
The LCD screen displays various parameters such as battery voltage, charging current, load status, and error codes. Use the operating keys (up, down, enter) to navigate through the display menus and view different system parameters or adjust settings.
4.2. Battery Type Selection
The controller supports automatic identification of 12V/24V system voltage. It is compatible with various battery types (GEL, Sealed, Flooded, Lithium). Ensure the correct battery type is selected in the controller settings to optimize charging algorithms and prolong battery life. Refer to the detailed manual (if provided separately) for specific instructions on changing battery type settings.
4.3. Current Limiting Charge Mode
The controller features a current limiting charge mode. If the power from the solar panel array is excessively high and the charging current exceeds the controller's rated current, the controller will automatically reduce the charging power to protect the battery and the controller itself.
4.4. Communication (RS232/RS485)
The controller supports the standard Modbus communication protocol via RS232/RS485 interfaces. This allows users to extend, view, and modify various system parameters through external devices or software. Consult the Modbus communication protocol documentation for detailed integration instructions.
5. Maintenance
To ensure long-term performance and reliability of your DeWin MPPT Solar Charge Controller, periodic maintenance is recommended.
- Cleanliness: Keep the controller clean and free from dust and debris. Use a dry cloth to wipe the exterior.
- Connections: Periodically check all wiring connections (solar panel, battery, load) to ensure they are tight and free from corrosion. Loose connections can lead to power loss or overheating.
- Ventilation: Ensure that the ventilation openings are not obstructed to allow for proper heat dissipation.
- Environmental Conditions: Verify that the operating environment remains within the specified temperature and humidity ranges.
No user-serviceable parts are inside the controller. Do not attempt to open or repair the unit yourself. Contact qualified personnel for any repairs.
6. Troubleshooting
If you encounter issues with your DeWin MPPT Solar Charge Controller, refer to the following general troubleshooting steps. For specific error codes or complex problems, consult the full product manual or contact support.
- No Display/Power: Check battery connections and ensure the battery voltage is within the operating range. Verify that the battery is charged.
- No Charging: Ensure solar panels are connected correctly and receiving sufficient sunlight. Check solar panel voltage and current. Verify that the charging indicator is active.
- Load Not Working: Check load connections and ensure the load is not exceeding the controller's rated load current. Verify that the load indicator is active.
- Abnormality Indicator On: This indicates a system error. Check the LCD screen for specific error codes or messages, then refer to the detailed manual for their meaning and resolution. Common issues include over-voltage, under-voltage, over-current, or short circuits.
- Incorrect Readings: Ensure the temperature sensor is properly connected and positioned.
Always disconnect power from the solar panels and battery before inspecting or adjusting any wiring.
7. Specifications
The following table provides detailed technical specifications for the DeWin MPPT Solar Charge Controller. Note that some parameters vary by model (20A, 30A, 40A, 60A).

Figure 5: Product information table showing key specifications for different models.
| Parameter | Value |
|---|---|
| System Voltage | 12V/24V Automatic |
| No-load Loss | 0.7W ~ 1.2W |
| Battery Voltage Range | 9V ~ 35V |
| Max Solar Input Voltage | 100V (25℃), 90V (-25℃) |
| MPPT Power Point Voltage Range | Battery Voltage + 2V ~ 75V |
| Battery Type | USE/FLD/GEL/LI/SLD |
| Rated Charging Current | 20A / 30A / 40A / 60A (model dependent) |
| Rated Load Current | 20A (for 20A model) |
| Max Capacitive Load Capacity | 10000uF |
| Max PV Input Power |
|
| Conversion Efficiency | ≤98% |
| MPPT Tracking Efficiency | >99% |
| Temperature Compensation Coefficient | -3mv/℃/2V (default) |
| Operating Temperature | -35℃ ~ +45℃ |
| Protection Class | IP32 |
| Communication Method | RS232/RS485 |
| Altitude | ≤ 3000 meters |
| Product Dimensions (approx.) |
|
| Weight (approx.) |
|
Note: Specifications are subject to change without prior notice. Please refer to the product label for the most accurate information for your specific model.
8. Warranty Information
Specific warranty details for the DeWin MPPT Solar Charge Controller are not provided in this manual. Please refer to your purchase documentation, the seller's website, or contact the retailer for information regarding warranty coverage and terms.
9. Customer Support
For technical assistance, troubleshooting beyond the scope of this manual, or inquiries about your DeWin MPPT Solar Charge Controller, please contact the retailer or the manufacturer's customer support channel. Contact information may be available on the product packaging or the seller's website.