1. Introduction
Thank you for choosing the Goodyear Rechargeable Tire Maintenance Kit, Model GY3197. This portable air compressor is designed for convenient inflation of vehicle tires, sporting equipment, and other inflatables. This manual provides essential information for the safe and efficient use of your new device. Please read it thoroughly before operation and retain it for future reference.
2. Safety Information
Always observe the following safety precautions to prevent injury or damage to the product:
- Do not leave the inflator unattended while in use.
- Keep out of reach of children.
- Do not operate the inflator in wet conditions or near flammable liquids or gases.
- Ensure the correct pressure setting for the item being inflated to avoid over-inflation.
- Allow the unit to cool down after extended use to prevent overheating.
- Use only the provided charging cord and battery.
- Disconnect the power source when not in use or before performing maintenance.
3. Package Contents
Verify that all items listed below are included in your package:
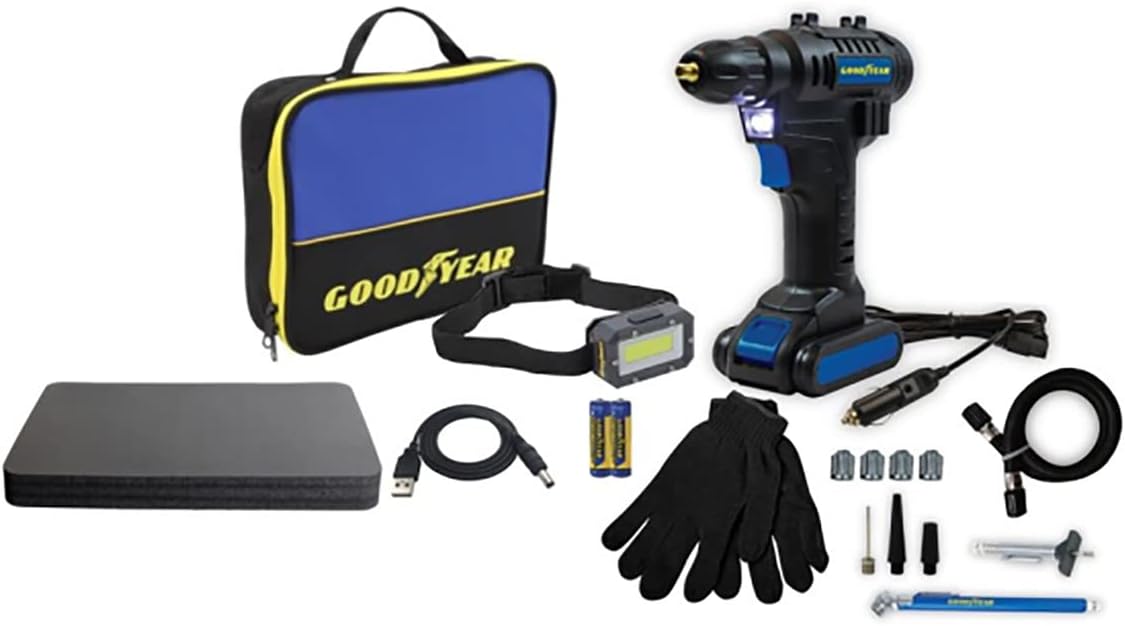
Figure 1: Goodyear GY3197 Rechargeable Tire Maintenance Kit components. This image displays the portable air compressor, a blue and black carrying case with the Goodyear logo, a headband light, a pair of black gloves, a USB charging cable, a 12V car adapter cable, a tire pressure gauge, and various inflation nozzles for different applications.
- Portable Hand-Held Air Compressor (GY3197)
- Rechargeable Battery Pack
- Charging Cord (USB)
- 12V Car Adapter Cable
- Air Hose with Screw-on Connector
- Various Nozzle Attachments (e.g., needle for balls, tapered nozzles for inflatables)
- Headband Light
- Gloves
- Carrying Case
- Tire Pressure Gauge
- User Manual (this document)
4. Setup
4.1 Charging the Battery
- Ensure the battery pack is securely attached to the air compressor.
- Connect the charging cord to the charging port on the battery pack.
- Plug the other end of the charging cord into a compatible USB power source (e.g., wall adapter, car charger, computer USB port).
- The charging indicator light will illuminate, typically red during charging and green when fully charged.
- A full charge may take several hours. Do not overcharge.
4.2 Attaching the Air Hose
Screw the air hose securely onto the designated air outlet port on the inflator. Ensure a tight connection to prevent air leakage.
4.3 Attaching Nozzles
Select the appropriate nozzle attachment for the item you intend to inflate. Screw or push the nozzle onto the end of the air hose connector.
5. Operating Instructions
5.1 Inflating Vehicle Tires
- Ensure the battery is charged or the 12V car adapter is connected to your vehicle's power outlet.
- Remove the valve cap from the tire.
- Screw the air hose connector firmly onto the tire valve stem.
- Turn on the inflator. The digital display (if present) will show the current tire pressure.
- Set the desired pressure using the controls (refer to your vehicle's manual or tire sidewall for recommended PSI).
- Press the start button to begin inflation. The inflator will automatically stop when the preset pressure is reached.
- Unscrew the connector from the valve stem and replace the valve cap.
5.2 Inflating Sporting Equipment and Other Inflatables
- Select the appropriate nozzle (e.g., needle for basketballs, tapered nozzle for air mattresses).
- Attach the nozzle to the air hose.
- Insert the nozzle into the item's inflation port.
- Turn on the inflator and begin inflation. Monitor the pressure carefully to avoid over-inflation, as many sporting goods do not have automatic shut-off features.
- Stop inflation manually once the desired firmness is achieved.
- Remove the nozzle.
5.3 Using the Headband Light
The included headband light provides illumination in low-light conditions. Simply wear it on your head and activate it using its power button. Ensure the batteries for the headband light are installed correctly.
6. Maintenance
6.1 Cleaning
Wipe the exterior of the inflator and accessories with a damp cloth. Do not use harsh chemicals or abrasive cleaners. Ensure the device is dry before storage.
6.2 Storage
Store the Goodyear GY3197 kit in its carrying case in a cool, dry place, away from direct sunlight and extreme temperatures. Ensure the battery is partially charged before long-term storage to maintain battery health.
7. Troubleshooting
| Problem | Possible Cause | Solution |
|---|---|---|
| Inflator does not turn on. | Battery is depleted or not properly connected. | Charge the battery. Ensure the battery pack is securely attached. Check 12V car adapter connection if using. |
| Air leaks during inflation. | Hose or nozzle not securely attached. | Tighten all connections. Ensure the nozzle is correctly inserted into the item. |
| Inflator stops prematurely. | Preset pressure reached or unit overheated. | Check preset pressure. Allow the unit to cool down if it has been running for an extended period. |
| Inaccurate pressure reading. | Gauge calibration issue or external factors. | Verify pressure with an external, calibrated gauge. Ensure the connection is tight. |
8. Specifications
- Model: GY3197
- Brand: Goodyear
- Power Source: Rechargeable Battery / 12V DC Car Adapter
- Item Weight: Approximately 4 pounds
- Package Dimensions: Approximately 11.9 x 8.31 x 3.8 inches
- Features: Portable, Cordless, Digital Pressure Gauge (if applicable), LED Work Light (integrated or headband)
- Included Accessories: Various nozzle tips, charging cables, carrying case, headband light, gloves.
9. Warranty and Support
For warranty information or technical support, please refer to the documentation provided with your purchase or contact Goodyear customer service. Keep your proof of purchase for warranty claims.
Goodyear Customer Service: Please visit the official Goodyear website or refer to your product packaging for contact details.