Introduction
This manual provides comprehensive instructions for the safe and efficient operation of your conecto Mechanical 24-Hour Timer, Model SA-CC50202-V2. Please read this manual thoroughly before first use and retain it for future reference.
Safety Instructions
- Ensure the timer is correctly installed and connected to a suitable power outlet.
- Do not exceed the maximum load capacity of 3500 W.
- The timer is rated IP44, indicating protection against solid objects larger than 1mm and splashing water from any direction. It is suitable for outdoor use but should not be submerged in water.
- Keep out of reach of children. The timer includes a child lock feature.
- Do not open or attempt to repair the timer yourself. Refer all servicing to qualified personnel.
- Disconnect the timer from the power supply before cleaning or when not in use for extended periods.
Product Overview
The conecto Mechanical Timer is designed for automated control of electrical devices. It features a 24-hour dial with 96 switching segments, allowing for precise scheduling.
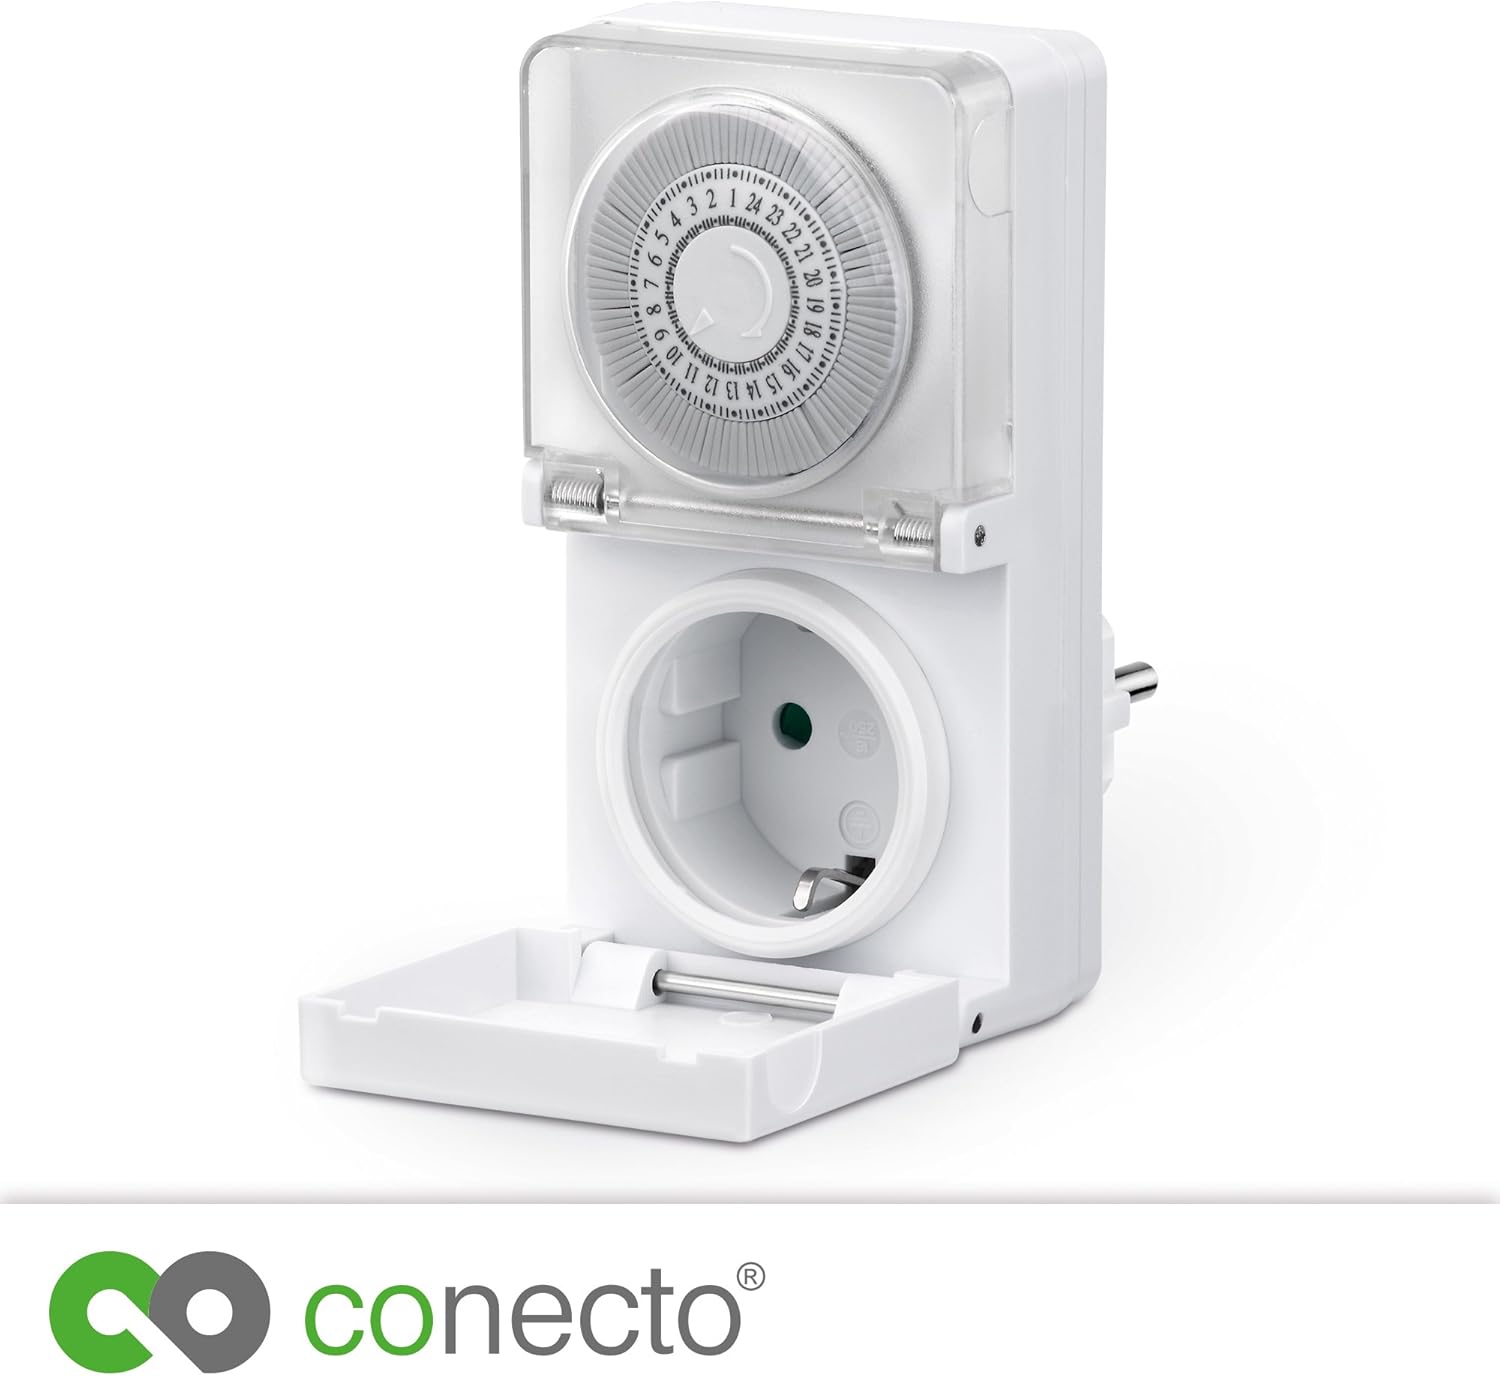
Figure 1: Front View of the Timer. This image displays the front of the conecto mechanical timer, highlighting the 24-hour rotating dial at the top and the integrated power outlet at the bottom. A clear protective cover shields the dial.
Key Components:
- 24-Hour Dial: Displays the current time and allows for setting ON/OFF periods.
- Switching Segments (Pins): 96 individual pins around the dial. Each pin represents 15 minutes. Pushed-in pins activate the connected device, pulled-out pins deactivate it.
- Power Outlet: Socket for connecting the device to be controlled.
- Protective Cover: Transparent cover over the dial and a hinged cover for the socket, providing IP44 protection.

Figure 2: Timer with Socket Cover Open. This image shows the conecto timer from a top-down perspective, with the hinged protective cover for the power outlet opened, revealing the socket for device connection.
Setup
- Set Current Time: Rotate the 24-hour dial clockwise until the current time aligns with the arrow or marker on the timer's body. The dial is marked from 1 to 24.
- Program ON/OFF Periods:
- Identify the time segments when you want the connected device to be ON.
- Each segment (pin) around the dial represents 15 minutes.
- To set a period as ON, push the corresponding pins inwards towards the center of the dial.
- To set a period as OFF, pull the corresponding pins outwards from the center of the dial.
- For example, to turn a device ON from 6:00 AM to 8:00 AM, push in all pins between the 6 and 8 marks on the dial.
- Connect Device: Plug the device you wish to control into the timer's power outlet.
- Plug Timer In: Insert the timer into a suitable wall socket. Ensure the wall socket is protected if used outdoors.

Figure 3: Detailed View of the Timer Dial. This close-up image focuses on the 24-hour dial of the conecto timer, clearly showing the numbered hours and the individual 15-minute switching pins that can be pushed in or pulled out to set the schedule.
Operating Instructions
Once the timer is set up and plugged in, it will automatically cycle the connected device ON and OFF according to your programmed schedule. The dial will continuously rotate, indicating the progression of time.
- Continuous Operation: If you wish for the device to remain ON continuously, ensure all pins are pushed inwards.
- Manual Override: To temporarily turn the device ON or OFF outside of the programmed schedule, you may need to manually adjust the pins or unplug the device. This model primarily relies on pin settings for scheduling.
Maintenance
- Cleaning: Disconnect the timer from the power supply before cleaning. Wipe the exterior with a soft, damp cloth. Do not use abrasive cleaners or immerse the timer in water.
- Storage: When not in use, store the timer in a dry, cool place, away from direct sunlight and extreme temperatures.
- Inspection: Periodically inspect the timer and its connections for any signs of damage or wear. Discontinue use if damage is observed.
Troubleshooting
| Problem | Possible Cause | Solution |
|---|---|---|
| Device does not turn ON/OFF at programmed times. | Incorrect time setting on the dial. Pins not correctly pushed in/pulled out. Timer not receiving power. | Verify the current time is aligned with the marker. Ensure pins are firmly set for ON (in) or OFF (out) for the desired periods. Check if the wall socket has power. |
| Timer dial is not rotating. | Timer is not plugged into a live power outlet. Internal malfunction. | Ensure the timer is securely plugged into a functional power outlet. If the problem persists, discontinue use and contact support. |
| Connected device does not power ON at all. | Device itself is faulty. Timer is not supplying power. All pins are in the OFF position. | Test the device by plugging it directly into a wall socket. Ensure the timer is plugged in and the current time is set correctly, with at least one pin pushed in for an ON period. Check pin settings. |
Specifications
- Brand: conecto
- Model Number: SA-CC50202-V2
- Type: Mechanical 24-Hour Timer
- Switching Segments: 96
- Shortest Switching Time: 15 minutes
- Max. Power Consumption: 3500 W
- Voltage: 230V AC, 50Hz
- Protection Rating: IP44 (Splash-proof)
- Product Dimensions: 3.35"D x 2.4"W x 4.37"H (8.5 x 6.1 x 11.1 cm)
- Item Weight: 6.3 ounces (178.6 grams)
- Material: Plastic, Metal
- Color: White
- Included Components: conecto Timer, Instruction Manual
- Batteries Required: No
Warranty and Support
Specific warranty information for the conecto Mechanical 24-Hour Timer (Model SA-CC50202-V2) is not provided within this manual. For details regarding warranty coverage, technical support, or service inquiries, please refer to the manufacturer's official website or contact conecto customer service directly.
Manufacturer: SatChef GmbH


