
EPOMAKER RT100
EPOMAKER RT100 Retro Gaming Keyboard User Manual
Model: RT100 | Brand: EPOMAKER
Introduction
This manual provides detailed instructions for the setup, operation, and maintenance of your EPOMAKER RT100 Retro Gaming Keyboard. The RT100 is a versatile 97-key gasket-mount mechanical keyboard featuring triple connectivity modes (Bluetooth 5.0, 2.4GHz wireless, USB-C wired), a customizable smart TFT-LCD display, hot-swappable switches, and full RGB backlighting. Please read this manual thoroughly to ensure optimal performance and longevity of your device.
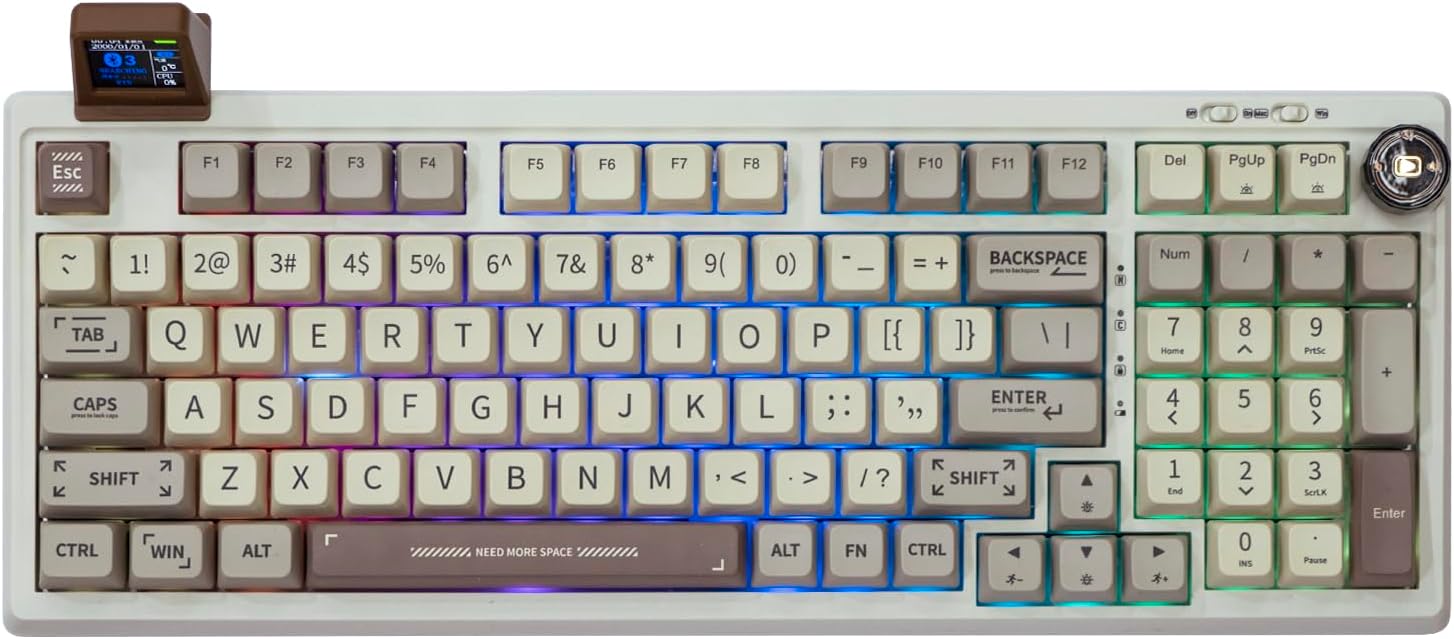
Image: The EPOMAKER RT100 Retro Gaming Keyboard, showcasing its full layout, RGB backlighting, and the detachable smart display.
What's in the Box
Upon unboxing your EPOMAKER RT100 keyboard, please verify that all the following components are included:
- Keyboard
- Keycap Puller
- USB C cable

Image: All components included in the EPOMAKER RT100 package: the keyboard, a keycap puller, and a USB-C cable.
Setup
To begin using your EPOMAKER RT100 keyboard, follow these steps:
- Charge the Keyboard: Connect the provided USB-C cable to the keyboard's USB-C port and the other end to a powered USB port on your computer or a wall adapter. The keyboard features a 5000mAh battery.
- Select Connection Mode: Use the mode switch located on the top right of the keyboard to select your preferred connection method (Bluetooth, 2.4GHz Wireless, or USB-C Wired).
- Operating System Switch: If applicable, use the dedicated switch to select between Windows and Mac OS layouts for optimal key functionality.
- Install Software (Optional but Recommended): For full customization of the display, RGB lighting, and knob functions, download and install the official EPOMAKER software from the manufacturer's website.

Image: Detail of the power switch, mode switch, and multimedia knob for easy access and control.
Connectivity Modes
The EPOMAKER RT100 offers three versatile connection options:
- USB-C Wired Mode: For the most stable and reliable connection, connect the keyboard directly to your device using the provided USB-C cable. This mode also charges the keyboard.
- 2.4GHz Wireless Mode:
For a low-latency wireless experience, locate the 2.4G receiver. This receiver is cleverly stored within the keyboard's housing, accessible by detaching the mini display. Insert the receiver into a USB port on your computer. Ensure the keyboard's mode switch is set to 2.4GHz wireless. The hidden storage space for the 2.4G receiver is slightly bigger to leave room for future upgrades, and the invisible hub will help you remember where the receiver is so you will never lose it.

Image: The detachable mini TV and the discreet storage compartment for the 2.4G wireless dongle.
- Bluetooth 5.0 Mode:
Enable Bluetooth on your device and set the keyboard's mode switch to Bluetooth. The RT100 can connect with up to three different devices simultaneously. Refer to your device's Bluetooth pairing instructions to connect to the keyboard. This mode offers convenience for multi-device users.

Image: Visual representation of the keyboard's triple connectivity modes and compatibility with various devices.
Smart TFT-LCD Display
The EPOMAKER RT100 features an exclusive detachable smart TFT-LCD display. This mini display can function as a smartwatch, showing date, time, weather forecasts, and keyboard battery level. It can also be customized with settings and programming via the accompanying software.

Image: The 1.33-inch detachable smart TFT-LCD display showing time, date, temperature, and CPU usage, highlighting its customizable nature.
Customizable RGB Backlighting
The RT100 keyboard is equipped with full RGB backlighting, featuring south-facing LEDs for optimal visibility from the user's perspective. There are 16 default light patterns, and you have the freedom to create your own custom patterns using the driver software.
- Turn On/Off Backlight: Press Fn + PGDN
- Switch RGB Effect: Press Fn + DEL
- Switch RGB Color: Press Fn + PGUP

Image: The keyboard displaying various RGB lighting effects, with instructions for changing patterns and colors.
Video: A demonstration of how to adjust the RGB backlighting on the EPOMAKER RT100 keyboard, showcasing different lighting modes and colors.
Hot-Swappable Switches
The RT100 features a hot-swappable Kailh socket PCB, allowing you to easily replace switches without soldering. This is convenient for keyboard enthusiasts who wish to customize their typing experience. The keyboard supports 3-pin and 5-pin mechanical switches.

Image: Detailed view of the hot-swappable PCB, illustrating how switches can be easily removed and replaced, along with pre-lubed switches and stabilizers.
Customizable Knob
The keyboard includes a versatile 2-in-1 customizable knob. By default, this knob controls media functions such as volume adjustment (up/down) and play/pause for audio and video. Its functionality can be further expanded and customized through the accompanying software, allowing for a wide range of custom functions.
Software Installation & Usage
To unlock the full potential of your EPOMAKER RT100, including advanced customization for the display, RGB lighting, and knob, download the dedicated software from the official EPOMAKER website. The software provides an intuitive interface for personalizing your keyboard settings.

Image: A view of the individualized custom software interface, demonstrating options for screen customization and other settings.
Maintenance
Proper maintenance ensures the longevity and performance of your keyboard:
- Cleaning Keycaps: Use a soft, damp cloth to wipe down the PBT keycaps. For deeper cleaning, remove keycaps using the provided keycap puller and wash them with mild soap and water. Ensure they are completely dry before reattaching.
- Cleaning Switches: Use compressed air to remove dust and debris from between the keycaps and switches. Avoid spraying liquids directly into the switches.
- Cable Care: Store the USB-C cable neatly to prevent kinks or damage.
- Display Care: Gently wipe the TFT-LCD display with a microfiber cloth to avoid scratches.
Troubleshooting
If you encounter issues with your EPOMAKER RT100 keyboard, refer to the following common solutions:
| Problem | Possible Solution |
|---|---|
| Keyboard not responding (Wired) | Ensure the USB-C cable is securely connected to both the keyboard and the computer. Try a different USB port or cable. |
| Keyboard not responding (Wireless/Bluetooth) | Check battery level. Ensure the mode switch is set correctly. For 2.4GHz, re-insert the dongle. For Bluetooth, re-pair the device. |
| RGB lights not working or incorrect | Ensure the backlight is turned on (Fn + PGDN). Check settings in the software. Update keyboard firmware if available. |
| Smart Display not showing correct information | Ensure the display is properly attached. Use the software to synchronize time, weather, or other data. Ensure the software is running as administrator for system information. |
| Keys not registering or double-typing | This could indicate a faulty switch. Utilize the hot-swappable feature to replace the problematic switch. Ensure switches are fully seated. |
If the issue persists after trying these solutions, please contact EPOMAKER customer support for further assistance.
Specifications
| Feature | Detail |
|---|---|
| Model Number | RT100 |
| Connectivity | Bluetooth 5.0, 2.4GHz Wireless, USB-C Wired |
| Number of Keys | 97 |
| Keycap Material | 5-Side Dye-sub Premium PBT with MDA Profile |
| Switches | Gateron Pro Yellow (Hot-Swappable Kailh Socket) |
| Backlighting | RGB (South-facing LEDs) |
| Battery Capacity | 5000mAh |
| Display Screen | 1.33" Detachable Smart TFT-LCD Display |
| Knob Function | 2-in-1 Customizable (Default: Media Control) |
| Compatibility | Windows, Mac OS, iOS, Android, Gaming Consoles (PS4, Xbox, PlayStation, Switch) |
| Dimensions | 12.99 x 4.57 x 0.98 inches |
| Item Weight | 3.12 pounds |
| Manufacturer | EPOMAKER |
| Country of Origin | China |
Warranty and Support
EPOMAKER provides a standard warranty for its products. For detailed warranty information, terms, and conditions, please refer to the official EPOMAKER website or the full user manual PDF available for download. For technical support, troubleshooting beyond this guide, or warranty claims, please contact EPOMAKER customer service directly through their official channels.
Official User Manual (PDF): Download PDF
EPOMAKER Store: Visit EPOMAKER Store on Amazon
Related documentsRT100


Ask a question about this manual
Ask about setup, troubleshooting, compatibility, parts, safety, or missing instructions. Manuals+ will review the question and use this page’s manual context to help answer it.