1. Introduction
Thank you for choosing the Scheppach MR225-61 Ride-On Lawn Mower. This manual provides essential information for the safe and efficient operation, maintenance, and troubleshooting of your new equipment. Please read this manual thoroughly before initial use and keep it for future reference.

Figure 1: The Scheppach MR225-61 Ride-On Lawn Mower. This image shows the overall design of the mower, including the seat, steering wheel, and grass collection bag at the rear.
2. Safety Instructions
Always prioritize safety when operating machinery. Failure to follow these instructions may result in serious injury or property damage.
- Read and understand all instructions before operating the mower.
- Wear appropriate personal protective equipment (PPE), including eye protection, hearing protection, and sturdy footwear.
- Never allow children or untrained individuals to operate the mower.
- Clear the mowing area of debris, rocks, and other objects that could be thrown by the blades.
- Do not operate the mower on excessively steep slopes (maximum 10 degrees).
- Turn off the engine and remove the key before performing any maintenance or clearing blockages.
- Refuel in a well-ventilated area with the engine off and cool.
3. Setup and Assembly
Before first use, ensure all components are correctly assembled and fluids are at appropriate levels.
- Unpacking: Carefully remove the mower from its packaging. Ensure all parts are present according to the packing list.
- Battery Installation: Install the battery as per the instructions provided in the separate battery manual. Connect the battery charger to fully charge the battery before first use.
- Engine Oil: Check the engine oil level. Add the supplied oil if necessary, ensuring it reaches the recommended mark on the dipstick.
- Fuel Tank: Fill the fuel tank with unleaded gasoline. Do not overfill.
- Grass Collection Bag: Attach the 150-liter grass collection bag to the rear of the mower. Ensure it is securely fastened.
4. Operating Instructions
This section details how to start, operate, and stop your Scheppach MR225-61 ride-on mower.
4.1 Starting the Engine
The mower features both electric start and manual recoil start options.

Figure 2: Electric Start Ignition. This image shows the ignition key slot and the 'Start' and 'Stop' positions, indicating the electric start mechanism.
- Ensure the parking brake is engaged.
- Insert the ignition key into the key slot.
- Turn the key to the 'Start' position. The engine should crank and start.
- If the electric start fails, use the manual recoil starter by pulling the cord firmly.
4.2 Adjusting Cutting Height
The cutting height can be adjusted to 5 different levels, from 35 mm to 75 mm.

Figure 3: Cutting Height Adjustment Lever. This image highlights the lever used to select one of the five cutting height positions, ranging from 35 mm to 75 mm.
To adjust the cutting height, move the height adjustment lever located near the operator's seat to the desired position. Higher numbers correspond to a higher cut.
4.3 Driving and Mowing
The mower has 4 forward speeds and 1 reverse speed, controlled by a gear lever.

Figure 4: Mowing and Collecting Applications. This diagram illustrates the two primary functions of the mower: cutting grass (Tonte) and collecting clippings (Ramassage).
- Release the parking brake.
- Select a forward gear (1-4) or reverse (R) using the gear lever.
- Slowly engage the clutch (if applicable) and press the accelerator pedal to begin moving.
- Engage the blade lever to start mowing.
- Steer using the steering wheel.
4.4 Stopping the Mower
- Disengage the blade lever.
- Bring the mower to a complete stop.
- Shift the gear lever to neutral (N).
- Engage the parking brake.
- Turn the ignition key to the 'Off' position to shut down the engine. Remove the key for safety.
5. Maintenance
Regular maintenance ensures the longevity and optimal performance of your mower.
5.1 Cleaning the Mower
The mower is equipped with a quick-wash connection for easy cleaning of the cutting deck.
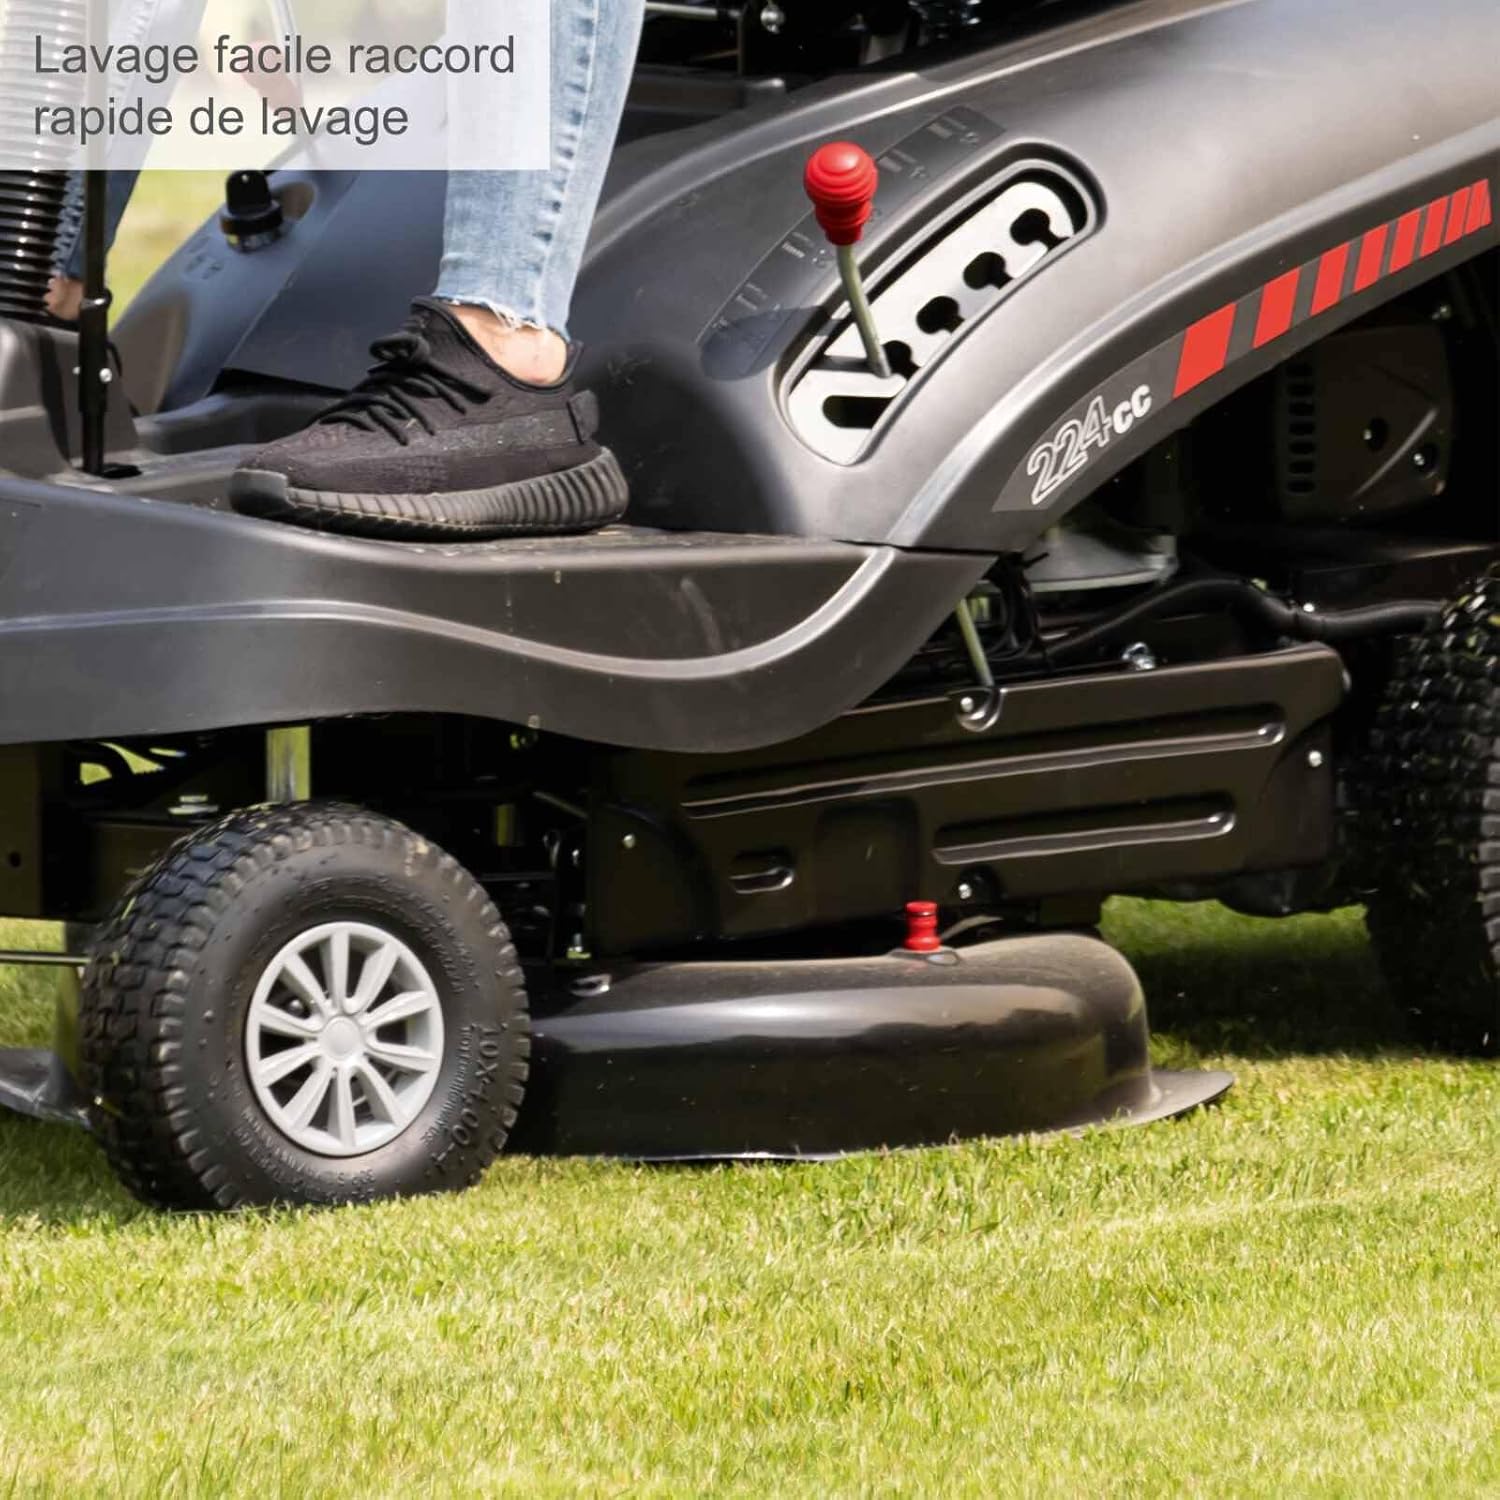
Figure 5: Quick Wash Connection. This image shows the water hose connection point on the cutting deck, designed for easy cleaning.
- After each use, connect a garden hose to the quick-wash connection.
- Turn on the water supply.
- Start the engine and engage the blades for a few minutes to allow the water to clean the underside of the deck.
- Turn off the engine and water supply. Disconnect the hose.
- Clean the exterior of the mower with a damp cloth.
5.2 Emptying the Grass Collection Bag
The 150-liter grass collection bag should be emptied regularly to maintain mowing efficiency.

Figure 6: Emptying Grass Collection Bag. This image shows a person detaching and emptying the large 150-liter grass collection bag from the rear of the mower.
To empty the bag, disengage the blades, turn off the engine, and remove the key. Lift the bag from its mounting points and empty the clippings. Reattach securely before resuming operation.
5.3 General Maintenance Schedule
- Before each use: Check oil level, fuel level, and tire pressure.
- After each use: Clean the cutting deck and empty the grass bag.
- Every 25 hours of operation: Inspect blades for sharpness and damage, clean air filter.
- Every 50 hours of operation: Change engine oil, check spark plug.
- Annually: Full service, including fuel filter replacement and general inspection by a qualified technician.
6. Troubleshooting
This section provides solutions to common issues you might encounter.
| Problem | Possible Cause | Solution |
|---|---|---|
| Engine does not start | No fuel, low battery, spark plug issue, choke not engaged | Check fuel level, charge battery, inspect/replace spark plug, engage choke. |
| Poor cutting performance | Dull blades, incorrect cutting height, clogged deck | Sharpen/replace blades, adjust cutting height, clean cutting deck. |
| Mower loses power | Low fuel, dirty air filter, engine overheating | Refuel, clean/replace air filter, allow engine to cool. |
| Excessive vibration | Bent blade, loose components | Inspect and replace bent blades, tighten all fasteners. |
7. Specifications
Key technical specifications for the Scheppach MR225-61 Ride-On Lawn Mower.

Figure 7: Mower Specifications Overview. This graphic summarizes key performance metrics such as mowing surface area, collection bag capacity, cutting dimensions, and maximum slope capability.

Figure 8: Engine and Width Specifications. This image provides details on the engine displacement and horsepower, along with the maximum width of the mower.
- Model: MR225-61
- Engine: 224 cm³ 4-stroke gasoline engine, 4.4 kW (6.0 CV)
- Power Source: Gas-powered
- Cutting Width: 61 cm
- Cutting Height: 5 positions, 35 - 75 mm
- Grass Collection Bag Capacity: 150 Liters
- Recommended Mowing Area: Up to 2600 m²
- Speeds: 4 forward, 1 reverse
- Max. Slope Incline: 10°
- Weight: 135.5 kg
- Material: Plastic (body)
8. Warranty and Support
For warranty information, please refer to the warranty card included with your product or visit the official Scheppach website. For technical support, spare parts, or service inquiries, please contact Scheppach customer service or an authorized service center. Ensure you have your model number (MR225-61) and purchase details ready when contacting support.
You can find more information and contact details on the official Scheppach website: www.scheppach.com


