1. Product Overview
The SEQURE D60B Pro is a portable electric soldering iron designed for various welding and repair tasks. It features an open-source application layer, allowing for customizable parameter settings such as sleep/shutdown times and temperature compensation. This tool supports multiple power supply options, including PD 3.0, DC12V-24V, and XT60 cable for Lipo batteries, making it highly versatile for both industrial and residential use.
Key features include rapid heating, intelligent temperature control, auto sleep and shut-off functions, and a digital display for precise temperature adjustments. Its compact design ensures portability and ease of use.
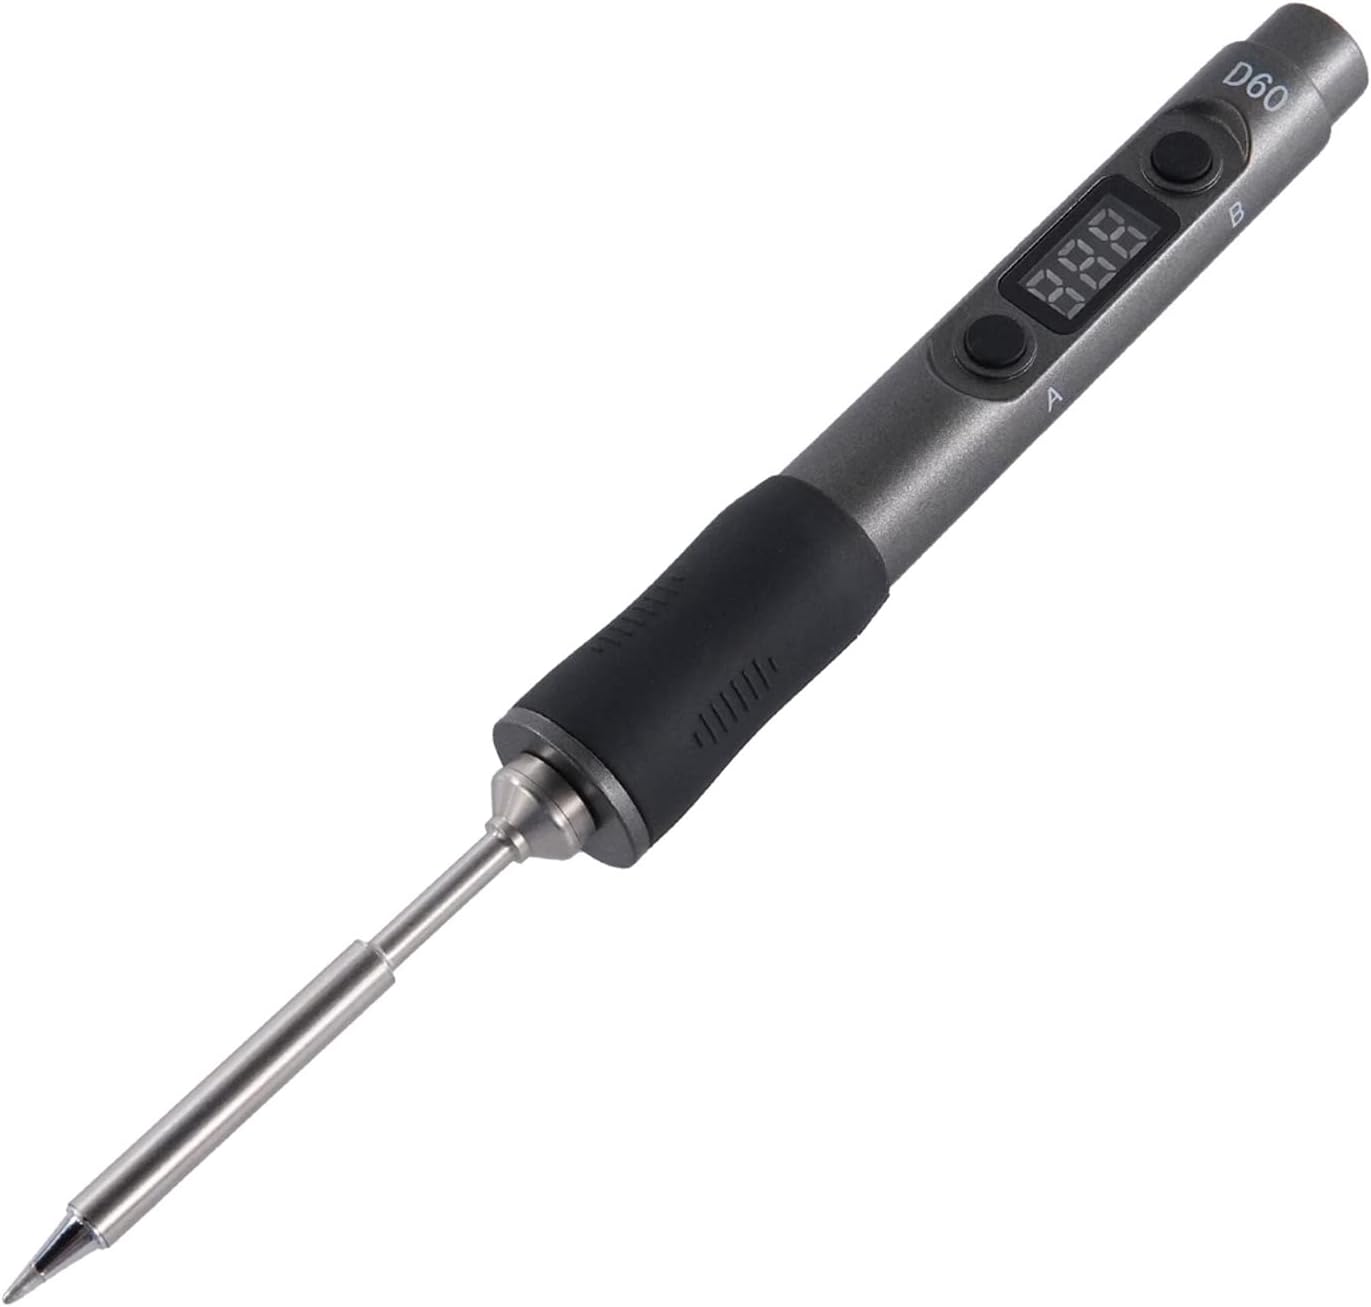
Figure 1: The SEQURE D60B Pro Portable Soldering Iron with its digital display and ergonomic design.

Figure 2: Visual representation of key product features including Auto Sleep, Auto Wake-up, Auto Shut Off, Fast Heating, Adjustable Temperature, Smart Constant Temperature, Temperature Compensation, Digital Display, and Portable & Outdoor use.
2. Package Contents
Before proceeding with setup, please verify that all components are present in your package:
- SQ-D60B Pro Soldering Iron
- Soldering Iron Tips (TS-B2 tip included, other tips available separately)
- Soldering Iron Stand
- 19V Power Adapter
- Conversion Line (for Type-C interface)
- XT60 Power Cable
- Instruction Manual
- Disassembly Tools

Figure 3: All items included in the SEQURE D60B Pro Soldering Iron kit, showing the soldering iron, stand, power adapter, cables, and instruction manual.
Video 1: An overview of the SEQURE D60B Pro Soldering Iron and its included accessories, demonstrating the unboxing experience and identifying each component.
3. Setup Guide
3.1 Power Supply Connection
The SQ-D60B Pro supports multiple power input methods:
- 3S-6S Lipo Batteries (via XT60 Cable): Connect your compatible Lipo battery to the provided XT60 cable, then connect the cable to the soldering iron.
- 12V-24V DC Power Adapter: Use the included 19V power adapter or another compatible 12V-24V DC power source. Connect the power adapter to the conversion line, then plug the conversion line into the soldering iron's Type-C port.
- PD 3.0 Power Supply: The soldering iron can be powered directly via a Type-C PD 3.0 compatible power supply.

Figure 4: Illustration of different power supply options for the soldering iron, including PD3.0 power supply, FPV Lipo battery, laptop power, and vehicle power supply, all connecting via the Type-C interface.
Video 2: Demonstrates connecting the soldering iron to a 3S-6S Lipo battery via the XT60 cable and to a 12V-24V power adapter, showing the different power supply modes.
3.2 Soldering Tip Installation
The SQ-D60B Pro supports TS soldering iron tips. To install or replace a tip:
- Ensure the soldering iron is powered off and cool.
- Gently pull out the existing tip (if any).
- Insert the desired TS soldering tip firmly into the heating element socket until it clicks into place.
- Ensure the tip is securely seated before powering on the device.

Figure 5: Step-by-step visual guide on how to properly install and remove the soldering iron tip.
Video 3: Illustrates the process of installing and removing a TS soldering iron tip, emphasizing proper handling and securing the tip.
4. Operating Instructions
4.1 Power On and Temperature Adjustment
Once powered, the digital display will show the current temperature. The D60B Pro features rapid heating, reaching the melting point of 572°F (300°C) within 13 seconds (with 24V/60W power supply).
- Use the 'A' and 'B' buttons to adjust the working temperature. The adjustable range is 100°C-400°C / 212°F-752°F.
- The intelligent temperature control algorithm ensures precise temperature control with a stability range of ±5°C.

Figure 6: Demonstrates the fast heat-up capability of the soldering iron, reaching 400°C quickly.

Figure 7: Details the temperature control range (100°C-400°C) and compensation range (-50°C to 50°C), along with button functions for adjustment.
Video 4: Shows how to adjust various function parameters and switch settings on the soldering iron using its buttons and digital display.
4.2 Auto Sleep and Shut-off
To protect the tip and conserve energy, the soldering iron features intelligent sleep and shut-off modes:
- Auto Sleep: If not used for 10 minutes, the soldering iron will automatically enter sleep mode, reducing the tip temperature to 100°C (212°F).
- Wake-up: Simply pick up and shake the soldering iron to wake it up. It will quickly return to the previously set temperature.
- Auto Shut-off: If the soldering iron remains in sleep mode for more than 5 minutes, it will automatically shut down completely.
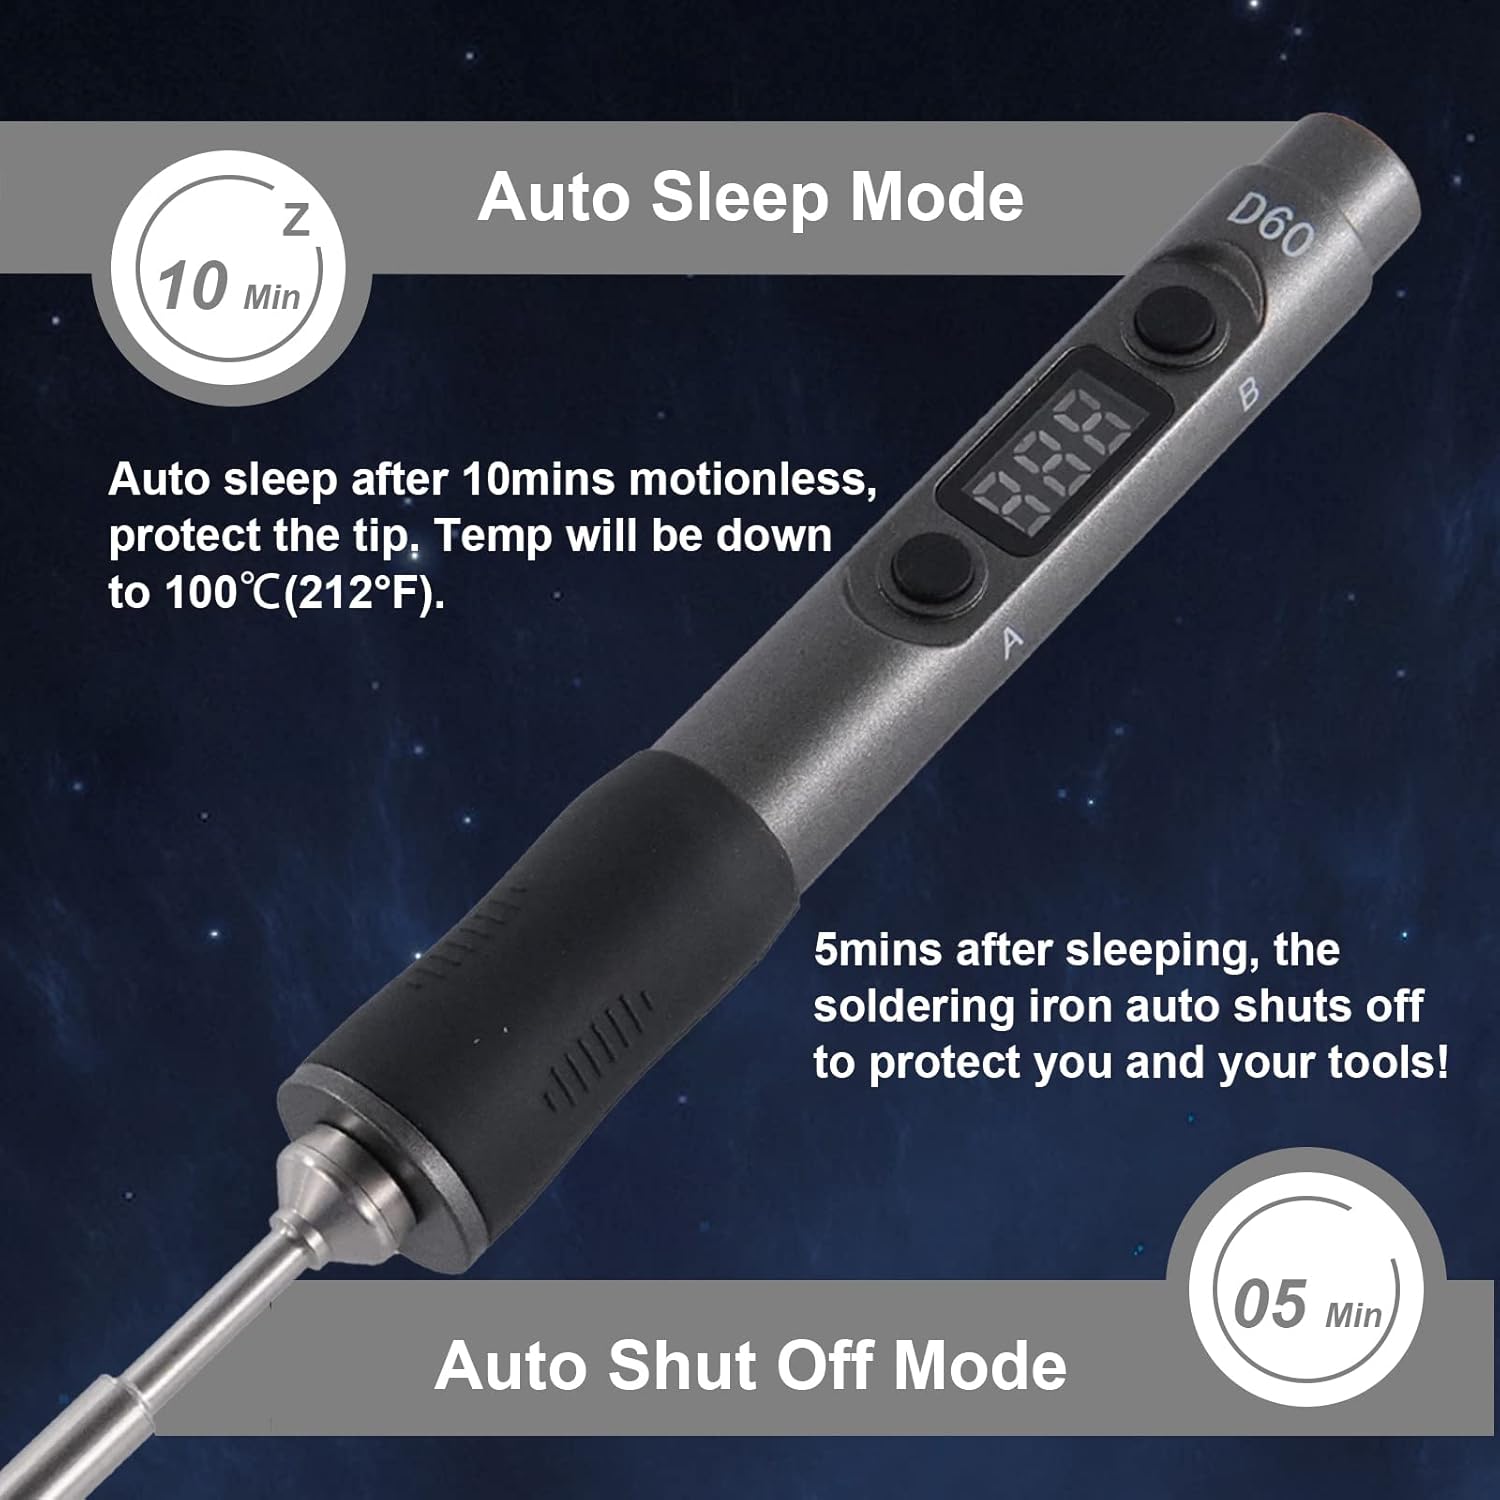
Figure 8: Explains the auto sleep mode (after 10 minutes of inactivity) and auto shut-off mode (after 5 minutes in sleep mode) to protect the tip and ensure safety.
4.3 Soldering Application
The D60B Pro is suitable for a wide range of applications, including:
- Welding circuit boards
- Appliance repair
- Computer hardware maintenance
- DIY projects (e.g., Racing Drones)
- Small electronic work
Always ensure proper ventilation and safety precautions when soldering. Use the soldering iron stand to safely rest the hot iron when not in use.

Figure 9: Collage showing the soldering iron being used in various scenarios, such as repairing circuit boards, working on drones, and general electronic repairs.
Video 5: Demonstrates the soldering iron in action, showing a user performing soldering on a circuit board, highlighting its precision and ease of use.
5. Maintenance
Proper maintenance ensures the longevity and optimal performance of your soldering iron:
- Tip Cleaning: Regularly clean the soldering tip using the included sponge or brass wool. This removes oxidation and ensures efficient heat transfer. Always wet the sponge before use.
- Tinning the Tip: After cleaning and before storing, apply a small amount of solder to the tip (tinning). This protects the tip from oxidation.
- Storage: Store the soldering iron in a dry, cool place when not in use. Ensure it is completely cool before storing.
- Handle Care: The ESD control handle is made of special high-temperature resistant material. Keep it clean and free from debris.
6. Troubleshooting
If you encounter issues with your SEQURE D60B Pro, consider the following common solutions:
- Iron Not Heating:
- Check power supply connection. Ensure the power adapter or battery is properly connected and providing sufficient voltage (12V-24V DC).
- Verify the power source is functional.
- Ensure the soldering tip is correctly installed and making good contact.
- Temperature Fluctuations:
- Ensure the tip is clean and properly tinned.
- Check for any loose connections.
- "Over-temperature" or "High-pressure" Alarm:
- This is a safety feature. Power off the device immediately and allow it to cool down.
- Check for any obstructions or issues with the heating element.
- If the issue persists, contact customer support.
- Digital Display Not Working:
- Ensure the device is powered on.
- If the issue persists after checking power, contact customer support.
For further assistance, refer to the official SEQURE support channels.
7. Specifications
| Feature | Detail |
|---|---|
| Brand | SEQURE |
| Model | SQ-D60B Pro |
| Power Source | DC (supports PD 3.0, 12V-24V, XT60) |
| Wattage | 60 watts |
| Voltage | 24 Volts (DC) |
| Temperature Range | 100°C-400°C / 212°F-752°F |
| Temperature Stability | ±5°C |
| Handle Material | Acrylonitrile Butadiene Styrene (ABS) |
| Heating Element Type | Ceramic |
| Item Weight | 1.01 pounds |
| Dimensions | 8.39 x 6.85 x 1.81 inches (Package) |
| Special Features | Adjustable Working Temperature, Easy to Install, Portable, Auto Sleep, Auto Shutoff, Digital Display, Open Source Design |

Figure 10: Internal view of the soldering iron, highlighting the digital display, A and B buttons, Type-C socket, and PCBA (Printed Circuit Board Assembly).

Figure 11: Shows the compact size of the soldering iron, emphasizing its portability and ease of carrying, along with its dimensions.
8. Warranty and Support
For warranty information, product support, or to purchase additional accessories and replacement parts, please visit the official SEQURE website or contact their customer service. Keep your purchase receipt as proof of purchase for any warranty claims.
Protection plans are available for extended coverage. Please refer to the product listing or contact your retailer for details on available protection plans.


