1. Introduction
The ANYCUBIC Photon Mono M5s is a high-precision 12K resin 3D printer designed for detailed and efficient additive manufacturing. Featuring smart leveling-free technology and enhanced printing speeds, it offers an accessible yet powerful solution for both hobbyists and professionals. This manual provides essential information for the safe and effective operation, maintenance, and troubleshooting of your printer.

Image: The ANYCUBIC Photon Mono M5s 12K Resin 3D Printer with its distinctive yellow UV-blocking cover.
2. Safety Information
Please read and understand all safety warnings before operating the printer. Failure to do so may result in injury or damage to the printer.
- Resin Handling: Resin is a chemical irritant. Always wear appropriate personal protective equipment (PPE), including gloves and safety glasses, when handling liquid resin or uncured prints. Work in a well-ventilated area.
- UV Light Exposure: The printer uses powerful UV light. Never look directly at the UV light source. The printer cover is designed to block UV light during operation.
- Electrical Safety: Ensure the printer is connected to a grounded power outlet. Do not operate with wet hands or in damp conditions. Disconnect power before performing any maintenance or cleaning.
- Moving Parts: Keep hands and loose clothing clear of moving parts during operation.
- Disposal: Dispose of uncured resin and contaminated materials according to local regulations. Cured resin can be disposed of as regular plastic waste.
3. What's in the Box
Upon unboxing your ANYCUBIC Photon Mono M5s, verify that all components are present:
- ANYCUBIC Photon Mono M5s 3D Printer Unit
- Build Plate
- Resin Vat
- Power Adapter and Cable
- USB Drive (containing user manual, slicing software, and test files)
- Tool Kit (gloves, masks, scraper, funnel, etc.)
Video: An unboxing guide for the Photon Mono M5s, demonstrating the contents and initial setup steps.
4. Setup
4.1 Initial Placement
Place the printer on a stable, level surface away from direct sunlight and heat sources. Ensure adequate ventilation around the printer.
4.2 Power Connection
Connect the power adapter to the printer and then to a grounded electrical outlet.
4.3 Resin Vat and Build Plate Installation
Carefully install the resin vat onto the printer platform, ensuring it is securely seated. Attach the build plate to the Z-axis arm. The Photon Mono M5s features a leveling-free system, eliminating the need for manual calibration of the build plate.

Image: Illustration of the leveling-free technology, showing the floating platform and internal sensors that automatically adjust for optimal printing.
4.4 Software Installation
Install the Anycubic Photon Workshop 3.1 slicing software from the provided USB drive or download the latest version from the official Anycubic website. This software is essential for preparing your 3D models for printing.

Image: Screenshot of the upgraded Anycubic Photon Workshop 3.1 software interface, highlighting its intelligent mode and improved support algorithms.
5. Operating Instructions
5.1 Preparing a Model for Printing
- Import your 3D model (.STL, .OBJ, etc.) into Anycubic Photon Workshop 3.1.
- Adjust the model's orientation, size, and add necessary supports.
- Utilize the new "Intelligent Mode" for optimized exposure parameters based on model details.
- Slice the model and save the file to the USB drive.

Image: The 'Intelligent Mode' feature within the Anycubic Photon Workshop 3.1, which automatically adjusts printing parameters for optimal results.
5.2 Starting a Print
- Ensure the resin vat is clean and securely installed.
- Pour resin into the vat, ensuring it is below the maximum fill line.
- Insert the USB drive into the printer.
- On the printer's touchscreen, select your prepared file.
- The printer will perform an auto device check and resin detection before starting the print.
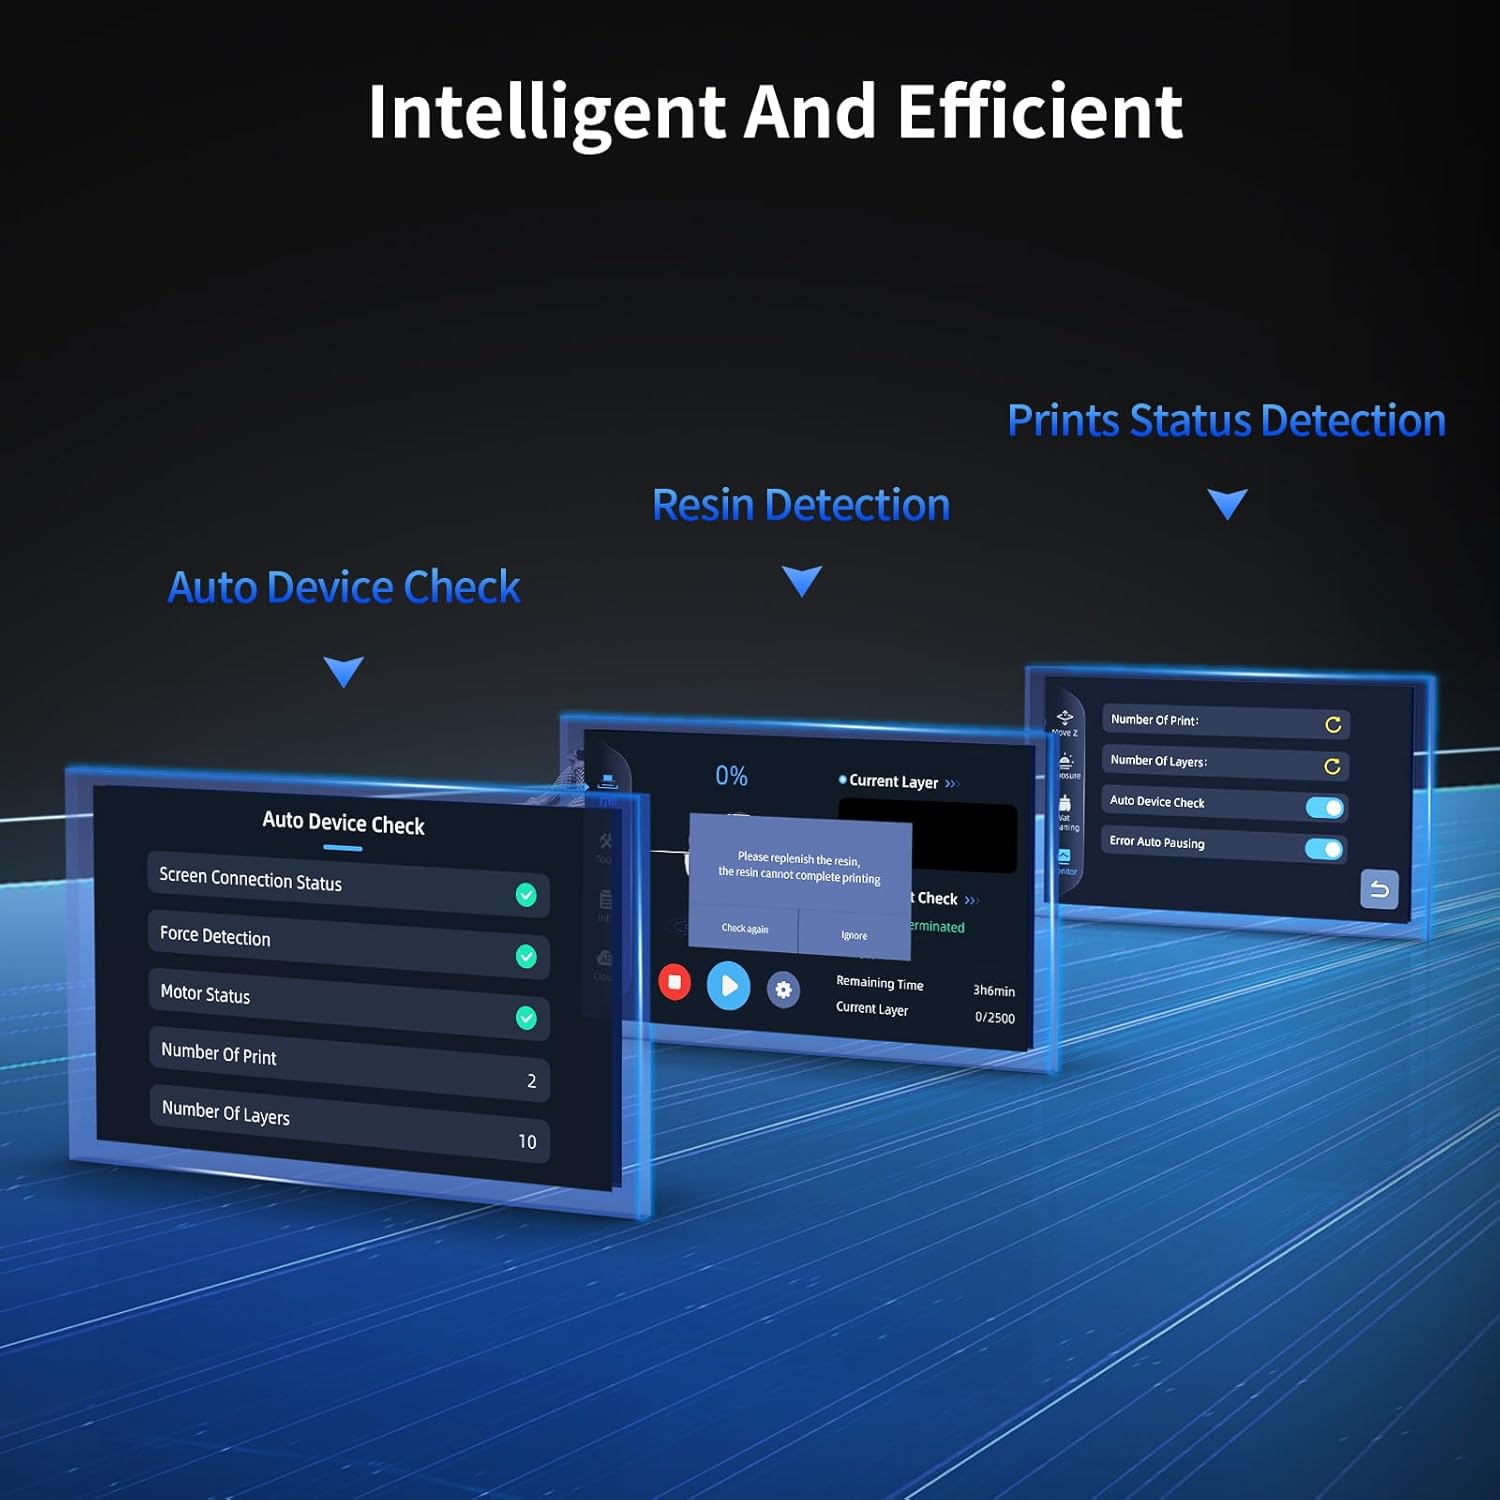
Image: Overview of the intelligent features including auto device check, resin detection, and print status detection, ensuring a smooth printing process.
Video: A demonstration of using the Photon Mono M5s to create a 3D model, from preparing the file to the finished print.
5.3 Key Features in Operation
- 12K Exquisite Details: The 10.1-inch 12K monochrome LCD screen (11520*5120 resolution, 19 microns X accuracy) allows for exceptionally fine details.
- 3X Faster Printing: Achieves an average print speed of 105mm/h with high-speed resin and a high-speed release film.
- Large Printing Size: Offers a printing volume of 7.87" x 8.58" x 4.84" (HWD).

Image: Close-up view illustrating the 12K resolution capabilities, highlighting the fine details achievable with the printer's screen.

Image: Comparison showing the significantly reduced printing time of the Photon Mono M5s with high-speed resin compared to other printers.

Image: Diagram illustrating the large build volume of the Photon Mono M5s, capable of printing larger models.
6. Maintenance
Regular maintenance ensures optimal performance and longevity of your printer.
6.1 Cleaning the Resin Vat and Build Plate
- After each print, carefully remove the build plate and clean off any excess resin using isopropyl alcohol (IPA).
- If changing resin types or storing the printer, clean the resin vat thoroughly with IPA. Ensure no cured resin particles remain on the FEP film.
Video: Instructions on how to operate resin residue cleaning for the Mono M5 series, ensuring proper maintenance of the resin vat.
6.2 Replacing Components
Over time, certain components may require replacement due to wear or damage.
- FEP Film: The FEP film in the resin vat is a consumable part. Replace it if you notice cloudiness, scratches, or punctures.
- LCD Screen: If the LCD screen is damaged or shows dead pixels, it will need to be replaced.
- Build Plate: The build plate may need replacement if it becomes severely damaged or warped.
- Motherboard: In rare cases of electronic malfunction, the motherboard may need replacement.
- Lead Screw Motor: If the Z-axis movement becomes erratic or stops, the lead screw motor might need attention.
Video: A detailed guide on how to replace the LCD screen of the Photon Mono M5s.
Video: Instructions for replacing the build plate on the Photon Mono M5s.
Video: A step-by-step guide on how to replace the motherboard of the Photon Mono M5s.
Video: Instructions for replacing the lead screw motor on the Photon Mono M5s.
7. Troubleshooting
This section addresses common issues you might encounter during operation.
- Print Failure (Bottoming-out): The printer's intelligent print status detection can report and analyze common bottoming-out failures, providing suggestions for improvement. Ensure proper support placement and exposure settings.
- Model Not Sticking to Build Plate: Ensure the build plate is clean and free of resin residue. Verify that the initial layer exposure time is sufficient in your slicing software.
- Resin Not Curing: Check the UV light source for proper function. Ensure the resin is not expired and is stored correctly. Verify exposure settings in the slicing software.
- Printer Not Responding: Check power connections. Restart the printer. If issues persist, refer to the official Anycubic support resources.
8. Specifications
| Feature | Detail |
|---|---|
| Model | Photon Mono M5s |
| LCD Screen | 10.1-inch Monochrome |
| Resolution | 11520 x 5120 (12K) |
| XY Accuracy | 19 microns |
| Contrast Ratio | 480:1 |
| Printing Speed (Average) | 105mm/h (with high-speed resin) |
| Build Volume (HWD) | 7.87" x 8.58" x 4.84" (200 x 218 x 123mm) |
| Product Dimensions | 14.57 x 14.17 x 23.23 inches |
| Item Weight | 19.6 pounds |
| Power Consumption | 100 watts (On-mode) |
9. Warranty and Support
ANYCUBIC provides a standard warranty for the Photon Mono M5s 3D Printer. For detailed warranty terms and conditions, please refer to the warranty card included with your product or visit the official ANYCUBIC website.
For technical support, troubleshooting assistance, or spare parts, please contact ANYCUBIC customer service through their official channels. You can find contact information on the ANYCUBIC website or the support section of the slicing software.
Official Website: www.anycubic.com
Brand Store: ANYCUBIC Official Store on Amazon


