Introduction
This manual provides essential information for the safe and effective operation of your SP Tools SP62015 Pocket Size Digital Multimeter. Please read this manual thoroughly before using the device and keep it for future reference. This multimeter is designed for measuring various electrical parameters with precision and ease.
Safety Information
Always adhere to the following safety precautions to prevent personal injury or damage to the multimeter:
- Do not exceed the maximum input limits for any function. The device features a 3600V CAT III safety design.
- Exercise extreme caution when working with live circuits. High voltages can be dangerous.
- Ensure the test leads are in good condition, without any cracks or damaged insulation.
- Always turn off the circuit power and discharge all high-voltage capacitors before performing resistance, continuity, or diode tests.
- Do not operate the multimeter if it appears damaged or if the casing is open.
- Replace the battery when the low battery indicator appears to ensure accurate readings.
- Keep the device dry and clean. Avoid exposure to extreme temperatures or humidity.
Product Overview
The SP Tools SP62015 is a compact and versatile digital multimeter. Familiarize yourself with its components:
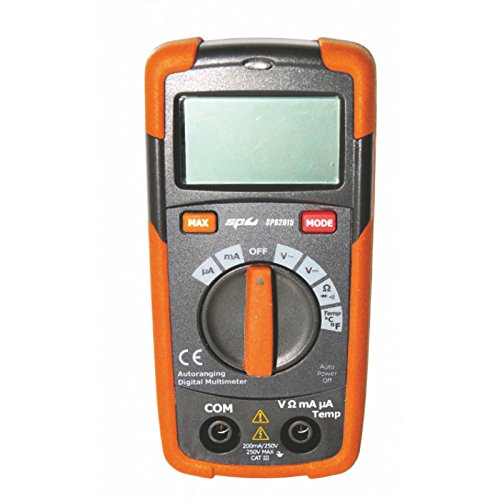
A front view of the SP Tools SP62015 Pocket Size Digital Multimeter, featuring an orange and black casing, a digital display, a large rotary dial for function selection, and input jacks at the bottom. The display shows a clear reading area. Above the rotary dial are buttons for 'MAX' and 'MODE'. The dial has settings for various measurements including mA, A, V~, V-, Ω, Temp (°C/°F), Continuity, and Diode. Below the dial are input jacks labeled 'COM', 'VΩmAμA', and 'Temp'.
- Digital Display: 2000 digital display for clear readings.
- Rotary Function Switch: Selects the desired measurement function (Voltage, Current, Resistance, Temperature, etc.).
- MAX Button: Used for capturing maximum readings.
- MODE Button: Toggles between different measurement modes within a function (e.g., AC/DC voltage, Celsius/Fahrenheit).
- Input Jacks:
- COM (Common): For the black test lead.
- VΩmAμA: For the red test lead when measuring voltage, resistance, or current (mA/μA).
- Temp: For connecting the K-type temperature sensor.
- Non-Contact LCA Detection: For detecting live AC voltage without direct contact.
- Automatic Range: Automatically selects the appropriate measurement range.
Setup
Before first use, install the battery:
- Ensure the multimeter is turned OFF.
- Locate the battery compartment on the back of the unit.
- Unscrew the retaining screw(s) and remove the battery cover.
- Insert the correct type and polarity of battery (as indicated inside the compartment). The multimeter is Battery Powered.
- Replace the battery cover and secure it with the screw(s).
- Connect the provided measuring leads to the appropriate input jacks. The black lead goes into the COM jack, and the red lead goes into the VΩmAμA jack for most measurements.
Operating Instructions
This section details how to perform common measurements with your SP62015 multimeter.
1. Measuring DC Voltage (V-)
- Turn the rotary switch to the V- position.
- Connect the black test lead to the COM jack and the red test lead to the VΩmAμA jack.
- Connect the test leads in parallel across the component or circuit to be measured.
- Read the voltage value on the digital display.
2. Measuring AC Voltage (V~)
- Turn the rotary switch to the V~ position.
- Connect the black test lead to the COM jack and the red test lead to the VΩmAμA jack.
- Connect the test leads in parallel across the AC source or component.
- Read the voltage value on the digital display.
3. Measuring Resistance (Ω)
- Turn the rotary switch to the Ω position.
- Ensure the circuit is de-energized before measuring resistance.
- Connect the black test lead to the COM jack and the red test lead to the VΩmAμA jack.
- Connect the test leads across the component whose resistance you want to measure.
- Read the resistance value on the digital display.
4. Continuity Test
- Turn the rotary switch to the Continuity position (often shared with Diode/Resistance).
- Use the MODE button if necessary to select continuity.
- Ensure the circuit is de-energized.
- Connect the black test lead to the COM jack and the red test lead to the VΩmAμA jack.
- Touch the test leads across the component or wire. A continuous beep indicates a good connection (low resistance).
5. Diode Test
- Turn the rotary switch to the Diode position (often shared with Continuity/Resistance).
- Use the MODE button if necessary to select diode test.
- Ensure the circuit is de-energized.
- Connect the black test lead to the COM jack and the red test lead to the VΩmAμA jack.
- Connect the red lead to the anode and the black lead to the cathode of the diode. A forward voltage drop will be displayed. Reverse the leads; an open circuit (OL) should be displayed for a good diode.
6. Measuring Current (mA/A/μA)
- Turn the rotary switch to the appropriate current range (mA, A, or μA).
- IMPORTANT: Connect the multimeter in series with the circuit.
- Connect the black test lead to the COM jack and the red test lead to the VΩmAμA jack.
- Break the circuit and insert the multimeter in series.
- Read the current value on the digital display.
7. Measuring Temperature (Temp)
- Turn the rotary switch to the Temp position.
- Connect the K-type temperature sensor to the Temp input jacks.
- Place the tip of the temperature sensor on the object or area whose temperature you wish to measure.
- Read the temperature value on the digital display. Use the MODE button to switch between Celsius (°C) and Fahrenheit (°F) if available.
8. Non-Contact LCA Detection
- This feature allows detection of live AC voltage without direct contact.
- Refer to the specific symbol or setting on your multimeter for this function.
- Bring the top of the multimeter near the AC voltage source. The device will indicate the presence of AC voltage, typically with an audible beep and/or visual indicator.
9. Data Retention (Data Hold)
- Press the MAX button (or a dedicated HOLD button if present) to freeze the current reading on the display.
- Press the button again to release the hold and resume live readings.
10. Automatic Shutdown
- The multimeter is equipped with an Automatic Shutdown feature to conserve battery life. If the device is idle for a certain period, it will automatically power off.
- To reactivate, turn the rotary switch to OFF and then back to the desired function, or press any button.
Maintenance
Proper maintenance ensures the longevity and accuracy of your multimeter.
- Cleaning: Wipe the casing with a damp cloth and mild detergent. Do not use abrasives or solvents. Ensure the device is dry before use.
- Battery Replacement: When the low battery indicator appears on the display, replace the battery promptly to maintain accuracy. Follow the steps outlined in the "Setup" section.
- Storage: If storing the multimeter for an extended period, remove the battery to prevent leakage. Store in a cool, dry place away from direct sunlight and extreme temperatures.
- Test Leads: Regularly inspect test leads for any signs of damage, such as cracks in the insulation or exposed wiring. Replace damaged leads immediately.
Troubleshooting
If you encounter issues with your multimeter, refer to the following common problems and solutions:
| Problem | Possible Cause | Solution |
|---|---|---|
| No display or dim display | Dead or low battery; Auto Power Off activated. | Replace battery; Turn rotary switch to OFF and then back on. |
| "OL" (Overload) displayed | Input value exceeds the selected range; Open circuit. | Select a higher range (if not auto-ranging); Check for open circuit in the component/leads. |
| Incorrect readings | Incorrect function selected; Poor test lead connection; Low battery. | Verify function switch setting; Ensure leads are firmly connected; Replace battery. |
| No continuity beep | Open circuit; Incorrect function. | Check the circuit for breaks; Ensure continuity function is selected. |
Specifications
Key technical specifications for the SP Tools SP62015 Digital Multimeter:
- Display: 2000 Digital Display
- Safety Rating: CAT III 3600V
- Features: Automatic Range, Data Retention, Non-contact LCA Detection, Automatic Shutdown, Low Battery Indicator
- Measurement Functions: DC Voltage, AC Voltage, DC Current, AC Current, Resistance, Continuity, Diode Test, K-type Temperature Input
- Power Source: Battery Powered
- Product Dimensions: 7.87 x 5.91 x 1.57 inches
- Item Weight: 1.1 Pounds (0.5 Kilograms)
- Color: Multicolored (Orange and Black)
- Included: Measuring Leads, K-type Temperature Sensor
Warranty and Support
For warranty information and technical support, please contact SP Tools directly or refer to their official website. Keep your purchase receipt as proof of purchase.
Manufacturer: SP Tools
For further assistance, visit the SP Tools Store on Amazon.


