1. Safety Information
Please read all instructions carefully before operating the safe. Keep this manual for future reference.
- Important: Always store the emergency keys in a secure location separate from the safe itself. Do not store them inside the safe.
- Ensure the safe is placed on a stable, level surface or securely mounted to a wall or floor to prevent tipping.
- Do not expose the safe to extreme temperatures or high humidity.
- Keep children away from the safe and its contents.
2. Package Contents
Verify that all items listed below are included in your package:
- WASJOYE FPJ Fingerprint Authentication Safe
- Emergency Keys (2)
- Anchor Bolts (4)
- Floor Mat
- Removable Shelf
- User Manual (this document)

Figure 2.1: Package Contents. This image displays the safe's accessories: two emergency keys, the user manual, four anchor bolts, a floor mat, and a removable shelf.
3. Setup
3.1. Battery Installation
- Locate the battery compartment, typically on the inside of the safe door.
- Insert 4 x AA batteries (sold separately) according to the polarity markings (+/-).
- Close the battery compartment cover securely.
3.2. Initial Fingerprint Registration
The safe allows registration of up to 32 fingerprints. The first registered fingerprint will be the administrator fingerprint.
- Open the safe using the emergency key if it's the first time or if batteries are new.
- Locate the "Setting Button" inside the safe, usually near the fingerprint sensor module.
- Press the "Setting Button". The indicator light on the fingerprint sensor will illuminate, indicating it's ready for registration.
- Place your finger firmly on the fingerprint sensor. Lift and repeat this process several times (usually 4-5 times) until the indicator light confirms successful registration (e.g., a green light or beep).
- Test the registered fingerprint to ensure it unlocks the safe.

Figure 3.1: Fingerprint Authentication Module. This image shows the high-precision semiconductor sensor capable of registering up to 32 fingerprints, with a 0.5-second response time and 99.99% accuracy.
3.3. Mounting the Safe (Optional)
For enhanced security, the safe can be fixed to a floor or wall using the provided anchor bolts.
- Choose a suitable location for mounting.
- Locate the pre-drilled holes on the back and bottom of the safe.
- Mark the drilling points on the wall or floor through these holes.
- Drill pilot holes at the marked points.
- Align the safe with the drilled holes and secure it using the anchor bolts. Tighten firmly.
4. Operating Instructions
4.1. Unlocking with Fingerprint
- Place a registered finger firmly on the fingerprint sensor.
- If the fingerprint is recognized, the safe's electric motor will activate, and the door will unlock dynamically.
- Pull the door open.
4.2. Unlocking with Emergency Key
Use the emergency key in case of battery depletion or forgotten fingerprints.
- Locate the hidden cover for the emergency lock, usually near the fingerprint module.
- Remove the cover.
- Insert the emergency key into the keyhole and turn it to unlock the safe.
- Pull the door open.
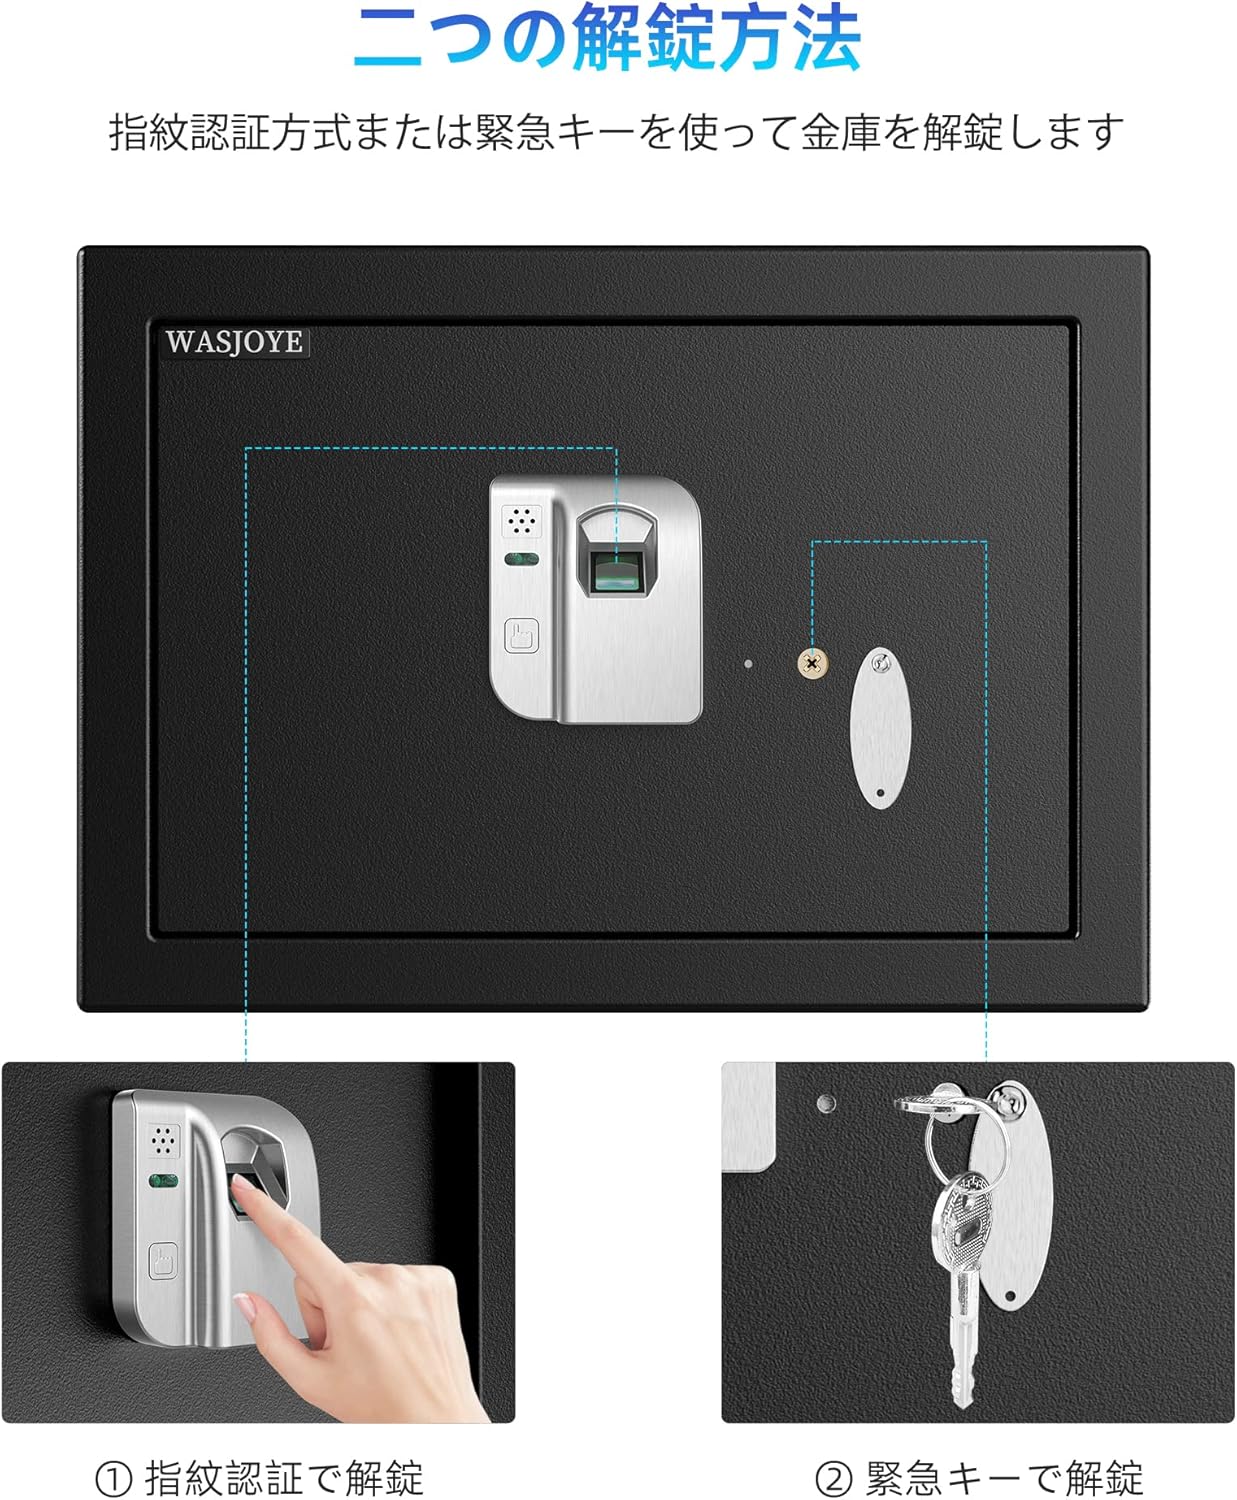
Figure 4.1: Two Unlock Methods. This image demonstrates both the fingerprint recognition method and the use of the emergency key to open the safe.
4.3. Adding/Deleting Fingerprints
Only the administrator fingerprint can add or delete other fingerprints.
- Open the safe using an administrator fingerprint.
- Press the "Setting Button" inside the safe.
- To add a new fingerprint: Follow the steps for initial fingerprint registration (Section 3.2).
- To delete fingerprints: Consult the full manual for specific instructions, as this often involves a reset or specific sequence.
4.4. Closing and Locking the Safe
Simply close the safe door. The safe will automatically lock.
5. Maintenance
- Cleaning: Wipe the safe's exterior with a soft, damp cloth. Avoid abrasive cleaners or solvents.
- Battery Replacement: Replace batteries promptly when the low battery indicator appears (if applicable) or if the safe becomes unresponsive. Always use 4 new AA batteries.
- Fingerprint Sensor: Keep the fingerprint sensor clean and dry for optimal performance.
6. Troubleshooting
| Problem | Possible Cause | Solution |
|---|---|---|
| Safe does not open with fingerprint. | Finger not placed correctly; unregistered fingerprint; low battery; dirty sensor. | Ensure finger covers the sensor completely; register the fingerprint; replace batteries; clean the sensor. |
| No power/safe unresponsive. | Batteries are dead or incorrectly installed. | Replace all 4 AA batteries; check polarity. Use emergency key to open. |
| Emergency key does not work. | Incorrect key; key not fully inserted or turned. | Ensure you are using the correct emergency key; insert fully and turn firmly. |
7. Specifications
- Model: FPJ
- Brand: WASJOYE
- Authentication: Fingerprint (up to 32 registrations)
- Material: Full Metal Body
- Door Thickness: 1.6 inches (4 cm)
- Door Bolts: 0.8 x 0.08 inches (2 x 2 mm) high strength bolts
- Power: 4 x AA Batteries (not included)
- Capacity: Approximately 5.6 gal (16.9 L)
- External Dimensions (approx.): 35cm (W) x 25cm (D) x 25cm (H)
- Internal Dimensions (approx.): 34.5cm (W) x 21cm (D) x 24.5cm (H)
- Special Features: Fingerprint authentication, emergency key access, removable shelf, pre-drilled mounting holes.

Figure 7.1: High-Strength Full Metal Body. This image highlights the safe's robust construction, featuring a 5cm (approx. 1.97 inches) thick door and 2cm (approx. 0.79 inches) diameter door bolts for enhanced security.

Figure 7.2: 16L Storage Capacity. This image illustrates the internal storage space, capable of accommodating A4 paper, passports, and other valuables. It also shows the flexibility of a removable divider to adjust space.
Figure 7.3: External and Internal Dimensions. This image provides a visual representation of the safe's measurements, showing external dimensions of 35cm (W) x 25cm (D) x 25cm (H) and internal dimensions of 34.5cm (W) x 21cm (D) x 24.5cm (H).
8. Warranty and Support
WASJOYE products are manufactured to high-quality standards. For warranty information, technical support, or service inquiries, please contact WASJOYE customer service through the retailer where the product was purchased or visit the official WASJOYE website.
Please retain your proof of purchase for warranty claims.