1. Introduction
This manual provides comprehensive instructions for the ORICO 11-in-1 USB-C Docking Station. This device expands a single USB-C port on your laptop, tablet, or smartphone into multiple connectivity options, enhancing your productivity and multimedia experience.
Key features include:
- 4K@60Hz HDMI output for external displays.
- High-speed data transfer with 2x USB 3.2 (10Gbps) and 1x USB-C (10Gbps) ports.
- Power Delivery (PD) up to 100W for charging your host device.
- Gigabit Ethernet port for stable wired network connection.
- SD and TF card readers for simultaneous data access.
- 2x USB 2.0 ports for peripherals.
- 3.5mm audio jack for headphones or speakers.

Figure 1: ORICO 11-in-1 USB-C Docking Station with port labels.
2. Product Overview
The ORICO 11-in-1 USB-C Docking Station is designed to provide extensive connectivity through a single USB-C connection. Below is a detailed look at its various ports and their functions.

Figure 2: Front and side view of the docking station highlighting each port.
Port Layout and Functions:
- USB-C Host Connector: Connects to your laptop, tablet, or smartphone's USB-C port.
- HDMI Port: Connects to an external monitor, TV, or projector for video output up to 4K@60Hz.
- USB-C PD Port (100W): For power input to charge your host device and power the docking station.
- USB 3.2 Gen 2 Type-A Ports (2x): High-speed data transfer up to 10Gbps.
- USB 3.2 Gen 2 Type-C Port (1x): High-speed data transfer up to 10Gbps.
- USB 2.0 Type-A Ports (2x): For connecting peripherals like keyboards, mice, or printers.
- Gigabit Ethernet (RJ45) Port: Provides a stable wired network connection (10/100/1000Mbps).
- SD Card Slot: Reads standard SD cards.
- TF Card Slot: Reads microSD cards.
- 3.5mm Audio Jack: For connecting headphones, earphones, or external speakers.

Figure 3: Compact and portable design of the docking station.
3. Setup Instructions
Follow these steps to set up your ORICO 11-in-1 USB-C Docking Station.
- Connect to Host Device: Plug the integrated USB-C cable from the docking station into a full-featured USB-C port on your laptop, tablet, or smartphone. Ensure your device's USB-C port supports DisplayPort Alternate Mode and Power Delivery for full functionality.
- Connect Power (Optional but Recommended): For stable operation and to charge your host device, connect your original power adapter (up to 100W) to the USB-C PD port on the docking station.
- Connect Peripherals:
- Display: Connect an HDMI cable from the docking station's HDMI port to your external monitor.
- Network: Connect an Ethernet cable to the RJ45 port for a wired internet connection.
- USB Devices: Plug in your USB devices (e.g., external hard drives, USB flash drives, keyboard, mouse) into the available USB-A or USB-C data ports.
- Memory Cards: Insert SD or TF cards into their respective slots.
- Audio: Connect headphones or speakers to the 3.5mm audio jack.
- Driver Installation: In most cases, the docking station is plug-and-play and does not require additional drivers for Windows, macOS, or Linux. If any issues arise, ensure your operating system is up to date.

Figure 4: Compatibility overview for devices and operating systems.
4. Operating Instructions
4.1. Video Output (HDMI)
Connect an HDMI-enabled display to the HDMI port. The docking station supports resolutions up to 4K (3840x2160) at 60Hz. Your operating system's display settings can be used to configure mirror mode (duplicate display) or extend mode (separate display).

Figure 5: Displaying content on an external monitor at 4K@60Hz.
Note: For Windows OS, mirror mode typically displays the same resolution as the laptop's primary screen.
4.2. Data Transfer (USB Ports)
The docking station features multiple USB ports for connecting various devices:
- USB 3.2 Gen 2 (10Gbps): Use these ports for high-speed data transfer with external SSDs, flash drives, or other compatible devices. Data transfer rates can reach up to 10 Gigabits per second.
- USB 2.0 (480Mbps): Ideal for connecting standard peripherals like keyboards, mice, and printers where high data speeds are not critical.

Figure 6: High-speed data transmission capabilities.
4.3. Power Delivery (USB-C PD Port)
Connect your laptop's original USB-C power adapter to the docking station's USB-C PD port. This allows the docking station to pass through up to 100W of power to charge your host device while simultaneously powering all connected peripherals.

Figure 7: Laptop receiving up to 100W power via the docking station.
4.4. Gigabit Ethernet
For a stable and fast internet connection, plug an Ethernet cable into the RJ45 port. The docking station supports 10/100/1000Mbps network speeds, providing a reliable alternative to Wi-Fi.
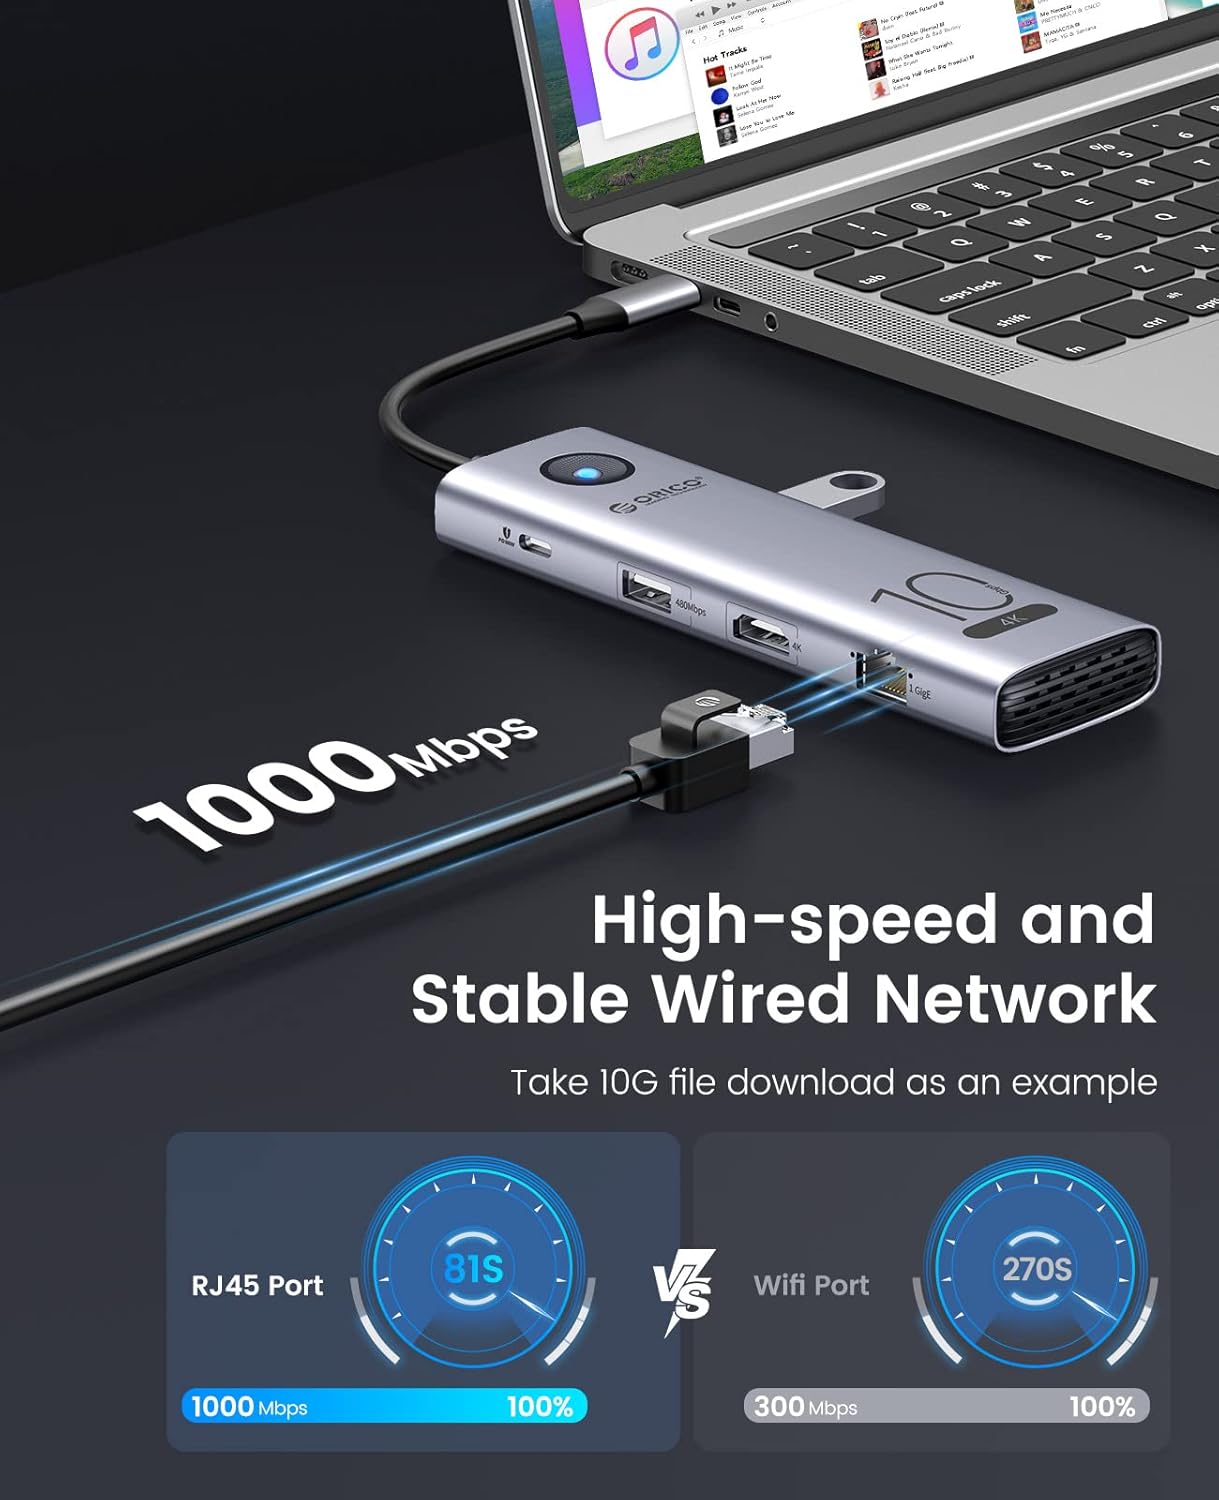
Figure 8: Stable wired network connection via Gigabit Ethernet.
4.5. SD/TF Card Reader
Insert your SD or TF (microSD) cards into the corresponding slots. The docking station allows for simultaneous reading and writing to both card types, with speeds up to 104MB/s.

Figure 9: Using the integrated SD and TF card reader.
4.6. Audio Output
Connect your 3.5mm headphones, earphones, or speakers to the audio jack for sound output from your host device.
5. Maintenance
- Cleaning: Use a soft, dry cloth to clean the surface of the docking station. Avoid liquid cleaners or abrasive materials.
- Storage: Store the device in a cool, dry place away from direct sunlight and extreme temperatures.
- Handling: Avoid dropping or subjecting the device to strong impacts. Do not attempt to disassemble the unit.
- Cable Care: Ensure the integrated USB-C cable is not bent sharply or strained, as this can damage the internal wiring.
6. Troubleshooting
If you encounter issues with your ORICO 11-in-1 USB-C Docking Station, refer to the following common solutions:
- No Display Output:
- Ensure your host device's USB-C port supports DisplayPort Alternate Mode.
- Check that the HDMI cable is securely connected to both the docking station and the monitor.
- Verify the monitor input source is set correctly (e.g., HDMI 1, HDMI 2).
- Try connecting the docking station's power adapter.
- Update your graphics drivers on your host device.
- USB Devices Not Recognized:
- Ensure the docking station is properly connected to your host device.
- Try connecting the docking station's power adapter, especially for power-hungry USB devices.
- Test the USB device by connecting it directly to your host device.
- Restart your host device.
- Slow Data Transfer Speeds:
- Ensure you are using the USB 3.2 (10Gbps) ports for high-speed devices.
- Verify that your connected USB device also supports USB 3.2 Gen 2 speeds.
- Avoid connecting too many power-hungry devices simultaneously without external power to the docking station.
- No Network Connection (Ethernet):
- Check the Ethernet cable connection to both the docking station and your router/modem.
- Verify that your network settings on your host device are configured for a wired connection.
- Restart your router/modem and host device.
- Docking Station Overheating:
- It is normal for the docking station to become warm during heavy use, especially when multiple ports are active and power delivery is engaged.
- Ensure adequate ventilation around the device. Avoid placing it in enclosed spaces.
- If the device becomes excessively hot and causes disconnections, try reducing the number of connected power-hungry peripherals or ensure external power is supplied to the PD port.
- Charging Issues (PD Port):
- Ensure your power adapter is connected to the docking station's USB-C PD port.
- Verify your power adapter provides sufficient wattage (up to 100W supported).
- Confirm your host device's USB-C port supports Power Delivery.
7. Specifications
| Feature | Detail |
|---|---|
| Model | ORICO-CX10-11P-GY-BP |
| Brand | ORICO |
| Ports | 11 (HDMI, 2x USB 3.2 10G, 1x USB-C 10G, 2x USB 2.0, 1x USB-C PD, Gigabit Ethernet, SD, TF, 3.5mm Audio) |
| HDMI Output | Up to 4K@60Hz |
| USB Data Transfer Rate | 10 Gigabits Per Second (USB 3.2/USB-C data ports) |
| Power Delivery | Up to 100 Watts |
| Ethernet Speed | 10/100/1000Mbps (Gigabit) |
| Card Reader Speed | Up to 104MB/s (SD/TF) |
| Compatible Operating Systems | Mac OS, Windows OS, Linux, iOS |
| Material | Metal |
| Item Weight | 18 g |
| Dimensions | 19.89 x 6.5 x 2.11 cm (Package Dimensions) |
8. Warranty and Support
For warranty information and technical support, please refer to the official ORICO website or contact your retailer. Keep your purchase receipt for warranty claims.
ORICO Official Website: www.orico.com.cn