
1. Introduction
This manual provides essential instructions for the safe and efficient operation, installation, and maintenance of your WASSERMANN 1/3HP Submersible Water Pump, Model 61303. This utility pump is designed for clean water removal from various applications such as swimming pools, garden areas, and basements. Please read this manual thoroughly before use and retain it for future reference.
2. Safety Information
WARNING: Failure to follow these safety instructions may result in electric shock, fire, or serious injury.
- Always disconnect the pump from the power source before handling, cleaning, or performing any maintenance.
- Ensure the power cord and plug are in good condition. Do not use if damaged.
- Do not operate the pump in dry conditions. Running dry can cause severe damage to the motor.
- This pump is designed for clean water. Do not use it for flammable, corrosive, or explosive liquids.
- Keep children and unauthorized persons away from the pump during operation.
- Ensure the electrical outlet is properly grounded and protected by a Ground Fault Circuit Interrupter (GFCI).
- Do not lift or carry the pump by its power cord. Use the integrated handle.
- The maximum solid size this pump can handle is 1/5 inch. Do not use in water containing larger debris.
3. Product Components
The WASSERMANN 1/3HP Submersible Water Pump Model 61303 includes the following main components and accessories:
- Utility Pump with integrated handle
- 10 FT Power Cord
- Adapter fittings: NPT1-1/2", NPT2", NPT3/4"
- 1 x Stainless Steel Hose Clamp
- 1 x Teflon Tape
- User Manual
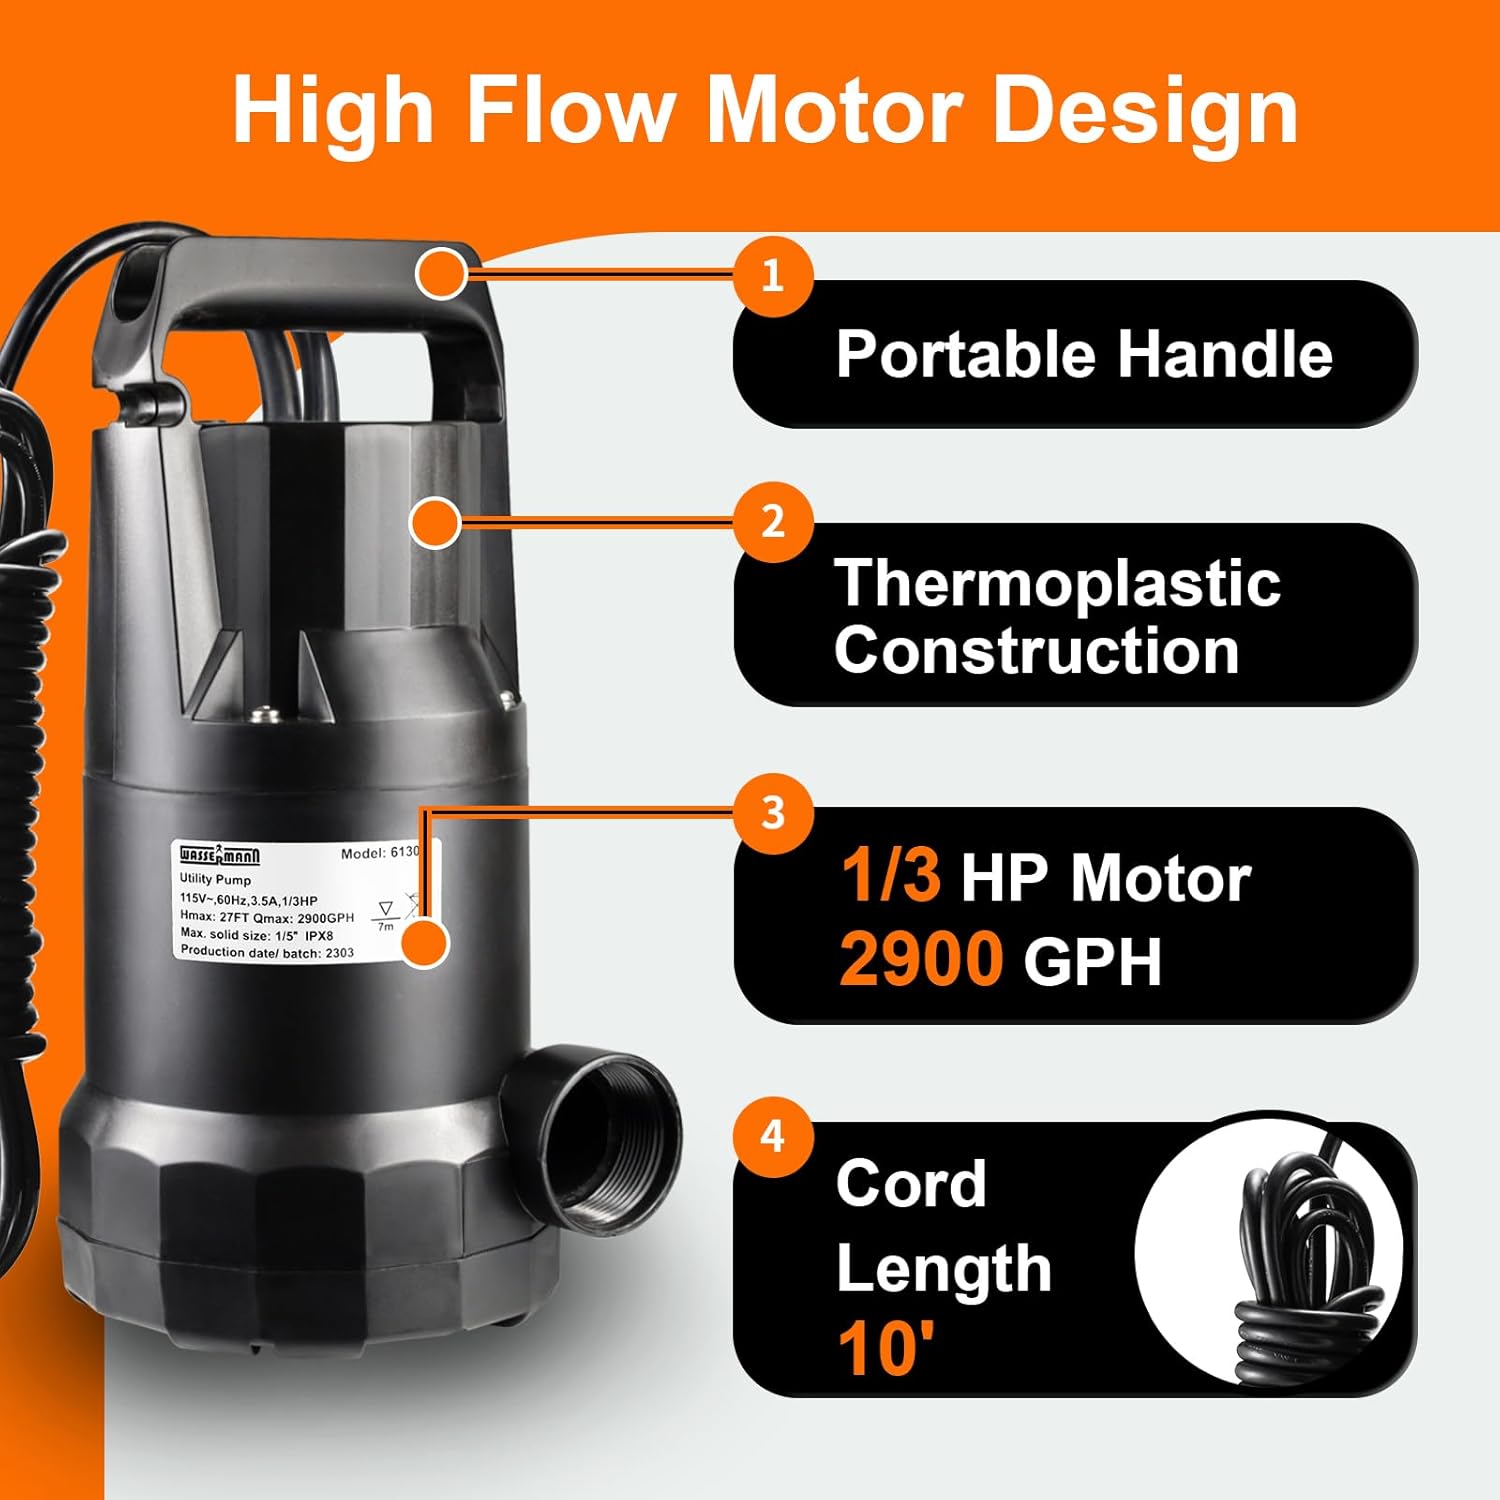
Figure 3.1: Key components of the WASSERMANN Submersible Water Pump.

Figure 3.2: Available discharge connection types.
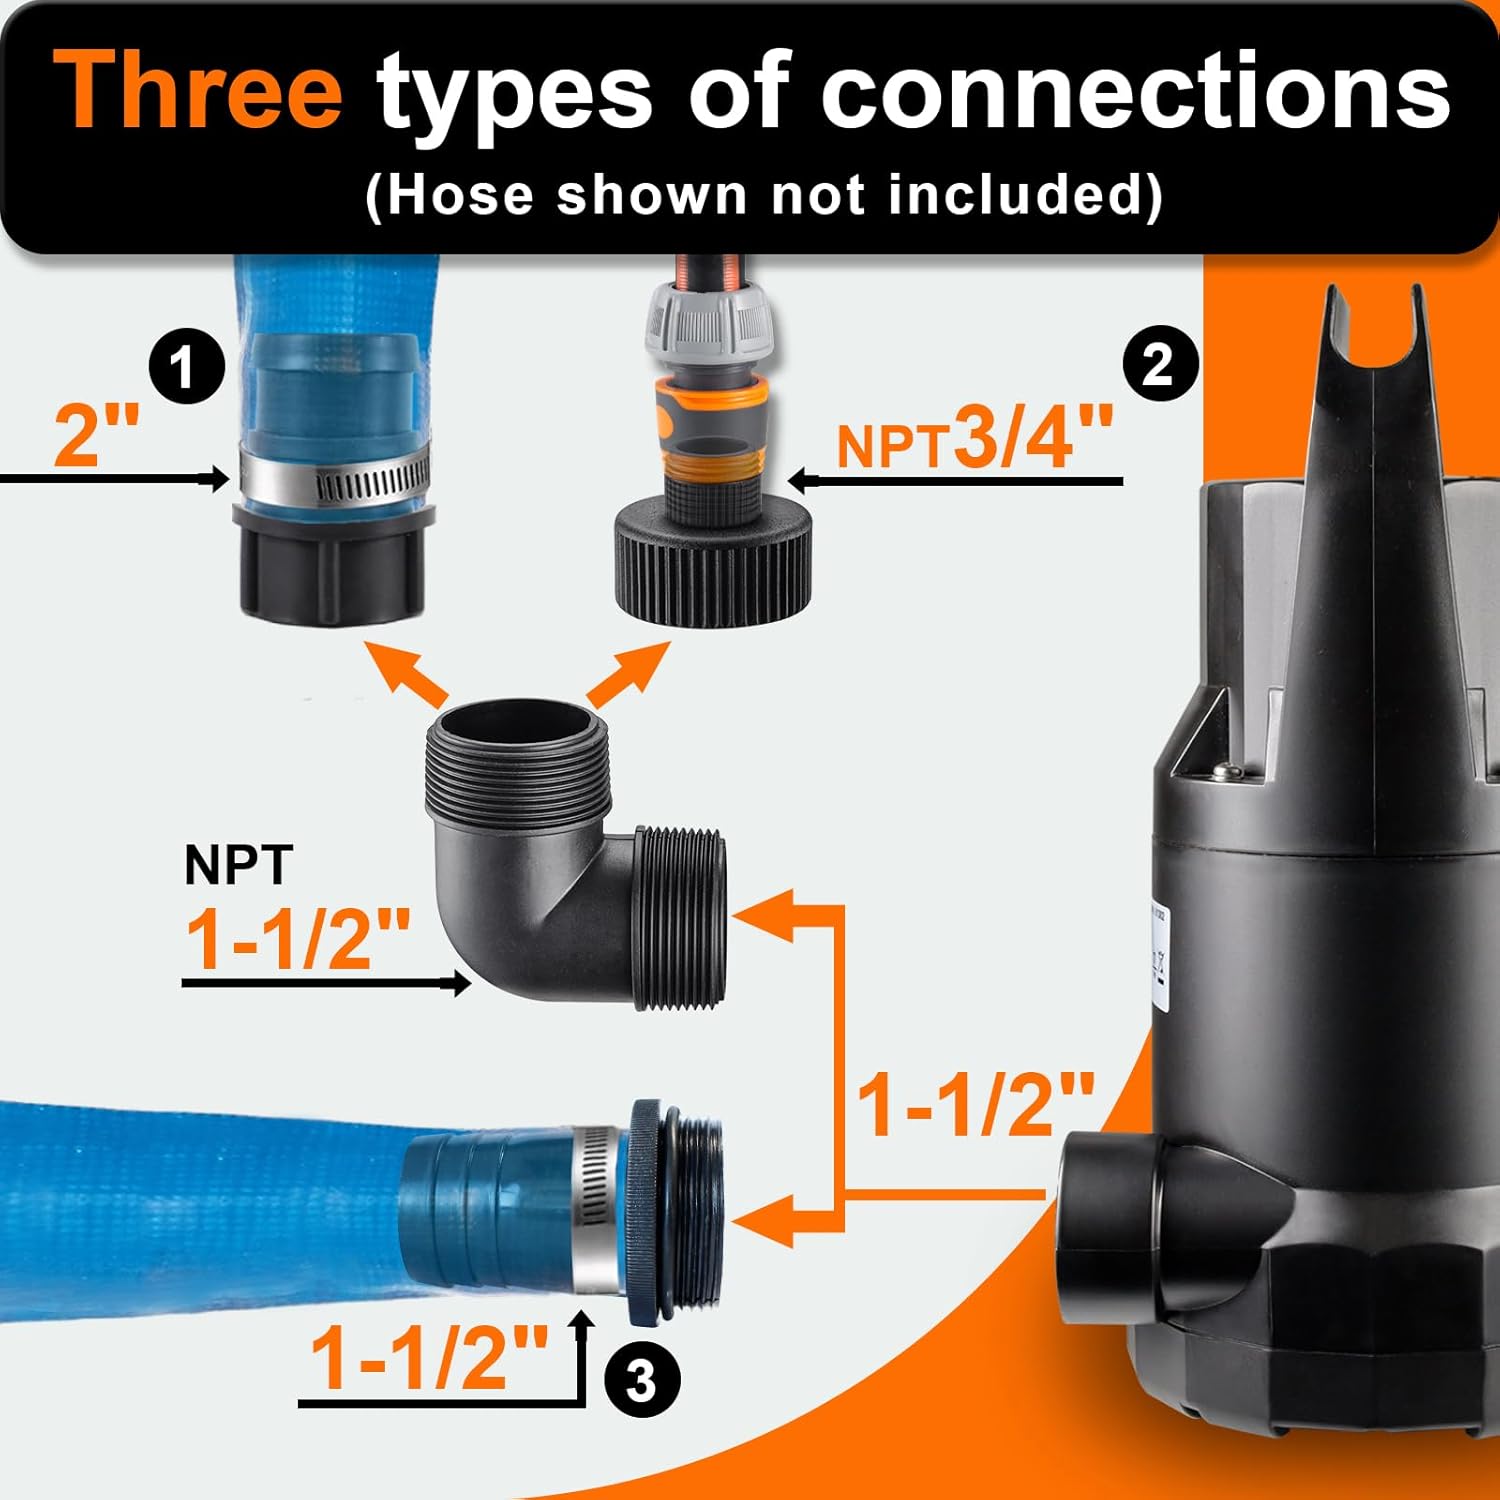
Figure 3.3: Internal features including impeller and solid handling capacity.
Unboxing Video
Video 3.1: Official unboxing and component overview of the WASSERMANN 1/3HP Utility Pump.
4. Specifications
Refer to the table below for detailed technical specifications of the WASSERMANN 1/3HP Submersible Water Pump Model 61303.

Figure 4.1: Technical Specifications Overview.
| Feature | Specification |
|---|---|
| Brand | WASSERMANN |
| Model Number | 61303 |
| Power | 1/3 HP |
| Maximum Flow Rate | 2900 Gallons Per Hour (GPH) |
| Maximum Lifting Height (Head) | 27 Feet |
| Voltage | 115 Volts |
| Material | Thermoplastic |
| Discharge Size | 1-1/2" (with adapters for NPT1-1/2", NPT2", NPT3/4") |
| Maximum Solid Size | 1/5 inch |
| Power Cord Length | 10 Feet |
| Product Dimensions (L x W x H) | 5.94" x 6.1" x 12.6" |
| Item Weight | 8.62 pounds |
5. Setup Instructions
- Choose Discharge Hose: Select a suitable discharge hose (not included) based on your application and desired flow rate. The pump includes adapters for NPT1-1/2", NPT2", and NPT3/4" hoses.
- Attach Adapter: Thread the appropriate adapter onto the pump's discharge port. Use the provided Teflon tape on the threads for a watertight seal. Secure the hose to the adapter using the stainless steel hose clamp.

Figure 5.1: Connecting the discharge hose.
- Position the Pump: Place the pump in the water to be removed. Ensure the pump is fully submerged and resting on a stable, flat surface. Avoid placing it directly on mud or loose debris.
- Initial Priming: To allow any trapped air to escape, submerge the pump into the water at a slight tilt angle before connecting power. This helps ensure proper priming and efficient operation.

Figure 5.2: Submerging the pump.
- Connect Power: Once the pump is submerged and the hose is securely attached, plug the 10-foot power cord into a properly grounded 115V electrical outlet protected by a GFCI.
6. Operating Instructions
- Start Pumping: The pump will begin operating immediately upon plugging it into the power outlet.
- Monitor Water Level: Continuously monitor the water level. The pump can remove water down to a minimum level of 1/4 inch.
- Avoid Dry Running: Do not allow the pump to run dry. Unplug the pump immediately once the water has been removed to the desired level or if the water source runs out. Running dry will damage the pump.

Figure 6.1: Power connection and dry running warning.
- Applications: This pump offers simple plug-and-play operation. It is suitable for removing water from swimming pools, hot tubs, flooded areas, and for garden irrigation.
- Draining swimming pools and hot tubs.
- Removing water from flooded basements or areas.
- Transferring water from tanks.
- Garden watering and irrigation.

Figure 6.2: Wide range of applications for the utility pump.
7. Maintenance
Regular maintenance ensures the longevity and optimal performance of your pump.
- Cleaning: After each use, especially if pumping slightly dirty water, rinse the pump thoroughly with clean water. Remove any debris from the intake screen to prevent blockages.
- Inspection: Periodically inspect the power cord for any signs of damage, cuts, or fraying. Check the discharge port and adapters for cracks or wear.
- Storage: When not in use, store the pump in a clean, dry, and frost-free environment. Ensure all water is drained from the pump before storage to prevent freezing damage.
- No Lubrication Required: The pump features an oil-free design and does not require lubrication.
8. Troubleshooting
| Problem | Possible Cause | Solution |
|---|---|---|
| Pump does not start | No power; GFCI tripped; Motor overload; Damaged power cord. | Check power connection and outlet. Reset GFCI. Allow pump to cool if overheated. Inspect power cord for damage. |
| Pump runs but no water is discharged | Pump not primed; Intake screen blocked; Discharge hose kinked or blocked; Air lock. | Ensure pump is fully submerged and tilted to release air. Clean intake screen. Check hose for obstructions. Re-submerge pump to clear air lock. |
| Reduced flow rate | Partial blockage in intake or hose; Worn impeller; Low voltage. | Clean intake screen and hose. Inspect impeller for damage. Ensure stable power supply. |
| Pump stops unexpectedly | Overheating (thermal overload protection); Power interruption; Dry running. | Allow pump to cool. Check power supply. Ensure pump is always submerged during operation. |
9. Warranty and Support
WASSERMANN products are manufactured to high-quality standards. For specific warranty details, please refer to the documentation included with your purchase or contact WASSERMANN customer service. If you encounter any issues or have questions regarding your pump, please contact our service team for assistance. We are committed to providing support within 24 hours.
Contact Information: Please refer to your product packaging or the official WASSERMANN website for the most current customer support contact details.