
1. Introduction
This manual provides detailed instructions for the setup, operation, maintenance, and troubleshooting of your Asustor AS6704T 4 Bay Network Attached Storage (NAS) device, bundled with the AS-T10G3 10GbE M.2 NVMe SSD Network Card. Please read this manual thoroughly before using your device to ensure proper installation and optimal performance.
2. Package Contents
Verify that all items are present in your package:
- Asustor AS6704T 4 Bay NAS Unit
- Asustor AS-T10G3 10GbE M.2 NVMe SSD Network Card
- Power Cord
- Ethernet Cable(s)
- Quick Installation Guide
- Screws for HDD/SSD installation
3. Product Overview

Figure 3.1: Asustor AS6704T NAS with AS-T10G3 Network Card.

Figure 3.2: Front view of the AS6704T NAS, showing drive bays and display.

Figure 3.3: Rear view of the AS6704T NAS, highlighting ports and fan.
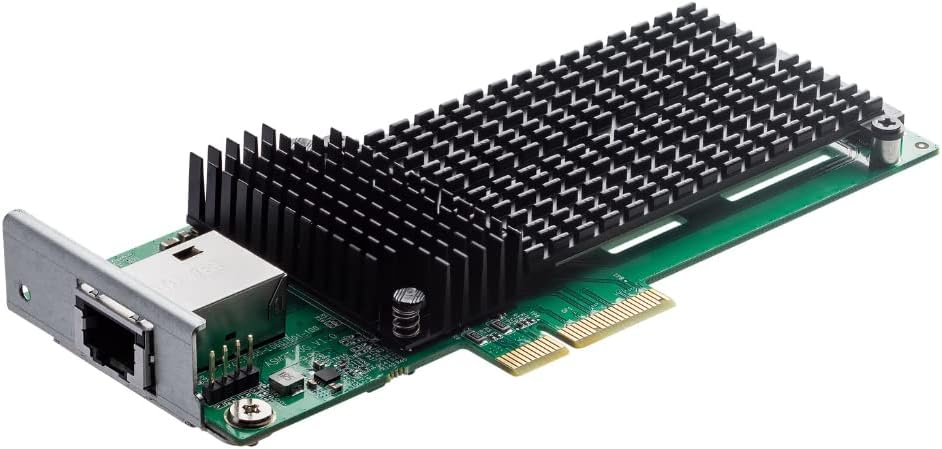
Figure 3.4: The AS-T10G3 10GbE M.2 NVMe SSD Network Card.
3.1 Front Panel
- Power Button: Turns the NAS on or off.
- Status Indicators: LEDs for power, system status, network activity, and disk activity.
- LCD Display: Shows system information and allows basic configuration.
- USB 3.2 Gen 2x1 Port: For connecting external devices.
- Drive Bays: Four hot-swappable bays for 3.5" or 2.5" HDDs/SSDs.
3.2 Rear Panel
- Power Inlet: Connects to the power supply.
- Fan: System cooling fan.
- 2.5 Gigabit Ethernet Ports (x2): For network connectivity.
- USB 3.2 Gen 2x1 Ports (x2): Additional ports for external devices.
- HDMI Port: For direct display output.
- PCIe Slot: For expansion cards like the AS-T10G3.
4. Setup and Installation
4.1 Installing Hard Drives/SSDs
- Open the drive trays from the front of the NAS.
- Place your 3.5" or 2.5" drives into the trays and secure them with the provided screws.
- Slide the trays back into the drive bays until they click into place.
4.2 Installing the AS-T10G3 10GbE M.2 NVMe SSD Network Card
The AS-T10G3 card enhances your NAS with 10 Gigabit Ethernet connectivity and M.2 NVMe SSD slots for high-speed caching or storage. Follow these steps for installation:
Video 4.1: Official Asustor guide on installing the AS-T10G3 into a Lockerstor Gen2 NAS.
This video demonstrates the complete process, including installing the necessary PCIe Switcher app, configuring PCIe modes, installing M.2 NVMe SSDs onto the AS-T10G3 card, physically installing the card into the NAS, and verifying detection.
- Install PCIe Switcher App: Access your NAS's ADM interface. Navigate to App Central, search for and install the "ASUSTOR NAS PCIe Mode Switcher" app. Accept the terms and proceed with installation.
- Switch PCIe Mode: Open the newly installed PCIe Mode Switcher app. Select the "10G NIC" mode to enable the PCIe slot for the network card. Confirm the switch, and the NAS will automatically shut down.
- Install SSDs onto AS-T10G3 (Optional but Recommended): If you plan to use M.2 NVMe SSDs with the AS-T10G3 card, carefully remove the heatsink from the card. Peel off the protective film from the thermal pads. Align and gently insert your M.2 NVMe SSDs into the designated slots on the card. Reattach the heatsink and secure it with screws.
- Install AS-T10G3 into NAS: Power off and unplug your NAS. Remove the two screws securing the top cover of the NAS at the rear. Slide the top cover back and then lift it off. Locate the PCIe slot inside the NAS. Remove the screw holding the blank cover plate for the PCIe slot. Carefully insert the AS-T10G3 card into the PCIe slot, ensuring it is fully seated. Secure the card with the screw you removed from the blank cover plate.
- Reassemble and Power On: Slide the top cover back onto the NAS and secure it with the two screws. Plug in the power cord and an Ethernet cable (preferably to the 10GbE port on the newly installed card). Power on the NAS.
- Verify Card Detection: Once the NAS boots up, check the LCD display for network status. Log in to the ADM interface. Go to "Settings" > "Network" > "Network Interface". You should see the new 10GbE interface (e.g., LAN 3) listed and detected. In "Storage Manager" > "Drive", any installed M.2 SSDs should also be detected.
5. Operating Instructions
5.1 Initial Setup (ADM)
After powering on, access the Asustor Data Master (ADM) operating system via a web browser using the IP address displayed on the NAS LCD or found using the Asustor Control Center utility. Follow the on-screen wizard to:
- Create an administrator password.
- Configure network settings.
- Create storage volumes (RAID configuration).
- Install essential apps.
5.2 Basic Operations
- File Explorer: Manage files and folders on your NAS.
- App Central: Download and install additional applications for various functionalities (e.g., media server, backup tools, surveillance).
- Storage Manager: Monitor disk health, manage volumes, and configure iSCSI.
- Access Control: Create user accounts, groups, and set access permissions.
6. Maintenance
- Regular Updates: Keep your ADM operating system and installed applications updated to the latest versions for security and performance improvements.
- Disk Health Check: Periodically check the health of your hard drives using the Storage Manager.
- Cleaning: Ensure proper airflow by regularly cleaning dust from the fan vents. Use a soft, dry cloth for external surfaces.
- Backup Strategy: Implement a robust backup strategy for your critical data stored on the NAS.
7. Troubleshooting
7.1 Common Issues and Solutions
- NAS Not Powering On: Ensure the power cord is securely connected to both the NAS and a working power outlet.
- Cannot Access ADM: Verify network cable connections. Check if your computer and NAS are on the same network segment. Use the Asustor Control Center to locate the NAS IP address.
- Drives Not Detected: Ensure drives are properly seated in their bays. If installing new drives, they may need to be initialized and formatted in Storage Manager.
- AS-T10G3 Not Detected: Confirm the PCIe Mode Switcher app is installed and the mode is set to "10G NIC". Ensure the card is fully seated in the PCIe slot.
- Slow Network Performance: Verify that all network cables are correctly connected and that your network infrastructure (router, switches) supports 10GbE if using the AS-T10G3 card.
For more detailed troubleshooting, refer to the online help within the ADM interface or visit the Asustor support website.
8. Specifications
| Component | Specification |
|---|---|
| CPU | Intel Celeron N5105 Quad-Core 2.0GHz (burst up 2.90 GHz) |
| Memory | 8GB SO-DIMM DDR4 (Expandable. max. 16GB) |
| Expansion | 2x USB 3.2 Gen 2x1 |
| Network | 2x 2.5 Gigabit Ethernet (2.5G/1G/100M) |
| Additional Card | AS-T10G3, 10GbE & M.2 NVMe SSD Network Card |
| Features | Supports Wake on LAN and Wake on WAN |
| Date First Available | March 16, 2023 |
9. Warranty and Support
Your Asustor AS6704T NAS and AS-T10G3 Network Card are covered by a manufacturer's warranty. Please refer to the warranty information provided with your product or visit the official Asustor website for details on warranty terms and conditions.
For technical support, software updates, and additional resources, please visit the Asustor support portal at www.asustor.com/service/support.


