
Askar 80PHQ
Askar 80PHQ Telescope Instruction Manual
Model: 80PHQ
1. Introduction
Welcome to the instruction manual for your new Askar 80PHQ Telescope. This high-quality quadruplet astrograph is designed for both deep sky astrophotography and visual astronomy, offering exceptional optical performance and ease of use. Please read this manual thoroughly to ensure proper setup, operation, and maintenance of your telescope.
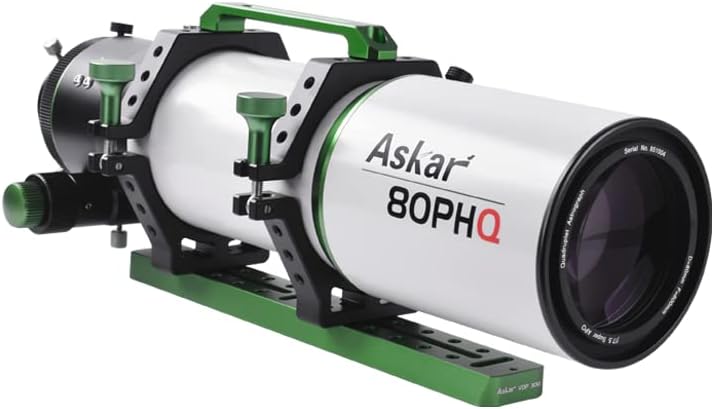
Image: The Askar 80PHQ Telescope, a white optical tube with green accents, mounted on a base.
2. Key Features
The Askar 80PHQ Telescope boasts several advanced features for superior performance:
- Optical Design: 3+1 quadruplet lens structure with two ED glass elements for effective chromatic aberration reduction and enhanced clarity.
- Integrated Lens Combination: A unique optical system where all lenses work together, ensuring better vignette control and superior image quality without needing external correctors.
- Focal Ratio: f/7.5, providing a balanced focal length for various astronomical observations and imaging.
- No Back Focus Calculation: Simplifies setup as there's no need to calculate back focus distance within connection limits.
- Flatfield Optical Design: Eliminates the need for an additional 1x flattener, streamlining the imaging process.
- Premium Finish: Ivory and pimply coating on the main tube for improved grip and aesthetic appeal.
3. Components Overview
Familiarize yourself with the main components of your Askar 80PHQ Telescope:
- Optical Tube Assembly: The main body housing the lenses.
- Focuser: Mechanism for adjusting focus, typically with fine and coarse adjustments.
- Tube Rings: Securely hold the optical tube to the mounting plate.
- Dovetail Plate: Attaches the telescope to a mount.
- Handle: For easy carrying and mounting.
- Dew Shield: Extends from the front of the telescope to prevent dew formation on the objective lens and block stray light.

Image: Close-up view of the focuser mechanism on the Askar 80PHQ Telescope, showing adjustment knobs and scales.
4. Setup and Assembly
Follow these steps to assemble your Askar 80PHQ Telescope:
- Unpacking: Carefully remove all components from the packaging. Inspect for any damage.
- Mounting the Telescope:
- Attach the dovetail plate to your astronomical mount. Ensure it is securely fastened.
- Place the optical tube, secured by its tube rings, onto the dovetail plate. Tighten the clamps on the tube rings to hold the telescope firmly.

Image: The Askar 80PHQ Telescope mounted on an equatorial telescope mount, with a camera attached to the focuser.
- Attaching Accessories:
- Eyepieces (for visual observation): Insert your desired eyepiece into the focuser. Secure it with the thumbscrew.
- Camera (for astrophotography): Connect your camera to the focuser using appropriate adapters. The 80PHQ's design simplifies this by not requiring complex back focus calculations.
- Finderscope: Attach the finderscope to its designated bracket on the telescope tube.

Image: The Askar 80PHQ Telescope showing various adapters (M68x1, M54x0.75, M48x0.75) used for connecting cameras and other accessories.
- Dew Shield Extension: Extend the dew shield fully before observation or imaging to protect the objective lens.
5. Operating Your Telescope
5.1. Visual Observation
- Aiming: Use the finderscope to locate your desired celestial object. Center the object in the finderscope's crosshairs.
- Focusing: Look through the eyepiece and slowly adjust the focuser knobs until the image is sharp and clear. Start with coarse adjustment, then fine-tune.
- Eyepiece Selection: Experiment with different eyepieces to achieve varying magnifications. Lower magnification eyepieces (longer focal length) provide a wider field of view, while higher magnification eyepieces (shorter focal length) offer more detail.
5.2. Astrophotography
The Askar 80PHQ is optimized for astrophotography due to its flatfield optical design and integrated lens system.
- Camera Connection: Ensure your camera is securely attached to the focuser using the appropriate adapters.
- Polar Alignment: For long-exposure astrophotography, accurate polar alignment of your equatorial mount is crucial. Refer to your mount's manual for detailed instructions.
- Focusing for Imaging: Achieve precise focus using a Bahtinov mask or software-assisted focusing tools. The focuser's fine adjustment allows for critical focus.
- Guiding: For exposures longer than a few seconds, an autoguider system is recommended to compensate for tracking errors and ensure sharp stars.
- Image Acquisition: Use your camera's software or dedicated astrophotography software to control exposures, ISO, and other settings.
Important Note: The Askar 80PHQ's integrated lens combination means you do not need to add an external 1x flattener, simplifying your imaging train and setup.
6. Maintenance and Care
- Lens Cleaning: Only clean the objective lens when absolutely necessary. Use a soft brush to remove dust, then a specialized optical cleaning solution and microfiber cloth. Avoid touching the lens surface with bare hands.
- Tube Cleaning: Wipe the telescope tube with a soft, damp cloth. Avoid abrasive cleaners.
- Storage: Store the telescope in a dry, dust-free environment, preferably in its original case or a padded bag. Ensure the dew shield is retracted and lens caps are on.
- Temperature Acclimation: Allow the telescope to acclimate to the ambient outdoor temperature for at least 30-60 minutes before use to minimize thermal currents within the tube.
7. Troubleshooting
| Problem | Possible Cause | Solution |
|---|---|---|
| Fuzzy or blurry images | Out of focus; poor seeing conditions; thermal currents. | Adjust focuser carefully; wait for stable atmospheric conditions; allow telescope to acclimate. |
| Stars appear elongated (astrophotography) | Poor polar alignment; tracking errors; no guiding. | Re-do polar alignment; use autoguider; check mount tracking. |
| Dew on objective lens | High humidity; insufficient dew shield extension. | Ensure dew shield is fully extended; use a dew heater strip. |
| No image visible | Lens caps on; wrong eyepiece/camera connection; object not in field of view. | Remove all lens caps; check connections; re-aim telescope using finderscope. |
8. Technical Specifications
| Specification | Value |
|---|---|
| Brand | Askar |
| Model Number | 80PHQ |
| Optical Design | Quadruplet Astrograph (3+1 lens structure with 2 ED glass elements) |
| Aperture | 80mm |
| Focal Ratio | f/7.5 |
| Optical Tube Length | 570 Millimeters (fully stretched) |
| Product Dimensions | 24.02 x 9.84 x 10.63 inches |
| Item Weight | 13.64 pounds (6.2 Kilograms) |
| Focus Type | Manual Focus |
| Compatible Devices | Camera |
| Finderscope | Reflex |
| Exit Pupil | 0.67 Millimeters |

Image: The Askar 80PHQ Telescope with its dew shield retracted, showing the compact form factor.

Image: Technical drawing of the Askar 80PHQ Telescope, illustrating key dimensions and thread sizes for connections.
9. Warranty and Support
For warranty information and technical support, please contact Askar customer service or visit the official Askar website. Keep your purchase receipt as proof of purchase for any warranty claims.
Manufacturer: Askar
Date First Available: March 16, 2023
For further assistance, you may also refer to the seller's information: SHARPSTAR OPTICS.
10. Product Videos
Below are official product videos demonstrating features or usage of the Askar 80PHQ Telescope.
Deep Sky Astrophotography Example 1
Video: An example of deep sky astrophotography captured with the Askar 80PHQ Telescope, showcasing a nebula with intricate details and vibrant colors.
Deep Sky Astrophotography Example 2
Video: Another example of deep sky astrophotography, displaying a different celestial object with rich star fields and nebular structures, demonstrating the telescope's imaging capabilities.
Related documents80PHQ


Ask a question about this manual
Ask about setup, troubleshooting, compatibility, parts, safety, or missing instructions. Manuals+ will review the question and use this page’s manual context to help answer it.