1. Introduction
Thank you for choosing the Teka Duetto Plus 70 EX Cooktop and Hood Pack. This manual provides essential information for the safe installation, operation, and maintenance of your appliance. Please read these instructions carefully before use and keep them for future reference.
1.1 Safety Instructions
- Ensure the appliance is installed by a qualified technician in accordance with local regulations.
- Do not modify the appliance. Any modifications may void the warranty and create safety hazards.
- Keep children away from the appliance during operation.
- Always disconnect the appliance from the power supply before cleaning or maintenance.
- Ensure adequate ventilation when using the gas cooktop.
- Do not store flammable materials near the appliance.
1.2 Package Contents
Verify that all components are present in the package:
- Teka Duetto Plus 70 EX Gas Cooktop
- Teka Recirculating Hood
- Carbon Filter (pre-installed or separate)
- Mounting Hardware (screws, brackets)
- User Manual (this document)
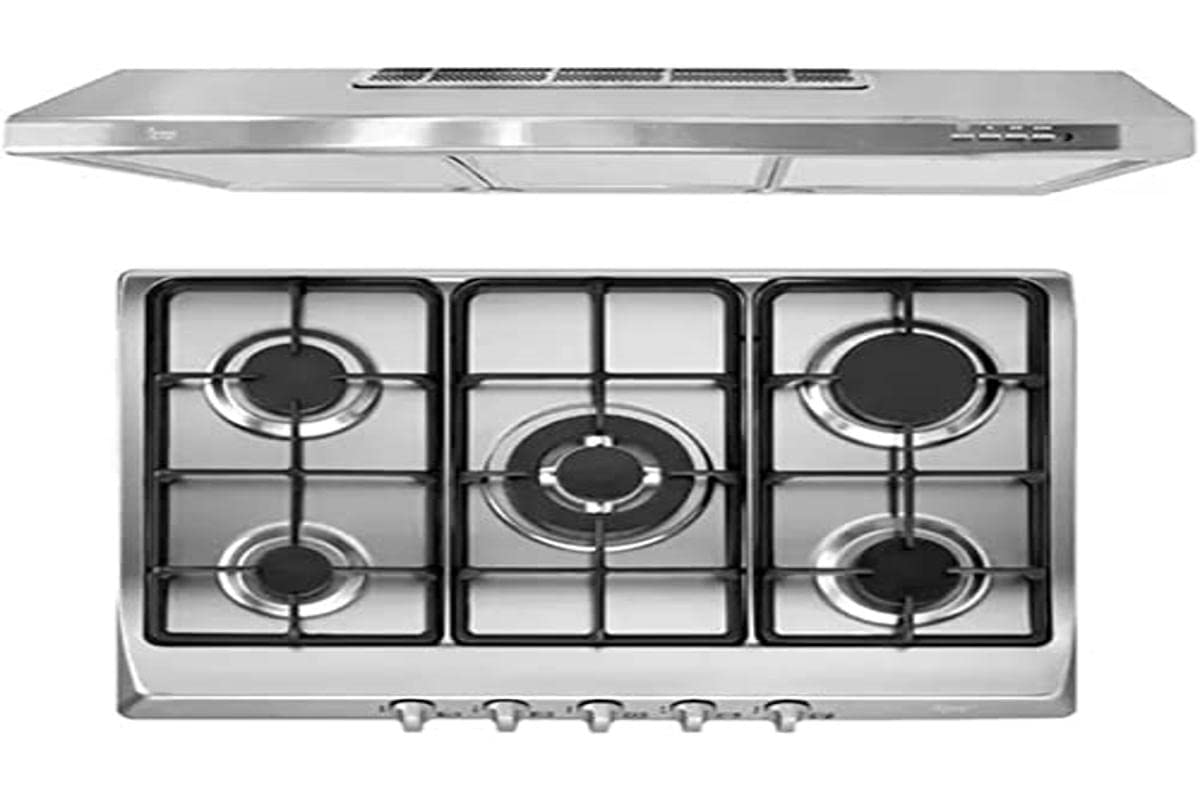
Image 1.1: Overview of the Teka Duetto Plus 70 EX Cooktop and Hood Pack. This image displays the combined cooktop and recirculating hood unit, highlighting its design and primary components.
2. Installation and Setup
Proper installation is crucial for the safe and efficient operation of your appliance. Refer to the detailed diagrams and instructions provided in the separate installation guide for specific measurements and procedures.
2.1 Cooktop Installation
- Countertop Preparation: Create an opening in the countertop according to the dimensions specified in the installation guide. Ensure sufficient clearance from walls and adjacent cabinets.
- Gas Connection: Connect the cooktop to the gas supply using appropriate fittings and flexible hoses, ensuring all connections are sealed and leak-tested by a certified professional.
- Electrical Connection: Connect the cooktop to a grounded electrical outlet as per local electrical codes. This powers the automatic ignition.
- Securing the Cooktop: Place the cooktop into the cutout and secure it using the provided clamps or brackets.
Note: A diagram illustrating the countertop cutout dimensions and gas/electrical connection points would typically be included here if available.
2.2 Hood Installation
- Mounting: Secure the hood to the wall or cabinet above the cooktop using the provided mounting hardware. Ensure it is level and at the recommended height above the cooking surface.
- Recirculation Setup: As this is a recirculating hood, ensure the carbon filter is correctly installed. The filtered air will be discharged back into the kitchen through the vents on the hood.
- Electrical Connection: Connect the hood to a grounded electrical outlet.
Note: An illustration of the hood mounting points and carbon filter placement would typically be included here if available.
3. Operation
Familiarize yourself with the controls before operating the appliance.
3.1 Cooktop Operation
- Ignition: Push and turn the desired burner knob counter-clockwise to the maximum flame position. The automatic ignition will spark, lighting the gas. Hold the knob for a few seconds after ignition to allow the thermocouple to heat up.
- Flame Adjustment: Once lit, adjust the flame size by turning the knob between the maximum and minimum flame settings. The triple flame burner provides efficient heat distribution.
- Turning Off: Turn the burner knob clockwise to the 'OFF' position. Ensure the flame is extinguished.
Note: A close-up image of the cooktop control knobs and burner layout would typically be included here if available.
3.2 Hood Operation
The hood features push-button controls for fan speed and lighting.
- Fan Speed: Press the fan speed buttons (usually marked 1, 2, 3, or Min, Med, Max) to select the desired extraction power.
- LED Lighting: Press the light button to turn the LED lamps on or off. These provide illumination for your cooking area.
Note: An image detailing the hood's push-button control panel would typically be included here if available.
4. Maintenance and Cleaning
Regular maintenance ensures the longevity and optimal performance of your appliance.
4.1 Cooktop Cleaning
- Stainless Steel Surfaces: Clean stainless steel surfaces with a soft cloth and a non-abrasive stainless steel cleaner. Wipe in the direction of the grain.
- Burners and Grates: Remove burner caps and grates. Wash them with warm soapy water. Ensure they are completely dry before reassembling.
- Ignition Plugs: Keep the ignition plugs clean and free from food debris to ensure reliable automatic ignition.
4.2 Hood Cleaning and Filter Replacement
- Exterior Surfaces: Clean the exterior of the hood with a soft cloth and mild detergent. Avoid abrasive cleaners.
- Grease Filters: The metal grease filters should be cleaned regularly (e.g., monthly) by hand or in a dishwasher. Refer to the hood's specific instructions for removal and reinstallation.
- Carbon Filter: The carbon filter (for recirculation) cannot be washed and must be replaced periodically, typically every 3-6 months depending on usage. Consult the hood's specific instructions for replacement.
Note: An image demonstrating the removal and cleaning of grease filters and replacement of the carbon filter would typically be included here if available.
5. Troubleshooting
Before contacting customer service, refer to the following table for common issues and their solutions.
| Problem | Possible Cause | Solution |
|---|---|---|
| Cooktop burner does not ignite. | No gas supply, ignition plug dirty, power outage. | Check gas valve. Clean ignition plug. Verify power supply. |
| Flame is irregular or too small. | Burner cap/ring not seated correctly, partially blocked burner holes. | Ensure burner components are correctly assembled. Clean burner holes. |
| Hood fan not working. | No power, fan motor fault. | Check electrical connection and circuit breaker. Contact service if power is present. |
| Hood suction is weak. | Grease filters clogged, carbon filter saturated. | Clean grease filters. Replace carbon filter. |
6. Specifications
Key technical specifications for the Teka Duetto Plus 70 EX Cooktop and Hood Pack:
- Model Number: PLUS-70EX
- Brand: Teka
- Color: Blanco (White)
- Material: Stainless Steel
- Dimensions (Product): 86 cm (depth) x 32 cm (width) x 61 cm (height)
- Weight (Product): 21 kg
- Power: 1000 watts (for hood/ignition)
- Voltage: 115 Volts
- Heating Elements: 2 (burners)
- Fuel Type: Natural Gas (adaptable to LP gas by qualified technician)
- Burner Type: Gas Burners (Triple Flame)
- Control Type: Button
7. Warranty and Support
Teka products are manufactured to high-quality standards and come with a manufacturer's warranty. Please refer to the warranty card included with your purchase for specific terms and conditions, including coverage duration and what is covered.
For technical assistance, spare parts, or warranty claims, please contact Teka customer support. Contact details can typically be found on the Teka official website or on your purchase documentation.
Keep your proof of purchase (receipt or invoice) as it will be required for any warranty service.


