
BSIDE Smart Multimeter
BSIDE A1 Voltage Tester User Manual
Model: Smart Multimeter | Brand: BSIDE
Introduction
The BSIDE A1 Voltage Tester is a compact and intelligent multimeter designed for a wide range of electrical measurements. It combines non-contact voltage detection with traditional multimeter functions, offering convenience and safety for both professional and home use. Its automatic identification feature simplifies operation, making it an ideal tool for various electrical tasks.

Figure 1: BSIDE A1 Voltage Tester and included accessories.
Package Contents
Please check the package for the following items:
- 1 x BSIDE A1 Voltage Tester
- 1 x Test Leads (Red and Black)
- 2 x AAA Batteries
- 1 x Carrying Case
- 1 x Screwdriver
- 1 x User Manual
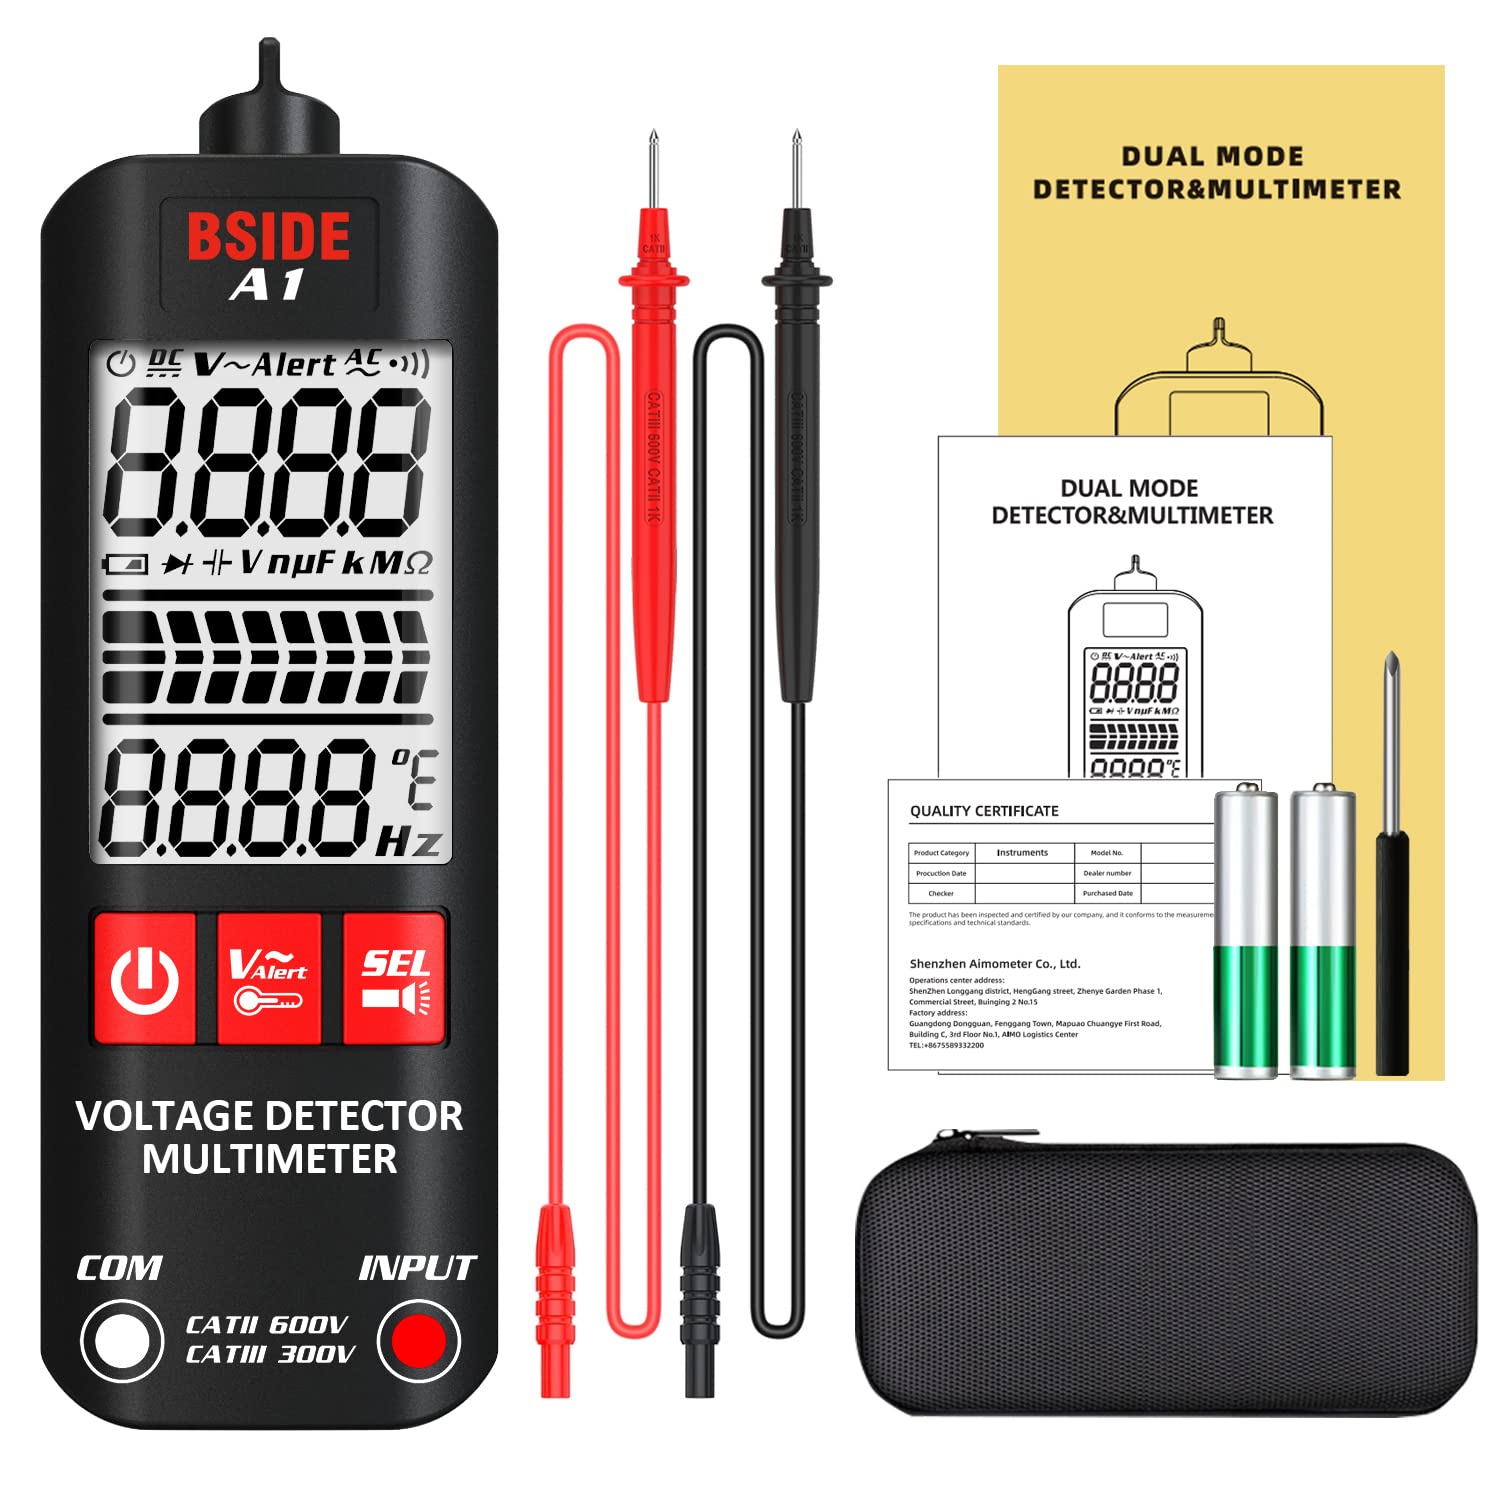
Figure 2: All items included in the BSIDE A1 Voltage Tester package.
Key Features
- Red and Green Backlight: The smart digital voltmeter features a large display screen with red and green backlight, enhancing readability.
- Easy to Use: Automatic identification design allows the multimeter to automatically identify tested parameters and select the required range.
- Sensitivity Adjustable: Adjustable sensitivity makes measurements more convenient, allowing for more accurate distinction in complex circuits when set to low sensitivity.
- Triple-Mode Alarm: Provides backlight flashing, LCD display analog bar, and continuous beeping sounds when detecting AC voltage.
- Carrying Case: Includes a high-quality carrying case for portability and protection.

Figure 3: The A1's display features both red and green backlighting for clear indication.
Setup
Battery Installation
- Locate the battery compartment on the back of the device.
- Use the included screwdriver to open the battery cover.
- Insert two (2) AAA batteries, ensuring correct polarity (+/-).
- Replace the battery cover and secure it with the screw.
Connecting Test Leads
- Insert the black test lead into the 'COM' (Common) input jack.
- Insert the red test lead into the 'INPUT' jack for voltage, resistance, and frequency measurements.
Operating Instructions
The BSIDE A1 features an intelligent auto-identification mode, simplifying most measurements. For specific functions, manual mode can be selected.
Power On/Off
Press the power button (U) to turn the device on or off. The device will automatically power off after a period of inactivity to conserve battery life.
Auto Mode Operation
In auto mode, the multimeter automatically detects and measures AC/DC voltage, resistance, and continuity. Simply connect the test leads to the circuit or component, and the device will display the appropriate reading.

Figure 4: The A1's auto mode simplifies measurement selection.
Non-Contact AC Voltage Detection (V-Alert)
To detect AC voltage without direct contact, simply bring the tip of the tester near the wire or outlet. The device will indicate the presence of AC voltage through visual (backlight flashing, analog bar) and audible (beeping) alarms. This feature is ideal for quickly checking for live circuits for safety (refer to video segment 0:14-0:22).

Figure 5: Non-contact AC voltage detection in action.
AC Voltage and Frequency Measurement
Connect the red and black test leads to the points where you want to measure AC voltage and frequency. The device will display both values simultaneously (refer to video segment 0:26-0:30).

Figure 6: Measuring voltage in an automotive application.
Live Wire Check
To distinguish between live and neutral wires, use the V-Alert function or the test leads. The device will provide a stronger signal (red backlight, faster beeping) for the live wire compared to the neutral wire (green backlight, slower beeping or no alarm) (refer to video segment 0:31-0:35).

Figure 7: Distinguishing a neutral wire (green backlight).
Figure 8: Distinguishing a live wire (red backlight).
Continuity Test
To check for continuity, connect the test leads across the component or circuit. If the resistance is less than 30Ω, the beeper will sound, indicating continuity (refer to video segment 0:36-0:41).
Resistance Measurement
To measure resistance, ensure the circuit is de-energized. Connect the test leads across the component. The device will display the resistance value (refer to video segment 0:42-0:47).
Flashlight Function
The integrated LED flashlight can be activated to illuminate dark work areas. This feature is useful for working in dimly lit environments (refer to video segment 0:48-0:54).

Figure 9: The built-in flashlight provides illumination for dark work areas.
Official Product Video
Video 1: Official demonstration of the BSIDE A1 Voltage Tester's features, including non-contact voltage detection, AC voltage and frequency measurement, live wire check, continuity, resistance, and flashlight function.
Specifications
| Parameter | Value |
|---|---|
| Display | 2000 counts |
| Screen | 2.2 inch |
| DC Voltage | 500V 0.01V ±(0.8%+3) |
| AC Voltage | 500V 0.01V ±(1.2%+5) |
| Resistance | 0Ω-10MΩ 1Ω ±(1.2%+3) |
| Frequency | 1000Hz 0.1Hz ±(2.0%+3) |
| Continuity | Beeper sounds if resistance < 30Ω |
| V-Alert (Non-contact Voltage Detection) | Yes |
| Live Wire Check | Yes |
| Power | 1.5V (AAA) x 2 |
| Size | 127 x 42 x 25 mm (4.72 x 1.57 x 0.79 inches) |
| Weight | 67g (2.36 ounces) |
Maintenance
- Cleaning: Wipe the device with a dry, soft cloth. Do not use abrasive cleaners or solvents.
- Storage: Store the multimeter in a cool, dry place away from direct sunlight and extreme temperatures. If storing for extended periods, remove the batteries to prevent leakage.
- Battery Replacement: Replace batteries when the low battery indicator appears on the display to ensure accurate readings.
Troubleshooting
- Device does not power on: Check if batteries are installed correctly and have sufficient charge. Replace if necessary.
- Inaccurate readings: Ensure test leads are properly connected. Verify the device is in the correct mode (though auto-mode handles most). Check battery level.
- No V-Alert detection: Ensure the V-Alert function is active. The sensitivity might need adjustment in complex environments.
- No continuity beep: Ensure the circuit is de-energized. Check if the resistance is above 30Ω, which would not trigger the beep.
Warranty and Support
Specific warranty information is not provided in the product details. For warranty claims, technical support, or service inquiries, please refer to the contact information provided with your purchase or visit the official BSIDE website.
Related documentsSmart Multimeter


Ask a question about this manual
Ask about setup, troubleshooting, compatibility, parts, safety, or missing instructions. Manuals+ will review the question and use this page’s manual context to help answer it.