1. Introduction
This manual provides detailed instructions for the installation, operation, and maintenance of your ATEM POWER 60A DC to DC Battery Charger. This device is designed to efficiently charge auxiliary batteries in 4WDs, RVs, campers, and trailers using power from your vehicle's alternator or solar panels. Please read this manual thoroughly before use to ensure proper function and safety.

This image displays the ATEM POWER 60A DC to DC Battery Charger, its retail packaging, and the included user manual, providing a complete view of the product and its accessories.
2. Key Features
- Dual Input Power: Charges from both vehicle alternator (DC) and solar panels (MPPT) simultaneously, with DC charging priority.
- Multi-Chemistry Support: Compatible with AGM, Gel, Calcium, Lead-Acid, and LiFePO4 batteries.
- Advanced Charging: Utilizes a smart multi-stage charging process to maximize battery performance and lifespan.
- High Efficiency: Features Switchmode Technology with over 94% efficiency at typical full load conditions.
- Comprehensive Protection: Includes Reverse Polarity, Short-Circuit, Over-Temperature, Over/Under Voltage, and Spark-Free protections.
- Anderson Plug Equipped: Designed with Anderson style plugs for convenient and secure wiring.

A detailed view of the charger emphasizing its robust design, including features like automatic output adjustment based on battery temperature to prevent overheating, and its IP20 rating for dust, splash, and shock resistance, making it suitable for under-bonnet installation.
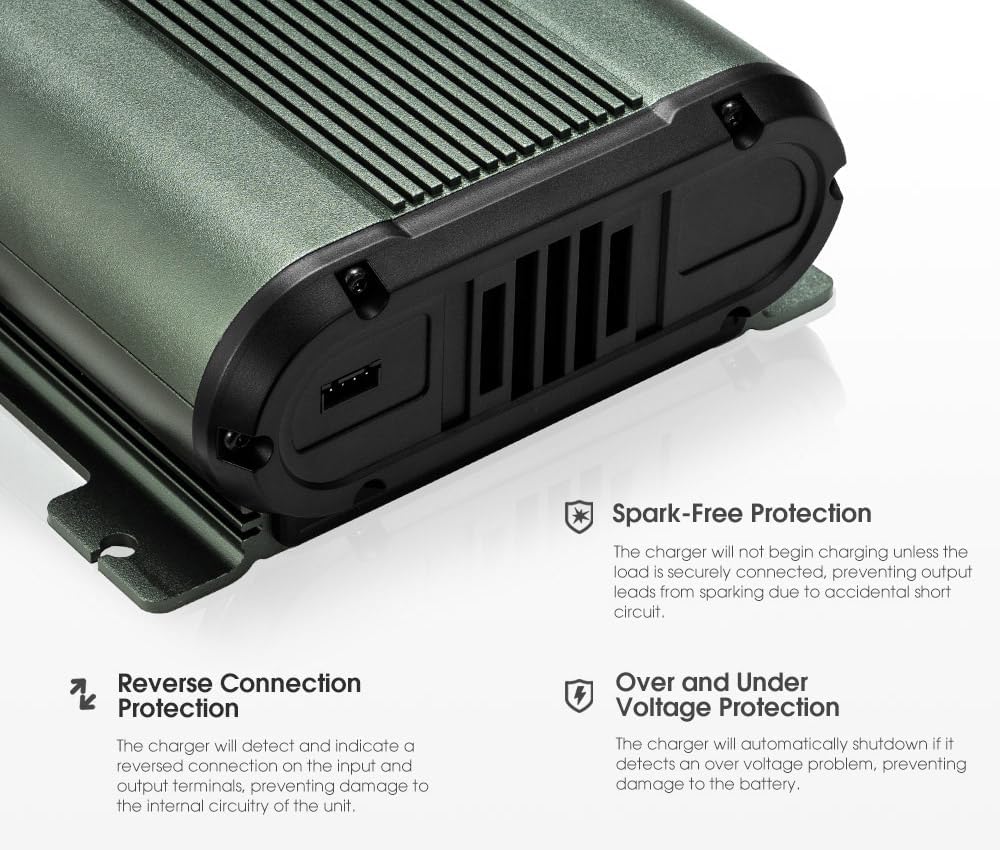
This image illustrates the advanced safety features of the charger, such as spark-free operation (charging only begins when securely connected), reverse connection protection to prevent damage from incorrect wiring, and over/under voltage protection for battery safety.

The charger is shown with annotations indicating its compatibility with various battery types including AGM, Gel, Calcium, LiFePO4, and Lead-Acid, along with its efficient Switchmode Technology that ensures over 94% efficiency for optimal charging.
3. Safety Information
Always observe the following safety precautions when installing or operating the ATEM POWER DC to DC Battery Charger:
- Ensure all connections are secure and correct before powering on the unit.
- Do not expose the charger to excessive moisture or extreme temperatures beyond its operating range.
- Only connect to compatible battery types as specified in this manual.
- Avoid short-circuiting the terminals.
- Installation should be performed by a qualified professional if you are unsure about the wiring process.
- Keep out of reach of children.
4. Setup and Installation
Proper installation is crucial for the performance and longevity of your charger. Follow these steps carefully:
4.1. Mounting the Charger
Select a secure, well-ventilated location for mounting the charger. Ensure it is protected from direct water exposure and excessive heat. The charger is designed for in-vehicle or under-bonnet installation.
4.2. Wiring Diagram
Refer to the diagram below for correct wiring connections. It is recommended to use appropriate fuses or circuit breakers for both the input and output lines.

Two diagrams are presented: one illustrating the dual input power capability, allowing simultaneous charging from solar and DC sources with DC priority, and another showing a typical 4WD installation setup for the charger with traditional or smart alternators.

A comprehensive wiring diagram detailing the connections required to install the ATEM POWER DC to DC charger, including connections to the 12V start vehicle battery, MPPT solar panel input, and 12V house battery bank, with optional fuses/breakers.
4.3. Anderson Plug Connections
The charger is equipped with Anderson style plugs for ease of connection. Ensure correct polarity and secure fit for each plug.
| Pin No. | Color | Function |
|---|---|---|
| 1 | Blue | Solar Input (+) |
| 2 | Black | GND (Ground) |
| 3 | Yellow | Output (+) |
| 4 | Black | GND (Ground) |
| 5 | Red | DC Input (+) |
| 6 | Black | GND (Ground) |
| 7 | Blue (thin) | ACC Ignition Line (Optional) |

This image provides a close-up of the Anderson style plugs equipped with the charger, clearly labeling each pin's function and color, simplifying wiring.
5. Operating Instructions
Once installed, the charger operates largely automatically. However, you can select the battery type for optimized charging.
5.1. Battery Type Selection
The charger supports various battery chemistries. To select the appropriate charging profile:
- Press the 'SELECT' button on the charger's control panel.
- Cycle through the available battery types (Lead Acid, AGM/GEL, Calcium, LiFePO4) until the desired type is indicated.
- The charger will automatically adjust its charging algorithm for the selected battery type.
5.2. Charging Priority
The charger is designed with DC charging priority. If both solar and DC inputs are available and meet the starting conditions, the vehicle battery input will be prioritized. The system continuously monitors inputs and will switch to DC power if conditions are met, even if solar charging is in progress.

This image focuses on the charger's control panel, demonstrating its ability to prolong battery life through an advanced four-stage charging process and offering flexible fast and slow charging options to suit energy needs.
6. Maintenance
The ATEM POWER DC to DC Battery Charger requires minimal maintenance. Follow these guidelines to ensure optimal performance:
- Regularly inspect all wiring and connections for signs of wear, corrosion, or looseness.
- Keep the charger clean and free from dust and debris. Use a dry cloth for cleaning.
- Ensure the ventilation fins are not obstructed to allow for proper heat dissipation.
- Periodically check the battery terminals for corrosion and clean them if necessary.
7. Troubleshooting
If you encounter issues with your charger, refer to the table below for common problems and their solutions:
| Problem | Possible Cause | Solution |
|---|---|---|
| Charger not turning on | No input power; Loose connections; Blown fuse/breaker | Check vehicle battery and solar panel connections; Ensure all plugs are secure; Inspect and replace fuses/breakers if necessary. |
| Battery not charging | Incorrect battery type selected; Over-temperature protection activated; Faulty battery | Verify battery type selection; Ensure adequate ventilation; Test the auxiliary battery. |
| Overheating | Poor ventilation; Excessive load; High ambient temperature | Relocate charger to a cooler, better-ventilated area; Reduce load if possible. |
| Error indicator light on | Reverse polarity; Over/under voltage; Short circuit | Check all wiring for correct polarity; Verify input/output voltages are within range; Inspect for any short circuits. |
8. Specifications
| Attribute | Detail |
|---|---|
| Brand | ATEM POWER |
| Model | AP60DC |
| Product Type | DC to DC Battery Charger |
| Current Rating | 60 Amperes |
| Input Voltage | 12V DC (from vehicle alternator/battery) |
| Output Voltage | 12V DC (for auxiliary battery charging) |
| Supported Battery Types | AGM, Gel, Calcium, Lead-Acid, LiFePO4 |
| Number of Ports | 1 (Input), 1 (Output) |
| Product Weight | 2.45 Kilograms |
| Product Dimensions (L x W x H) | Approx. 225mm x 135mm x 60mm |
| Efficiency | >94% |
| Protection Features | Reverse Polarity, Short-Circuit, Over-Temperature, Over/Under Voltage, Spark-Free |
| Available Since | March 13, 2023 |

A diagram illustrating the physical dimensions of the ATEM POWER DC to DC charger, showing its length (225mm), width (135mm), height (60mm), and cable length (270mm).
9. Warranty and Support
The ATEM POWER 60A DC to DC Battery Charger comes with a 1-year warranty, serving as a testament to its quality and reliability. For technical support, warranty claims, or further inquiries, please refer to the contact information provided with your product packaging or visit the official ATEM POWER website.
For more information about ATEM POWER products, visit their official store: ATEM POWER Store


