1. Introduction
The Synology DiskStation DS423 is a 4-bay Network Attached Storage (NAS) device designed for consolidating, organizing, and securing your data. It provides built-in solutions within Synology DiskStation Manager (DSM) for file synchronization, multi-device access, digital photo management, and video surveillance. This manual provides essential information for setting up, operating, maintaining, and troubleshooting your DS423.
2. Product Overview
Familiarize yourself with the physical components of your Synology DS423.
Front View
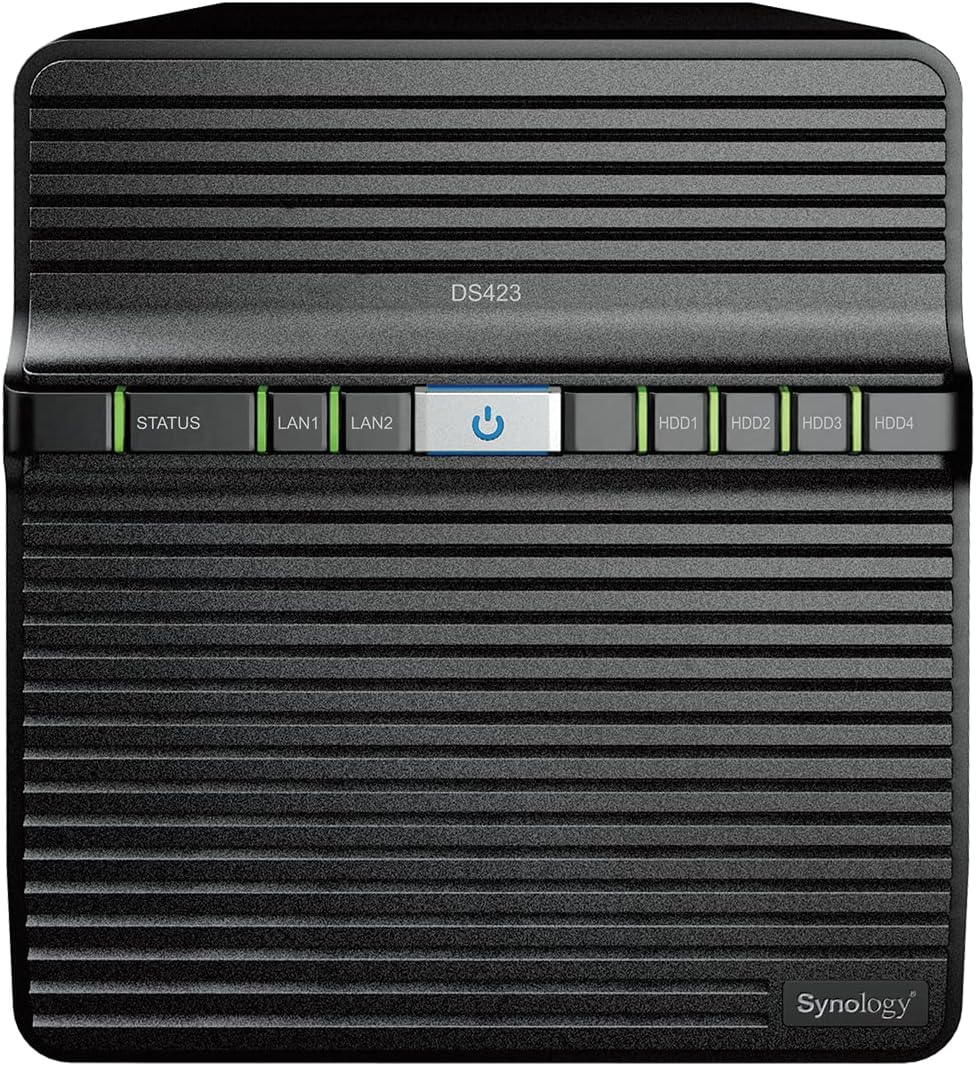
Image: Front view of the Synology DS423, showing LED indicators for status, LAN, and individual hard drives, along with the power button.
- Status Indicator: Displays the system status.
- LAN Indicators (LAN1, LAN2): Show network connection status.
- Power Button: Turns the device on or off.
- Drive Status Indicators (HDD1-HDD4): Indicate the status of each installed hard drive.
Rear View

Image: Rear view of the Synology DS423, highlighting the dual fans, LAN ports, USB ports, and power input.
- Fans: Provide cooling for the system.
- Power Port: Connects to the power adapter.
- LAN Ports (LAN1, LAN2): Connect to your network router or switch.
- USB 3.2 Gen 1 Ports: For connecting external storage devices or peripherals.
- Reset Button: Used for system reset (refer to troubleshooting for details).
- Kensington Security Slot: For physical security.
3. Setup
Follow these steps for initial setup and hard drive installation.
3.1 Hard Drive Installation
The DS423 features tool-less drive trays for easy installation.
- Gently pull out the drive trays from the front of the NAS.
- Mount your 3.5-inch or 2.5-inch SATA hard drives or SSDs into the trays. For 3.5-inch drives, no screws are typically needed as the trays are designed for tool-less installation. For 2.5-inch drives, use the provided screws to secure them.
- Slide the loaded drive trays back into the NAS until they click into place.
Image: Synology DS423 with drive bays open, showing the internal structure for hard drive installation.
3.2 Initial Software Setup
After installing the drives and connecting the NAS to your network and power, you will proceed with the DiskStation Manager (DSM) setup via a web browser. Refer to the Synology Quick Installation Guide for detailed steps.
3.3 Official Setup Video
Video: An official Synology guide demonstrating the NAS setup process, including hardware installation and initial software configuration.
4. Operating Instructions
Learn how to manage and access your data on the Synology DS423.
4.1 File Access and Sharing
The Synology DS423 allows you to securely access and share files from various devices.
Video: An official Synology guide on how to access files stored on your NAS via Windows File Explorer or Mac Finder.
Video: An official Synology guide demonstrating how to add and share files on your Synology NAS.
4.2 Data Protection and Surveillance
Utilize the DS423's features for comprehensive data protection and versatile video surveillance.
- Backup Solutions: Back up your media and documents to multiple destinations, and leverage snapshots to protect against malware.
- Video Surveillance: Protect your home or business with intuitive monitoring, archiving, and analysis tools for up to 30 IP cameras (camera licenses sold separately).
5. Maintenance
Regular maintenance ensures optimal performance and data integrity.
- Software Updates: Keep your DiskStation Manager (DSM) and installed applications updated to the latest versions for security and feature enhancements.
- Security Checks: Periodically review security settings and run system health checks within DSM.
- Drive Health: Monitor the health of your hard drives through DSM's Storage Manager to anticipate and prevent potential failures.
6. Troubleshooting
If you encounter issues, consult these resources:
- Synology Knowledge Center: Visit the official Synology website for extensive documentation, FAQs, and troubleshooting guides.
- Synology YouTube Channel: Find video tutorials and setup guides for common issues.
- Reset Button: A paperclip can be used to press the reset button on the back of the device for various reset options (refer to Synology documentation for specific reset procedures).
7. Specifications
| Feature | Detail |
|---|---|
| Brand | Synology |
| Series | DS423 |
| Item Model Number | DS423 |
| Item Weight | 4.87 pounds |
| Product Dimensions | 9 x 6.6 x 7.24 inches |
| Color | Black |
| Material | Metal |
| Manufacturer | Synology |
| First Available | March 19, 2023 |
8. Warranty and Support
The Synology DS423 comes with a 2-year warranty. For further assistance, please refer to the official Synology support channels.
- Online Support: Visit the Synology website for their knowledge base, forums, and contact information.
- Product Registration: Register your product on the Synology website to ensure full warranty coverage and receive important updates.


