1. Introduction
This manual provides essential information for the safe and effective operation of your EVH 5150 Iconic Series 15-watt 1x10-inch Tube Combo Amplifier. Please read this manual thoroughly before using the amplifier to ensure proper setup, operation, and maintenance. Retain this manual for future reference.

Figure 1: Front view of the EVH 5150 Iconic Series 15-watt 1x10-inch Tube Combo Amplifier. This image displays the amplifier's front grille, the '5150' logo, and the EVH emblem, showcasing its classic ivory finish.
2. Important Safety Information
To reduce the risk of electric shock, fire, or injury, always observe the following precautions:
- Read Instructions: Read all safety and operating instructions before using the product.
- Retain Instructions: Keep the safety and operating instructions for future reference.
- Heed Warnings: Adhere to all warnings on the product and in the operating instructions.
- Follow Instructions: Follow all operating and use instructions.
- Water and Moisture: Do not use this product near water (e.g., bathtub, sink, wet basement, swimming pool).
- Ventilation: Ensure proper ventilation. Do not block ventilation openings.
- Heat: Do not place near heat sources such as radiators, heat registers, stoves, or other heat-producing appliances.
- Power Sources: Connect only to a power supply of the type described in the operating instructions or marked on the product.
- Power-Cord Protection: Protect the power cord from being walked on or pinched.
- Cleaning: Clean only with a dry cloth.
- Servicing: Do not attempt to service this product yourself. Refer all servicing to qualified service personnel.
3. Package Contents
Verify that all items are present and in good condition upon unpacking:
- EVH 5150 Iconic Series 15-watt 1x10-inch Tube Combo Amplifier
- Power Cord
- Footswitch
- User Manual (this document)
4. Controls and Features
4.1 Front Panel Controls

Figure 2: Left side of the amplifier's front panel, showing the input jack, channel select buttons, and Gain controls for Channel One and Channel Two.
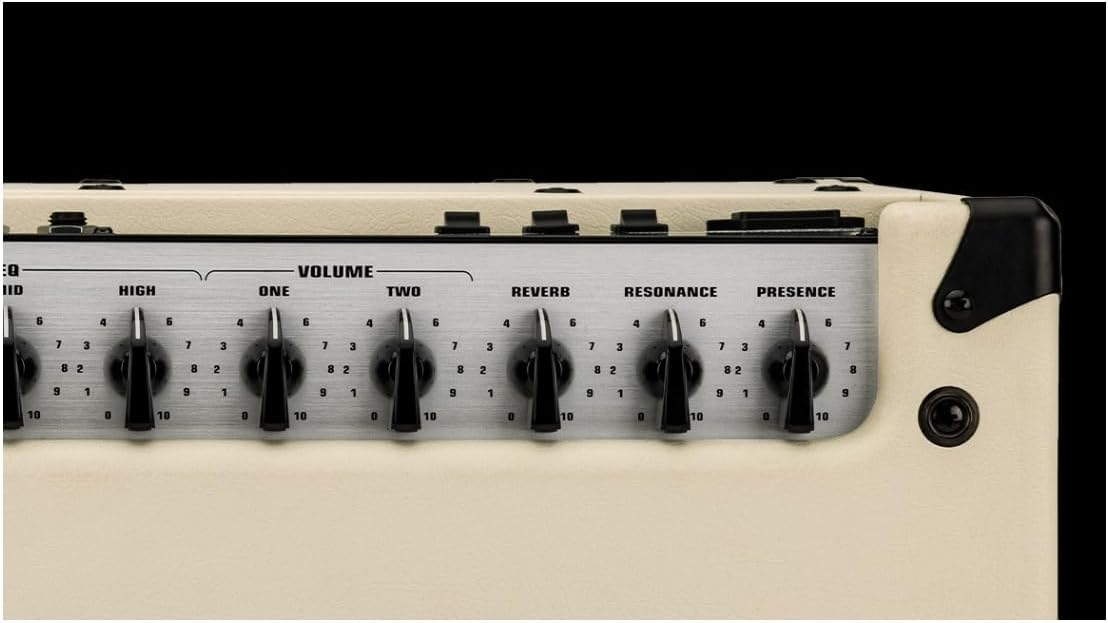
Figure 3: Right side of the amplifier's front panel, displaying the shared EQ (Low, Mid, High), Volume controls for Channel One and Channel Two, Reverb, Resonance, and Presence knobs.
- INPUT: 1/4-inch jack for connecting your guitar.
- CH1/CH2 Select Buttons: Toggles between Channel One (Clean/Crunch) and Channel Two (Lead/Burn).
- GAIN (ONE): Adjusts the input gain for Channel One.
- GAIN (TWO): Adjusts the input gain for Channel Two.
- LOW, MID, HIGH: Three-band equalizer controls to shape the tone. These controls are shared between both channels.
- VOLUME (ONE): Controls the output volume for Channel One.
- VOLUME (TWO): Controls the output volume for Channel Two.
- REVERB: Adjusts the amount of built-in digital reverb effect.
- RESONANCE: Controls the low-frequency response and resonance of the power amp section.
- PRESENCE: Controls the high-frequency response and presence of the power amp section.
4.2 Rear Panel Controls and Connections

Figure 4: Rear panel of the amplifier, showing the power input, power switches, effects loop, speaker outputs, and other utility connections.
- POWER Switch: Turns the amplifier's main power ON or OFF.
- STANDBY Switch: Engages or disengages the amplifier's standby mode. Always use standby when warming up or cooling down tubes.
- POWER LEVEL Switch: Selects between FULL (15 watts) and 1/4 (approximately 3.75 watts) power output.
- EFFECTS LOOP (SEND/RETURN): 1/4-inch jacks for connecting external effects pedals or processors.
- SPEAKER EMULATED OUT: XLR output for direct connection to a mixing console or audio interface, featuring speaker cabinet emulation.
- FOOTSWITCH: Input for the included footswitch to remotely select channels.
- LOAD IMPEDANCE Selector: Selects the output impedance (4Ω, 8Ω, 16Ω) to match external speaker cabinets.
- PARALLEL SPEAKER OUTPUTS: Two 1/4-inch jacks for connecting external speaker cabinets. Ensure total impedance matches the LOAD IMPEDANCE setting.
5. Setup
- Placement: Place the amplifier on a stable, level surface, ensuring adequate ventilation around the unit. Avoid placing it near heat sources or in direct sunlight.
- Power Connection: Ensure the POWER switch is OFF and the STANDBY switch is in STANDBY. Connect the supplied power cord to the amplifier's AC inlet and then to a grounded electrical outlet.
- Guitar Connection: Connect your guitar to the INPUT jack on the front panel using a high-quality instrument cable.
- Footswitch Connection: Connect the included footswitch to the FOOTSWITCH jack on the rear panel for remote channel switching.
- External Speakers (Optional): If using external speaker cabinets, ensure the amplifier's internal speaker is disconnected (if applicable, consult the full manual for specific instructions) and connect your external cabinet(s) to the PARALLEL SPEAKER OUTPUTS. Set the LOAD IMPEDANCE selector to match the total impedance of your external speaker setup. Incorrect impedance matching can damage the amplifier.
- Effects Loop (Optional): If using external effects, connect the SEND jack to the input of your effects unit and the output of your effects unit to the RETURN jack.
6. Operation
- Power On:
- Ensure all volume controls are set to minimum.
- Flip the POWER switch to ON. The power indicator light will illuminate.
- Wait approximately 60 seconds for the tubes to warm up.
- Flip the STANDBY switch to ON.
- Channel Selection:
- Use the CH1/CH2 buttons on the front panel or the footswitch to select your desired channel.
- Channel One: Offers clean to crunch tones.
- Channel Two: Provides lead and high-gain "Burn" tones.
- Adjusting Tone:
- Use the GAIN controls to set the amount of overdrive/distortion for each channel.
- Adjust the LOW, MID, and HIGH EQ controls to shape your desired tonal characteristics.
- Use the REVERB knob to add spatial depth to your sound.
- The RESONANCE and PRESENCE controls fine-tune the overall low-end and high-end response of the amplifier.
- Volume Adjustment: Slowly increase the VOLUME (ONE) or VOLUME (TWO) control for the selected channel to achieve your desired output level.
- Power Level: Use the POWER LEVEL switch on the rear panel to select between FULL (15W) for maximum headroom and volume, or 1/4 (approx. 3.75W) for reduced volume suitable for practice or recording.
- Power Off:
- Flip the STANDBY switch to STANDBY.
- Wait a few moments for the tubes to cool down.
- Flip the POWER switch to OFF.
7. Maintenance
- Cleaning: Disconnect the amplifier from power before cleaning. Use a soft, dry cloth to wipe down the exterior. Do not use abrasive cleaners or solvents.
- Tube Replacement: Vacuum tubes have a finite lifespan and will eventually need replacement. If you notice a decrease in performance, unusual noise, or loss of volume, tubes may need to be replaced. This procedure should ideally be performed by a qualified technician.
- Storage: When not in use for extended periods, store the amplifier in a dry, temperature-controlled environment, away from direct sunlight and extreme temperatures.
- Ventilation: Always ensure that the amplifier's ventilation openings are clear and unobstructed during operation.
8. Troubleshooting
| Problem | Possible Cause | Solution |
|---|---|---|
| No sound |
|
|
| Low volume or weak tone |
|
|
| Excessive hum or noise |
|
|
If problems persist after attempting these solutions, contact qualified service personnel.
9. Specifications

Figure 5: Dimensional overview of the EVH 5150 Iconic Series 15-watt 1x10-inch Tube Combo Amplifier, showing height, width, and depth.
| Feature | Detail |
|---|---|
| Model | 5150 Iconic Series 15-watt 1x10-inch Tube Combo Amp |
| Output Wattage | 15 Watts (Full), approx. 3.75 Watts (1/4 Power) |
| Channels | 2 (Clean/Crunch, Lead/Burn) |
| Speaker | 1 x 10-inch EVH Celestion Custom Designed Speaker |
| Controls (Front) | Input, CH1/CH2 Select, Gain (One), Gain (Two), Low, Mid, High, Volume (One), Volume (Two), Reverb, Resonance, Presence |
| Controls (Rear) | Power, Standby, Power Level (Full/1/4), Effects Loop (Send/Return), Speaker Emulated Out (XLR), Footswitch, Load Impedance (4Ω, 8Ω, 16Ω), Parallel Speaker Outputs |
| Effects Loop | Yes |
| Dimensions (Product) | 23.5 x 22.7 x 14.3 inches (approx. 59.7 x 57.7 x 36.3 cm) |
| Item Weight | 44.4 pounds (approx. 20.1 kg) |
| Power Source | Corded Electric |
| Connector Type | 6.35mm Jack (Input, Speaker Outputs, Effects Loop, Footswitch) |
| Color | Ivory |
10. Warranty and Support
For warranty information and technical support, please refer to the documentation provided with your purchase or visit the official EVH website. Keep your proof of purchase for warranty claims.
EVH Official Website: www.evhgear.com


