Introduction
Thank you for choosing the Acoustech PL-300 12-inch Powered Subwoofer. This subwoofer is designed to deliver powerful, balanced, and tight bass for both home theater and music applications. Featuring a custom-designed heavy-duty long-throw 12-inch poly-injected woofer, a high-power magnet, and a high-excursion surround, the PL-300 offers state-of-the-art performance. This manual provides essential information for proper setup, operation, and maintenance to ensure optimal performance and longevity of your subwoofer.
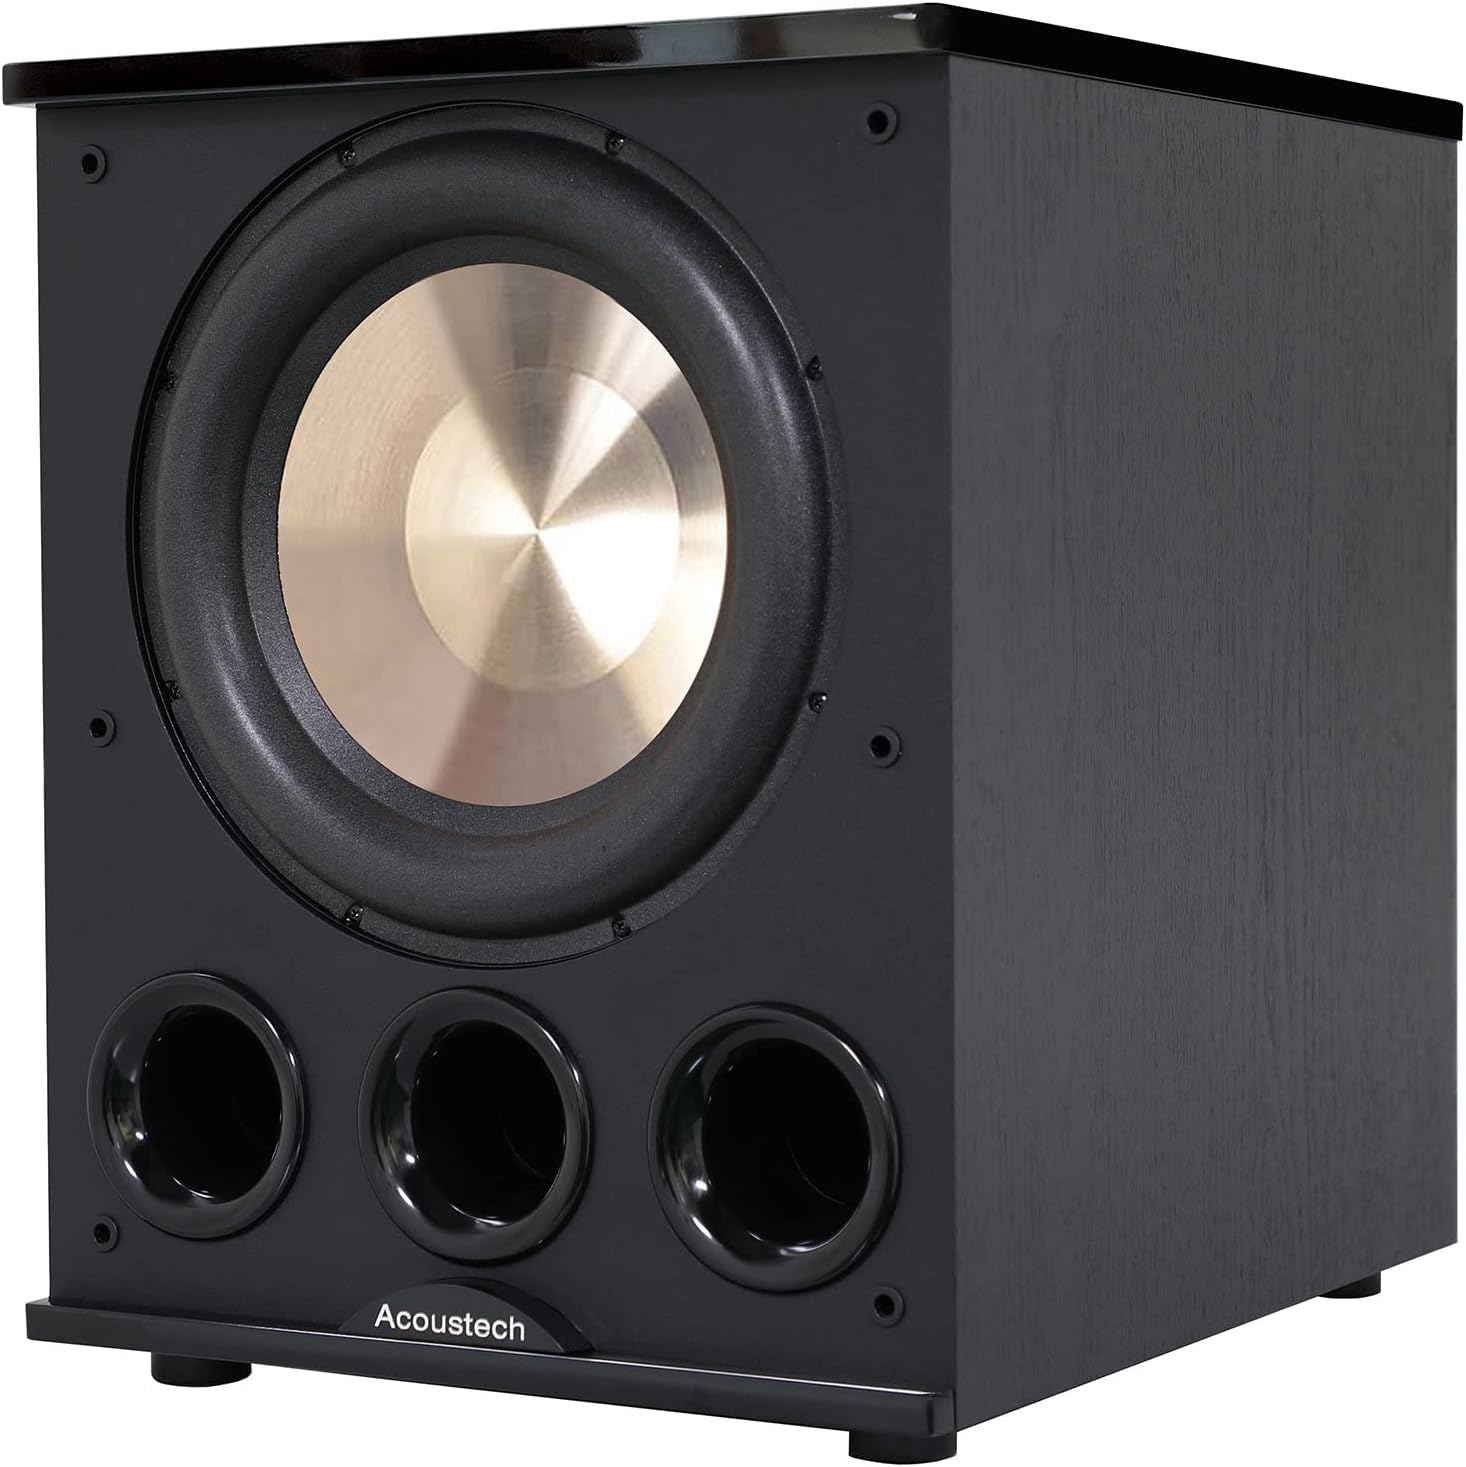
Figure 1: Front view of the Acoustech PL-300 Powered Subwoofer, showcasing the 12-inch woofer and triple front-firing ports.
Safety Information
Please read all safety and operating instructions before using your subwoofer. Retain these instructions for future reference.
- Power Source: Connect the subwoofer only to a power supply of the type described in the operating instructions or as marked on the unit.
- Ventilation: Do not block any ventilation openings. Install in accordance with the manufacturer's instructions.
- Heat: Do not install near any heat sources such as radiators, heat registers, stoves, or other apparatus (including amplifiers) that produce heat.
- Water and Moisture: Do not use this apparatus near water. Do not expose to dripping or splashing.
- Cleaning: Clean only with a dry cloth.
- Servicing: Do not attempt to service this product yourself. Refer all servicing to qualified service personnel.
- Power Cord Protection: Protect the power cord from being walked on or pinched, particularly at plugs, convenience receptacles, and the point where they exit from the apparatus.
Package Contents
Verify that all items are present in the package:
- Acoustech PL-300 Powered Subwoofer
- Power Cord
- Port Plug (for optional bass tuning)
- User Manual (this document)
Product Features
The Acoustech PL-300 subwoofer incorporates advanced features for superior audio performance:
- 12-inch Poly-Injected Woofer: Heavy-duty, long-throw design with high-power magnet and high-excursion surround for deep, impactful bass.
- 1400W Peak Output: Powerful amplification for dynamic sound reproduction.
- Tri-Tuned Triple Ports: Front-firing ports designed for efficient bass output.
- BASS BOOST Switch: Enhances low-frequency response for a more pronounced bass experience.
- MAX OUTPUT Switch: Optimizes the subwoofer for maximum sound pressure levels.
- Port Plug: Allows for sealed enclosure operation, providing tighter bass response and extending low-frequency reach down to 15Hz when used with the BASS BOOST switch.
- Adjustable Crossover: Fine-tune the upper frequency limit of the subwoofer to seamlessly blend with your main speakers.
- Phase Control: Adjusts the phase of the subwoofer output to match your main speakers, ensuring coherent bass.
Controls and Connections
Familiarize yourself with the rear panel controls and connections:

Figure 2: Rear panel of the Acoustech PL-300, displaying the various input, output, and control knobs/switches.
- SUB IN (RCA): Input for connecting to the LFE/Subwoofer output of your A/V receiver or pre-amplifier.
- VOLUME: Adjusts the overall output level of the subwoofer.
- PHASE (0°/180°): Selects the phase of the subwoofer output. Use 0° or 180° to achieve the most coherent bass with your main speakers.
- MAX OUTPUT Switch: Toggles between normal and maximum output modes.
- BASS BOOST Switch: Activates or deactivates the bass boost function.
- CROSSOVER FREQUENCY: Adjusts the low-pass filter from 40Hz to 180Hz. This determines the highest frequency the subwoofer will reproduce.
- CROSSOVER POWER (ON/AUTO/OFF):
- ON: Subwoofer remains powered on.
- AUTO: Subwoofer automatically turns on when an audio signal is detected and enters standby mode after a period of inactivity.
- OFF: Subwoofer is powered off.
- Voltage Selector (120V/240V): Selects the appropriate voltage for your region. Ensure this is set correctly before connecting to power.
- FUSE: Replace only with the specified fuse type and rating.
- Power Inlet: Connect the supplied power cord here.
Setup
Placement
The placement of your subwoofer significantly impacts its performance. Experiment with different locations to find the best sound in your listening environment. Generally, corner placement can enhance bass output, while placing it along a wall can provide a more balanced response. Consider the overall speaker configuration for optimal sound staging.

Figure 3: Example of a 7.2 surround sound configuration, illustrating ideal placement for two subwoofers (PL-300s) within a home theater setup.
Connecting the Subwoofer
Before making any connections, ensure all audio components are turned off and unplugged from the power outlet.
- Locate the LFE or Subwoofer output on your A/V receiver or pre-amplifier.
- Connect an RCA cable from the LFE/Subwoofer output of your receiver to the SUB IN (RCA) input on the PL-300 subwoofer's rear panel.
- Ensure the Voltage Selector switch on the rear panel is set to the correct voltage for your region (120V for North America, 240V for other regions).
- Connect the supplied power cord to the Power Inlet on the subwoofer and then to a wall outlet.
Initial Settings
After connecting, power on your receiver and the subwoofer. Set the initial controls as follows:
- CROSSOVER POWER: Set to AUTO for convenience, or ON for continuous power.
- VOLUME: Start with the volume knob at its minimum setting (fully counter-clockwise).
- CROSSOVER FREQUENCY: If your receiver has a built-in bass management system (LFE output), set the subwoofer's crossover to its maximum (180Hz). If not, set it to match the low-frequency extension of your main speakers (typically 80Hz-100Hz).
- PHASE: Start with 0°. You can adjust this later during calibration.
- BASS BOOST Switch: Start with this switch in the OFF position.
- MAX OUTPUT Switch: Start with this switch in the OFF position.
Once these initial settings are made, play some audio content with significant bass. Gradually increase the VOLUME control on the subwoofer until the bass output blends seamlessly with your main speakers. Avoid setting the volume too high, which can lead to boomy or distorted bass.
Using the Port Plug for Bass Tuning
The PL-300 includes a port plug that allows you to modify the subwoofer's bass characteristics. Inserting the plug into one of the front ports effectively changes the enclosure from ported to a sealed-like design, which can extend the low-frequency response down to 15Hz, especially when combined with the BASS BOOST switch.

Figure 4: Illustration demonstrating the insertion of the included port plug into the center port of the PL-300. This configuration, combined with the BASS BOOST switch, can achieve bass response down to 15Hz.
To use the port plug, simply insert it firmly into the center port. Experiment with the BASS BOOST switch ON/OFF to find your preferred bass preference. This feature allows you to choose between exciting room-shaking bass below 20Hz or the loudest levels of bass down to 20Hz.
Operating
Once set up, operating your PL-300 is straightforward:
- Power On/Off: If the CROSSOVER POWER switch is set to AUTO, the subwoofer will automatically turn on when an audio signal is detected and enter standby mode after approximately 15-20 minutes of no signal. If set to ON, it will remain powered on. For complete power off, set the switch to OFF or unplug the power cord.
- Volume Adjustment: Use the VOLUME knob on the rear panel to fine-tune the bass level relative to your main speakers. Make small adjustments for best results.
- Phase Adjustment: If the bass sounds weak or out of sync, try flipping the PHASE switch between 0° and 180°. Choose the setting that provides the most impactful and coherent bass.
- Crossover Adjustment: If you notice a "hole" in the sound (missing frequencies) or boomy bass, adjust the CROSSOVER FREQUENCY. If your receiver handles bass management, keep the subwoofer's crossover at its maximum. Otherwise, adjust it to blend smoothly with your main speakers.
- Bass Preference: Experiment with the BASS BOOST and MAX OUTPUT switches, along with the optional port plug, to achieve your desired bass characteristics for different content (movies vs. music).
Maintenance
Proper care will ensure the longevity and performance of your subwoofer:
- Cleaning: Dust the cabinet with a soft, dry cloth. Do not use liquid cleaners or aerosol sprays, as they may damage the finish or internal components.
- Grille Care: The subwoofer comes with a removable grille. If you remove it for cleaning, handle it carefully to avoid damaging the fabric or mounting pegs.
- Ventilation: Ensure that the ventilation openings on the rear panel are not obstructed. Adequate airflow is crucial for preventing overheating.
- Environment: Avoid placing the subwoofer in direct sunlight, near heat sources, or in areas with high humidity.

Figure 5: The Acoustech PL-300 subwoofer with its protective front grille attached, providing a clean aesthetic and protecting the driver.
Troubleshooting
If you experience issues with your PL-300 subwoofer, refer to the following common problems and solutions:
| Problem | Possible Cause | Solution |
|---|---|---|
| No sound from subwoofer. |
|
|
| Bass is weak or thin. |
|
|
| Bass is boomy or distorted. |
|
|
| Subwoofer hums. |
|
|
Specifications
Technical specifications for the Acoustech PL-300 Powered Subwoofer:
| Model Name | PL-300 |
| Speaker Type | Powered Subwoofer |
| Woofer Diameter | 12 Inches |
| Speaker Maximum Output Power | 1400 Watts (Peak) |
| Frequency Response | 20 Hz (can extend to 15Hz with port plug and Bass Boost) |
| Connectivity Technology | RCA |
| Product Dimensions (D x W x H) | 18.75"D x 18.75"W x 19.33"H |
| Item Weight | 48 pounds |
| Power Source | Corded Electric |
| Included Components | Power Cord, Port Plug |

Figure 6: Dimensional view of the Acoustech PL-300 subwoofer, indicating its height, width, and depth.
Warranty and Support
The Acoustech PL-300 is designed and engineered in the U.S. and comes with an extended warranty:
- Woofer: 8-year warranty
- Amplifier and Associated Electronics: 5-year warranty
For warranty claims or technical support, please contact Acoustech customer service. Keep your proof of purchase for warranty validation.


