
1. Product Overview
The ORICO WS400U3 is a high-capacity 4-bay hard drive enclosure designed for efficient and secure data storage. It supports both 2.5-inch and 3.5-inch SATA HDDs and SSDs, offering a maximum capacity of up to 80TB (4 x 20TB drives). Its robust aluminum construction, coupled with an 80mm cooling fan and honeycomb airflow design, ensures optimal heat dissipation and stable operation. The enclosure features a USB 3.0 Type-A interface, providing high-speed data transfer rates of up to 5Gbps.
This enclosure is equipped with multiple protection features including anti-over voltage, over-current, overheat, short-circuit, and leakage protection, safeguarding your valuable data. An intelligent 10-minute auto sleep mode helps conserve energy and extend drive lifespan. It is compatible with Windows XP/Vista/7/8, Mac OS X 10.2 and higher, and Linux operating systems.
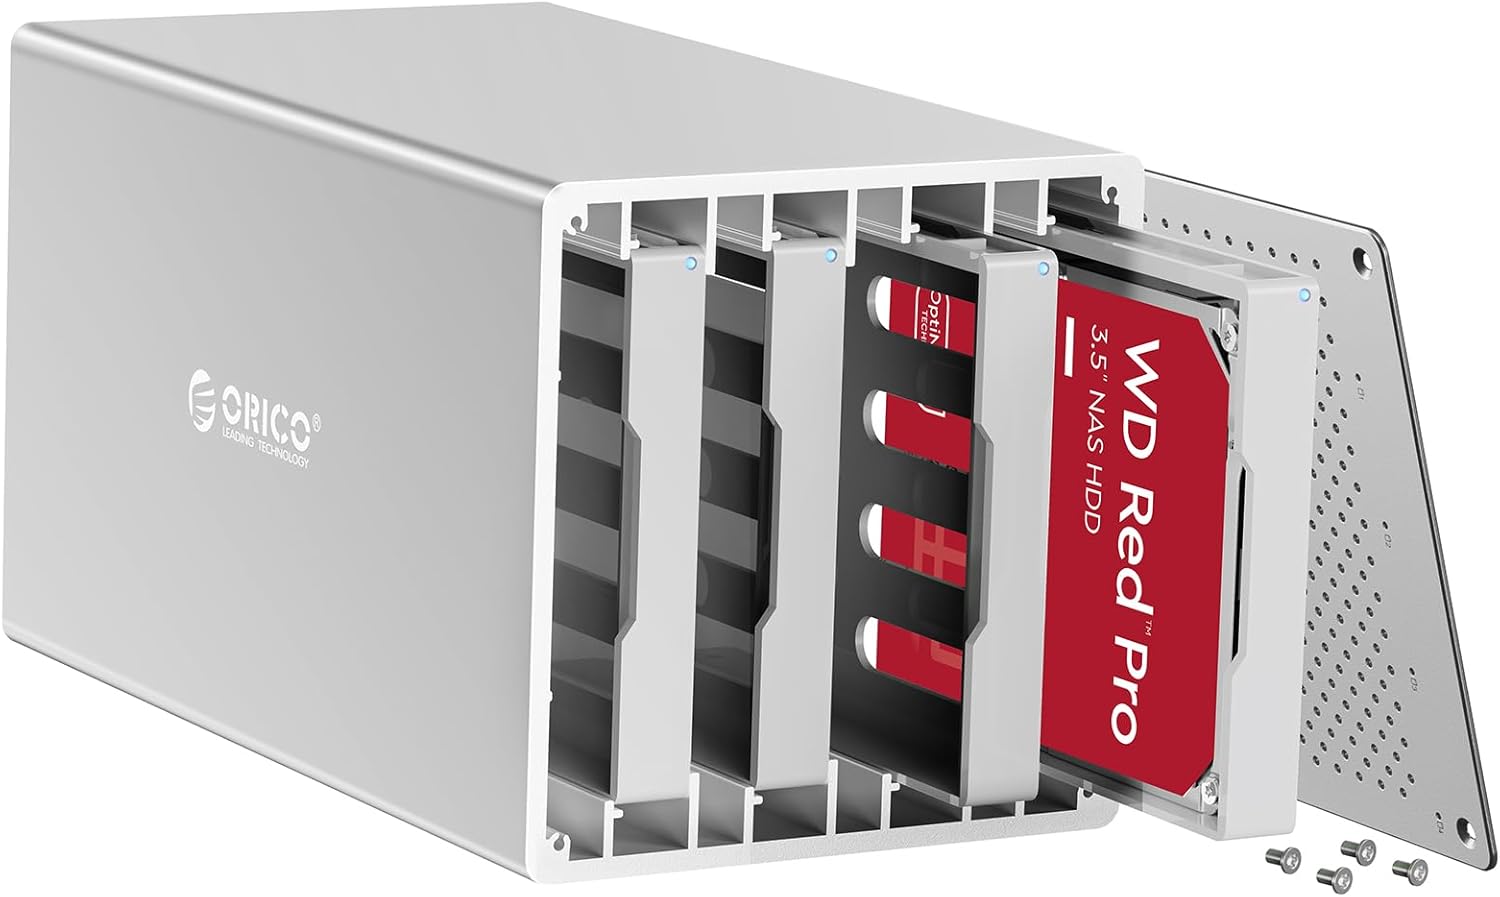
Image: The ORICO WS400U3 4-Bay Hard Drive Enclosure, showcasing its sleek aluminum design and the process of inserting a 3.5-inch hard disk drive into one of its bays.
2. Package Contents
Please verify that all items are present in your package:
- 1x ORICO Aluminum 4-Bay Hard Drive Enclosure (WS400U3)
- 1x 1-meter USB 3.0 Type-A Data Cable
- 1x Set of Screws for drive installation
- 1x 12V Power Adapter
- 1x User Manual
3. Setup Guide
3.1 Hardware Installation
- Prepare the Enclosure: Unscrew and remove the rear panel of the enclosure to access the drive bays.
- Install 3.5-inch HDDs:
- Slide a 3.5-inch SATA HDD into an empty drive tray.
- Secure the HDD to the tray using the provided screws.
- Slide the assembled tray into an available bay in the enclosure until it clicks into place.

Image: Illustrates the DIY installation process, showing how 3.5-inch HDDs and 2.5-inch SSDs are mounted onto their respective brackets for secure placement within the enclosure.
- Install 2.5-inch SSDs/HDDs (with Mounting Bracket):
- Attach your 2.5-inch SATA HDD or SSD to the included 1125SS mounting bracket.
- Secure the 2.5-inch drive to the bracket using the provided screws.
- Slide the assembled bracket with the 2.5-inch drive into an empty drive tray, then slide the tray into an available bay.
- Secure the Enclosure: Once all drives are installed, reattach the rear panel and secure it with the screws.
- Connect Power and Data:
- Connect the 12V power adapter to the enclosure's DC input port and then to a power outlet.
- Connect the USB 3.0 Type-A data cable from the enclosure's USB 3.0 port to an available USB 3.0 port on your computer or compatible device.

Image: The ORICO WS400U3 Hard Drive Enclosure connected to its 12V power supply and a computer via USB, illustrating its independent power supply and compatibility with various devices like iMac, Desktop, Laptop, TV, Router, and PS4/5.
3.2 Disk Formatting and Partitioning
After physical installation, new hard drives must be formatted and partitioned by your operating system to be usable. The process varies slightly depending on your OS.
Video: A detailed guide on how to format and partition hard drives in Windows, macOS, and Linux operating systems. This video is provided by the seller, ORICO Direct US Store, and is essential for preparing your drives for use with the enclosure.
Windows System:
- Right-click on 'This PC' (or 'My Computer') and select 'Manage'.
- In the Computer Management window, navigate to 'Disk Management' under 'Storage'.
- Locate your newly installed disk(s), which will likely appear as 'Unallocated Space'.
- Right-click on the unallocated space and select 'New Simple Volume'.
- Follow the New Simple Volume Wizard to assign a drive letter, choose a file system (NTFS is common for Windows), and format the drive.
macOS System:
- Open 'Disk Utility' (found in Applications > Utilities).
- Select your new disk from the sidebar.
- Click 'Erase' from the top menu.
- Choose a Name, Format (e.g., APFS or Mac OS Extended (Journaled)), and Scheme (e.g., GUID Partition Map).
- Click 'Erase' to format the drive.
Linux System:
- Open the 'Disks' utility (often found in Utilities or System Tools).
- Select your new disk from the left panel.
- Click the gear icon or 'Format Disk' option.
- Choose a partition type (e.g., GPT) and a file system (e.g., Ext4 for Linux, or NTFS for Windows compatibility).
- Confirm and proceed with formatting.
3.3 RAID Configuration (WS400U3 supports JBOD/CLONE/RAID 0/1/3/5/10)
The ORICO WS400U3 supports various RAID modes for advanced data management. The RAID mode is configured via DIP switches located on the rear panel of the enclosure. Please refer to the detailed instructions in the included user manual or the ORICO website for specific DIP switch settings for each RAID level. Always back up your data before changing RAID modes, as this will erase all data on the drives.
Video: An overview of the ORICO WS Enclosure, demonstrating its physical setup, drive installation, and highlighting features like RAID support and data transfer speeds. This video is provided by the seller, ORICO Direct US Store, and offers a visual guide to the product's capabilities.
4. Operating Instructions
4.1 Data Transfer
Once the drives are formatted and recognized by your system, you can begin transferring data. The USB 3.0 interface provides a maximum theoretical transfer rate of 5Gbps, allowing for rapid data movement. Actual speeds may vary based on your system, the type of drives used, and the size/number of files.

Image: Shows the ORICO WS400U3 enclosure connected to a computer, illustrating its capability for fast data transfer at 5Gbps via USB 3.0 Type-B, enabling quick file operations.
4.2 LED Indicators
The front panel of the enclosure features LED indicators for each drive bay. These LEDs provide visual feedback on the status of your hard drives:
- Blue Light (Solid): Indicates normal operation and power.
- Blue Light (Flashing): Indicates data activity (reading or writing).
- Red Light: Indicates a warning or error, such as a drive failure in a RAID setup or a drive not being properly detected.
4.3 Auto Sleep Mode
The enclosure is designed with an intelligent 10-minute auto sleep mode. If there is no data activity for approximately 10 minutes, the enclosure will automatically enter a low-power sleep state. This feature helps to reduce power consumption and prolong the lifespan of your hard drives. The drives will automatically wake up when data access is requested.
5. Maintenance
5.1 Heat Dissipation
The ORICO WS400U3 features an all-aluminum body shell, an 80mm cooling fan, and a honeycomb airflow design on the front and rear panels to ensure excellent heat dissipation. This design helps maintain stable operating temperatures for your hard drives, which is crucial for their longevity and performance.

Image: An internal view of the ORICO WS400U3 enclosure, emphasizing its 80mm silent cooling fan and the honeycomb design on the panels, which together provide excellent heat dissipation for optimal performance.
5.2 Cleaning
To maintain optimal performance and appearance, periodically clean the exterior of the enclosure with a soft, dry cloth. Ensure the honeycomb ventilation holes are free from dust buildup to allow for proper airflow. Do not use liquid cleaners or abrasive materials.
6. Troubleshooting
6.1 Drive Not Recognized
- Ensure the power adapter is securely connected and the enclosure is powered on.
- Verify the USB data cable is firmly connected to both the enclosure and your computer's USB 3.0 port.
- Check if the hard drives are properly seated in their trays and the trays are fully inserted into the enclosure bays.
- For new drives, ensure they have been formatted and partitioned by your operating system. Refer to Section 3.2 for detailed instructions.
- Try connecting the enclosure to a different USB port or another computer to rule out port or system issues.
6.2 Overheating Concerns
While the ORICO WS400U3 is designed with excellent heat dissipation, factors like ambient temperature and continuous heavy load can affect drive temperatures. Ensure the enclosure is placed in a well-ventilated area, away from direct sunlight or heat sources. Avoid blocking the honeycomb ventilation holes on the front and rear panels. If you experience persistent overheating, ensure the internal 80mm cooling fan is operating correctly.
6.3 Slow Data Transfer Speeds
- Ensure you are connected to a USB 3.0 port on your computer. USB 2.0 ports will significantly limit transfer speeds.
- Check the quality of your USB 3.0 cable. Using a different, high-quality USB 3.0 cable might resolve the issue.
- The performance of the hard drives themselves can impact speed. Older or slower HDDs will not achieve the maximum 5Gbps transfer rate.
- Background processes or other connected USB devices can sometimes interfere with transfer speeds.
6.4 Issues with Provided Screwdriver
The provided screwdriver is intended for initial setup. If you encounter issues with the screwdriver, such as stripping or deforming, it is recommended to use a standard, high-quality Phillips head screwdriver of appropriate size for the enclosure's screws. This will ensure proper installation and removal of components without damage.
7. Specifications
| Feature | Specification |
|---|---|
| Model Number | WS400U3 |
| Brand | ORICO |
| Memory Storage Capacity | Up to 80 TB (4 x 20TB) |
| Compatible Devices | PS4, Laptop, Mac Desktop, Router, Xbox |
| Hard Disk Form Factor | 3.5 Inches (supports 2.5 Inches with bracket) |
| Max Number of Supported Devices | 4 |
| Data Transfer Rate | 5 Gigabits Per Second (USB 3.0) |
| Hardware Interface | USB 3.0 Type B, USB 3.0 Type A |
| Material | Aluminum Metal |
| Color | Silver |
| Product Dimensions | 9.57 x 5.35 x 5.28 inches |
| Item Weight | 6.98 pounds |
| Manufacturer | ORICO Technologies Co.,Ltd |
8. Warranty and Support
ORICO products are designed for reliability and performance. For warranty information and technical support, please refer to the warranty card included in your package or visit the official ORICO website. You can also contact ORICO customer service directly for assistance with product setup, troubleshooting, or any other inquiries.
For further assistance, please visit the ORICO Store on Amazon.


