
Streamlight 69473
Streamlight 69473 TLR-10 G Flex 1000-Lumen Rail-Mounted Tactical Weapon Light
Instruction Manual
Introduction
This manual provides detailed instructions for the safe and effective use of your Streamlight 69473 TLR-10 G Flex Tactical Weapon Light. This high-performance, rail-mounted accessory features a 1000-lumen white LED light and an integrated green aiming laser, designed for full-frame weapons. Please read this manual thoroughly before installation and operation.

Image: The Streamlight TLR-10 G Flex tactical weapon light, showcasing its compact design with the LED light and green laser module.
Safety Information
WARNING: This product contains chemicals known to the State of California to cause cancer and birth defects or other reproductive harm.
Always ensure the weapon is unloaded and pointed in a safe direction before installing, removing, or performing any maintenance on the TLR-10 G. Avoid direct eye exposure to the laser beam. Do not disassemble the unit; refer all servicing to qualified personnel. Use only specified batteries.
Package Contents
- Streamlight TLR-10 G Flex Tactical Weapon Light
- 2 CR123A Batteries
- Key Kit for Rail Mounting
- Low Switch (interchangeable)
- User Guide
Setup
1. Battery Installation
- Unscrew the face cap of the light counter-clockwise.
- Insert two CR123A batteries with the positive (+) end facing forward (towards the LED).
- Replace the face cap by screwing it clockwise until secure.
2. Mounting the Light
The TLR-10 G comes with a key kit to ensure a secure fit on various weapon rails. Select the appropriate key for your weapon platform.
- Loosen the rail clamp screw.
- Align the chosen key with the rail slot on your weapon.
- Slide the light onto the weapon rail until the key engages the slot.
- Tighten the rail clamp screw firmly to secure the light.
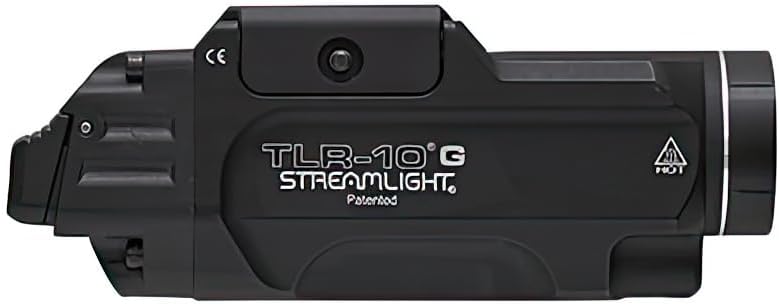
Image: Side view of the TLR-10 G, illustrating the rail clamp mechanism for secure attachment to a weapon.
3. Interchangeable Rear Switches
The TLR-10 G includes both high and low rear switches to customize the fit and ergonomics for your shooting style. The low switch is included in the package contents.
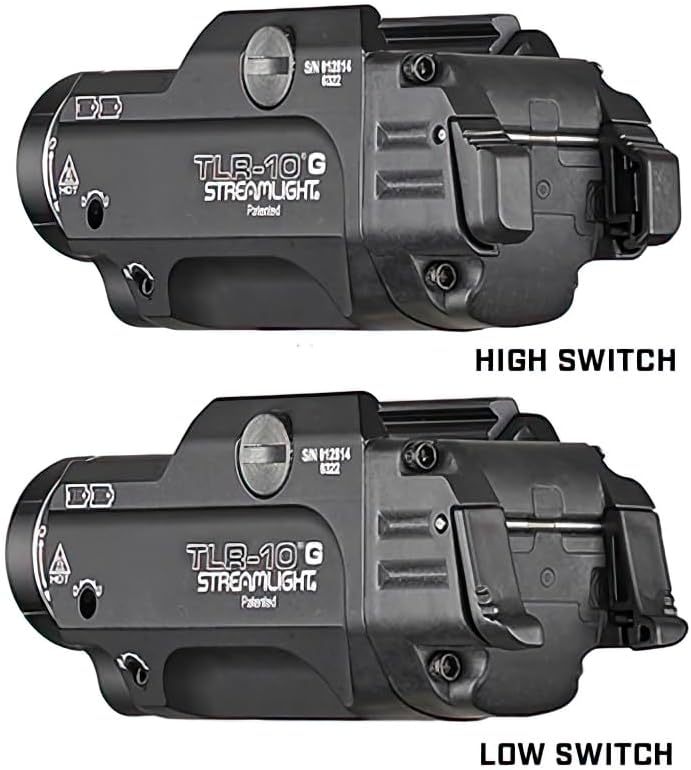
Image: Top-down view comparing the high and low rear switch options for the TLR-10 G, allowing user customization.
Operating Instructions
1. Ambidextrous Rear Switch Operation
- Momentary Activation: Press and hold either the left or right rear switch. Release to turn off.
- Constant On/Off: Press and quickly release either switch to turn the light on. Press and quickly release again to turn off.
2. Mode Selection (Light, Laser, and Combined)
The TLR-10 G offers three selectable modes: LED only, laser only, and both laser and LED. To cycle through modes:
- With the unit OFF, press and hold one of the rear switches.
- While holding, press the other rear switch. The mode will change.
- Release both switches when the desired mode is selected. The unit will remember the last selected mode.
3. Strobe Function
To activate the strobe mode, quickly double-tap either the left or right rear switch (within 0.4 seconds). To deactivate, press and release either switch.
4. Green Laser Adjustment
The integrated green laser can be adjusted for windage and elevation to zero with your weapon. Use a small Allen wrench (typically included in the key kit) for adjustments.
- Elevation Adjustment: Use the screw located on the top of the unit. Turning clockwise moves the laser dot down; counter-clockwise moves it up.
- Windage Adjustment: Use the screw located on the side of the unit. Turning clockwise moves the laser dot left; counter-clockwise moves it right.
Perform adjustments carefully and test at a safe range to ensure accuracy.

Image: The TLR-10 G mounted on a firearm, demonstrating the active green aiming laser beam.
Maintenance
1. Cleaning
Wipe the unit with a clean, soft cloth. For stubborn dirt, a damp cloth can be used. Do not use abrasive cleaners or solvents. Clean the lens with a lens-specific cleaning solution and cloth.
2. Battery Replacement
Replace batteries when the light output diminishes or the laser becomes dim. Always replace both CR123A batteries simultaneously with new, high-quality batteries.
3. Storage
For long-term storage, remove the batteries to prevent leakage and potential damage to the unit. Store in a cool, dry place.
Troubleshooting
- Light/Laser not activating: Check battery orientation and ensure batteries are fresh. Confirm the face cap is fully tightened.
- Dim light/laser: Replace batteries.
- Inconsistent operation: Ensure the unit is securely mounted and electrical contacts are clean.
- Laser not holding zero: Ensure the mounting screws are tight and the rail clamp is secure.
Technical Specifications
| Model | 69473 |
| Light Output | 1000 Lumens |
| Beam Distance | 200 Meters |
| Candela | 10,000 cd |
| Run Time (Light) | 1.5 hours |
| Run Time (Laser Only) | 11 hours |
| Laser Type | Class 3R Green Laser (<5mW, 510-530nm) |
| Batteries | 2 x CR123A Lithium (included) |
| Material | 6000 series Machined Aircraft Aluminum, BOROFLOAT® glass lens |
| Water Resistance | IPX4 (Water Resistant) |
| Operating Temperature | -40°F to +120°F |
| Dimensions | 7.53"D x 3.9"W x 1.4"H |
| Weight | 5.3 ounces (0.33 Pounds) |

Image: The TLR-10 G with overlaid text indicating its dimensions, 1000 lumens output, 1.5 hours runtime, 200 meters beam distance, and CR123A battery type.
Warranty and Support
The Streamlight TLR-10 G Flex is covered by a Limited Lifetime Warranty. For detailed warranty information, service, or technical support, please visit the official Streamlight website or contact their customer service department.
For further assistance, please refer to the manufacturer's official website: www.streamlight.com
Related documents69473


Ask a question about this manual
Ask about setup, troubleshooting, compatibility, parts, safety, or missing instructions. Manuals+ will review the question and use this page’s manual context to help answer it.