1. Introduction
This manual provides comprehensive instructions for the setup, operation, maintenance, and troubleshooting of your HAKO Pro Android 11 TV Box. Please read this manual thoroughly before using the device to ensure optimal performance and safety.
The HAKO Pro Android 11 TV Box is a streaming media player designed to deliver a wide range of content, including 4K Netflix, YouTube, Prime Video, and Disney Plus, powered by Android 11.0 OS and an Amlogic S905Y4-B processor.
2. Package Contents
Verify that all items listed below are present in your package:
- HAKO Pro Box
- IR+BT Voice Remote Control
- HD Cable (HDMI Cable)
- Power Adapter (12V/1A)
- User Manual (this document)

Image: Contents of the HAKO Pro TV Box package, including the TV box, remote control, power adapter, and HDMI cable.
3. Product Overview
3.1 Device Layout

Image: Top-down view of the HAKO Pro TV Box, highlighting its various ports and connections. Labels include DC In, HDMI, Ethernet, USB 2.0 (x2), and Micro SD card slot.
The HAKO Pro TV Box features several ports for connectivity:
- DC In (12V/1A): Power input port.
- HDMI: Connects to your TV or display for video and audio output.
- Ethernet (RJ45): For wired network connection (10M/100M adaptive).
- USB 2.0 (x2): For connecting external devices such as USB drives, keyboards, or mice.
- Micro SD: Slot for expanding storage with a Micro SD card.
- IR Receiver: For receiving signals from the remote control.
- Power Indicator: LED light indicating power status.
- Reset: Button for factory reset (typically located in a small pinhole).
3.2 Remote Control
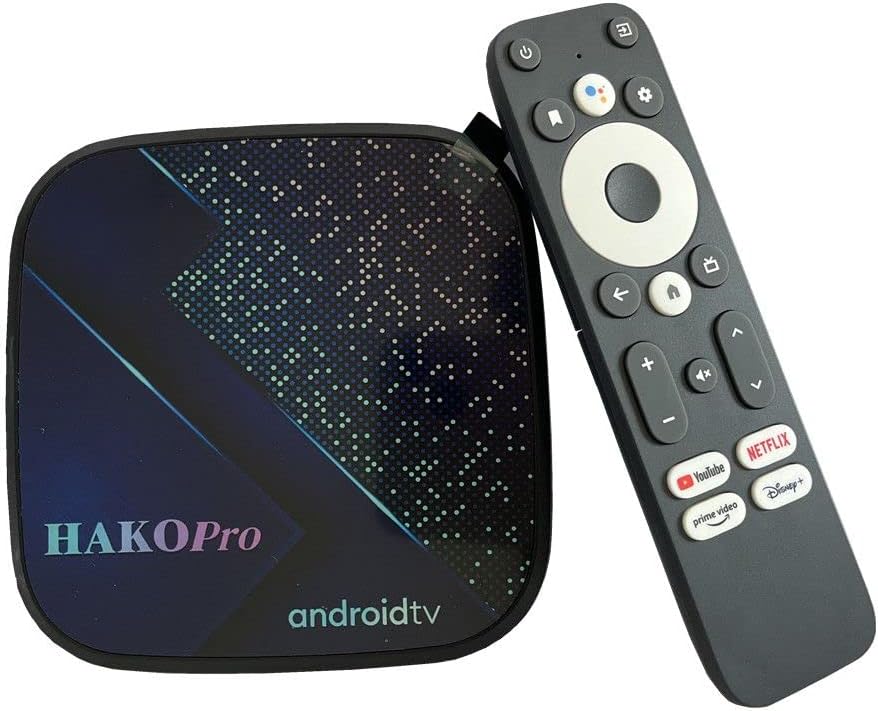
Image: The HAKO Pro TV Box alongside its included remote control. The remote features dedicated buttons for YouTube, Netflix, Prime Video, and Disney+.
The included remote control is an IR+BT Voice Remote, offering both infrared and Bluetooth connectivity. It features dedicated buttons for popular streaming services and a microphone button for Google Assistant voice commands.
- Power Button: Turns the device on or off.
- Navigation Pad: For menu navigation.
- OK Button: Confirms selections.
- Back Button: Returns to the previous screen.
- Home Button: Returns to the main home screen.
- Volume Buttons: Adjusts audio volume.
- Microphone Button: Activates Google Assistant for voice commands.
- Dedicated App Buttons: Quick access to YouTube, Netflix, Prime Video, and Disney+.
3.3 Internal Components

Image: An illustration of the Amlogic S905Y4-B chip, highlighting its role as the high-performance processor within the HAKO Pro TV Box. Key specifications like Quad 64-bit CPU, Mali-G31 mp2 GPU, 4GB RAM, and 32GB ROM are indicated.
The HAKO Pro TV Box is powered by an Amlogic S905Y4-B ARM Quad 64-bit Cortex-A35 CPU and an ARM Mali-G31 MP2 GPU, ensuring stable and smooth performance for streaming and applications. It includes 4GB DDR4 RAM and 32GB eMMC flash storage.
4. Setup Guide
4.1 Initial Connection
- Connect to TV: Connect one end of the provided HD Cable (HDMI) to the HDMI port on the HAKO Pro Box and the other end to an available HDMI input on your television.
- Connect to Power: Plug the power adapter into the DC In port on the HAKO Pro Box, then plug the adapter into a wall outlet. The power indicator light on the box should illuminate.
- Select Input: Turn on your TV and select the correct HDMI input source using your TV's remote control.
- Power On: The HAKO Pro Box should automatically power on. If not, press the Power button on the included remote control.
4.2 Remote Control Pairing
The IR+BT Voice Remote needs to be paired via Bluetooth for voice control functionality. For initial pairing, ensure the remote is within 20 cm of the TV box.
- Once the TV Box is powered on and displaying the initial setup screen, follow the on-screen prompts.
- Typically, you will be instructed to press and hold specific buttons on the remote (e.g., "OK" and "Volume Down") simultaneously until a pairing indicator appears on the screen or the remote's LED flashes.
- Confirm the pairing on the screen.
4.3 Network Connection
You can connect your HAKO Pro Box to the internet via Wi-Fi or Ethernet.
Wi-Fi Connection:
- From the home screen, navigate to Settings.
- Select Network & Internet.
- Turn on Wi-Fi.
- Select your desired Wi-Fi network from the list.
- Enter the Wi-Fi password if prompted and select Connect.
Ethernet Connection:
- Connect an Ethernet cable from your router or modem to the Ethernet port on the HAKO Pro Box.
- The device should automatically detect and connect to the wired network. You can verify this in Settings > Network & Internet.
4.4 Google Account Setup
To access the Google Play Store and other Google services, you will need to sign in with your Google account during the initial setup process or later via the Settings menu.
5. Operating Instructions
5.1 Navigating the Interface
Use the navigation pad and OK button on your remote control to browse the Android TV interface. The Home button will always return you to the main screen.
5.2 Installing Applications
Applications can be downloaded from the Google Play Store:
- From the home screen, select the Google Play Store icon.
- Search for the desired application using the on-screen keyboard or voice search (via the remote's microphone button).
- Select the app and choose Install.
5.3 Using Voice Control (Google Assistant)

Image: A hand holding the HAKO Pro remote control, with the Google Assistant interface displayed on a TV screen. Examples of voice commands like "What's the weather right now?" and "Please play an action movie" are shown.
Press the Microphone button on your remote control to activate Google Assistant. You can then speak commands such as:
- "Open Netflix"
- "Play [movie title]"
- "What's the weather?"
- "Search for [actor's name]"
5.4 Media Playback
The HAKO Pro Box supports various video and audio formats, including AV1, VP9, H.265, and Dolby Digital Plus. You can play media from installed streaming apps, connected USB drives, or Micro SD cards.
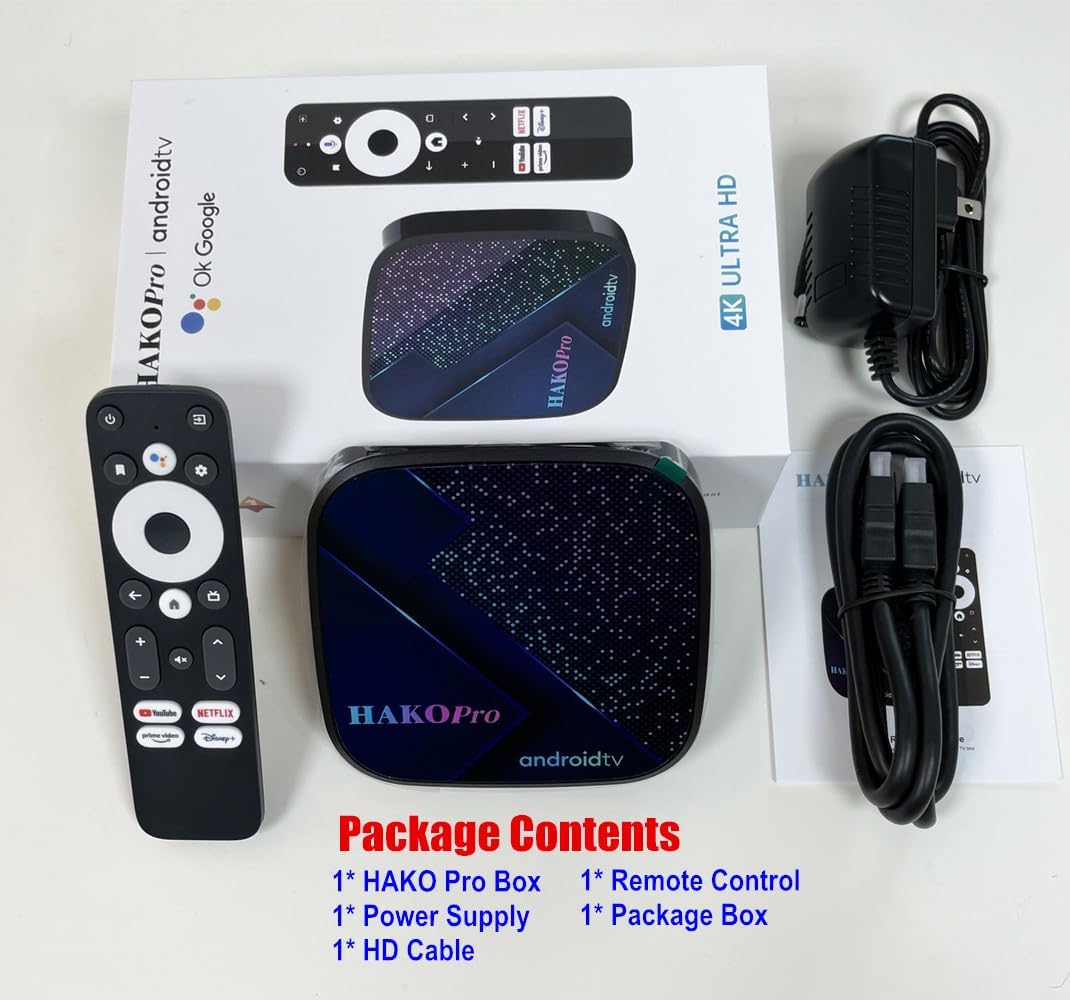
Image: A TV screen displaying content with a "Dolby Digital Plus" logo, indicating enhanced audio experience. The HAKO Pro TV Box and remote are visible in the foreground.
For optimal audio experience, the device supports Dolby Digital Plus, providing realistic restoration of original sound for a cinema-quality surround sound field.
6. Maintenance and Care
- Cleaning: Use a soft, dry cloth to clean the device. Do not use liquid cleaners or aerosols.
- Ventilation: Ensure the device is placed in a well-ventilated area to prevent overheating. Do not block ventilation openings.
- Power Off: Always power off the device correctly before unplugging it.
- Storage: If storing the device for an extended period, disconnect it from power and store it in a cool, dry place.
7. Troubleshooting
| Problem | Possible Cause | Solution |
|---|---|---|
| No power | Power adapter not connected or faulty. | Ensure the power adapter is securely connected to the device and a working power outlet. Try a different outlet. |
| No picture on TV | Incorrect HDMI input selected on TV; HDMI cable loose or faulty. | Verify the TV is on the correct HDMI input. Check HDMI cable connections. Try a different HDMI cable or port. |
| Remote control not responding | Batteries low/dead; remote not paired (for Bluetooth functions). | Replace remote control batteries. Re-pair the remote control as described in Section 4.2. Ensure no obstructions between remote and box. |
| Wi-Fi connection issues | Incorrect password; router issues; signal interference. | Double-check Wi-Fi password. Restart your router and the TV Box. Move the TV Box closer to the router or use an Ethernet connection. |
| Applications freezing or slow performance | Too many apps running; low storage; software glitch. | Close unused applications. Clear app caches (Settings > Apps > [App Name] > Clear cache). Restart the TV Box. Consider a factory reset if issues persist (Settings > Device Preferences > About > Factory reset). |
8. Specifications
| Feature | Detail |
|---|---|
| Operating System | Android 11 TV OS |
| CPU | Amlogic S905Y4-B ARM Quad 64-bit Cortex-A35 |
| GPU | ARM Mali-G31 MP2 |
| RAM | 4GB DDR4 |
| Flash Storage | 32GB eMMC |
| HDR Support | HDR 10, HLG, HDR 10+ |
| DRM | Widevine, Playready |
| Resolution | Up to 4K 60fps |
| Ethernet | J45 Interface 10M/100M adaptive |
| Wi-Fi | 2 x 2 MIMO Wi-Fi 2.4GHz/5GHz 802.11a/b/g/n/ac |
| Bluetooth | BT 5.0 |
| Video Codecs | AV1 MP-10 L5.1 (up to 4Kx2K 60fps), VP9 Profile-2 (up to 4Kx2K 60fps), H.265/HEVC MP-10 L5.1 (up to 4Kx2K 60fps), H.264/AVC HP L5.1 (up to 4Kx2K 30fps), MPEG-2 MP/HL (up to 1080P 60fps) |
| Audio Codecs | AAC-LC, AAC-HE, MPEG-1 Layers 1,2,3, Dolby Audio |
| Power Supply | 12V/1A |
| Dimensions | 110mm x 110mm x 26mm (4.3 x 4.3 x 1 inches) |
| Digital Video Output | HD 2.0 with HDCP |
| Peripheral Interface | 2 x USB 2.0, Micro TF (SD Card) Support |
9. Warranty and Support
For warranty information and technical support, please refer to the documentation provided with your purchase or contact SHYSKY customer service. Keep your proof of purchase for warranty claims.
Contact information for support may be available on the manufacturer's official website or through your retailer.


