
1. Introduction
This manual provides detailed instructions for the installation, operation, and maintenance of your RackChoice 4U Rackmount Server Chassis. Please read this manual thoroughly before beginning any installation or operation to ensure proper usage and to prevent damage to the product or other components.
The RackChoice 4U Rackmount Server Chassis is designed for high-performance server applications, offering extensive compatibility with various motherboard sizes and advanced cooling solutions, including support for liquid cooling radiators up to 360mm.
2. Safety Information
- Always disconnect power from all components before installation or maintenance.
- Wear anti-static gloves or use an anti-static wrist strap when handling internal components to prevent electrostatic discharge (ESD) damage.
- Some edges inside the chassis may be sharp. Exercise caution during installation to avoid injury.
- Ensure proper ventilation around the chassis to prevent overheating.
- Do not attempt to modify the chassis in any way not described in this manual.
3. Package Contents
Verify that all items are present in the package. If any items are missing or damaged, contact your retailer.
- RackChoice 4U Rackmount Server Chassis
- Accessory kit (screws, standoffs, cable ties)
- Front panel keys
Note: Rack sliding rails are not included and must be purchased separately if required for your rack setup. The chassis width (438mm) is not compatible with standard sliding rails; a universal rack shelf is recommended.

Image: Example of universal rack shelf (not included) for mounting the chassis in a cabinet.
4. Setup and Component Installation
Follow these steps for installing your server components into the chassis.
4.1 Chassis Overview
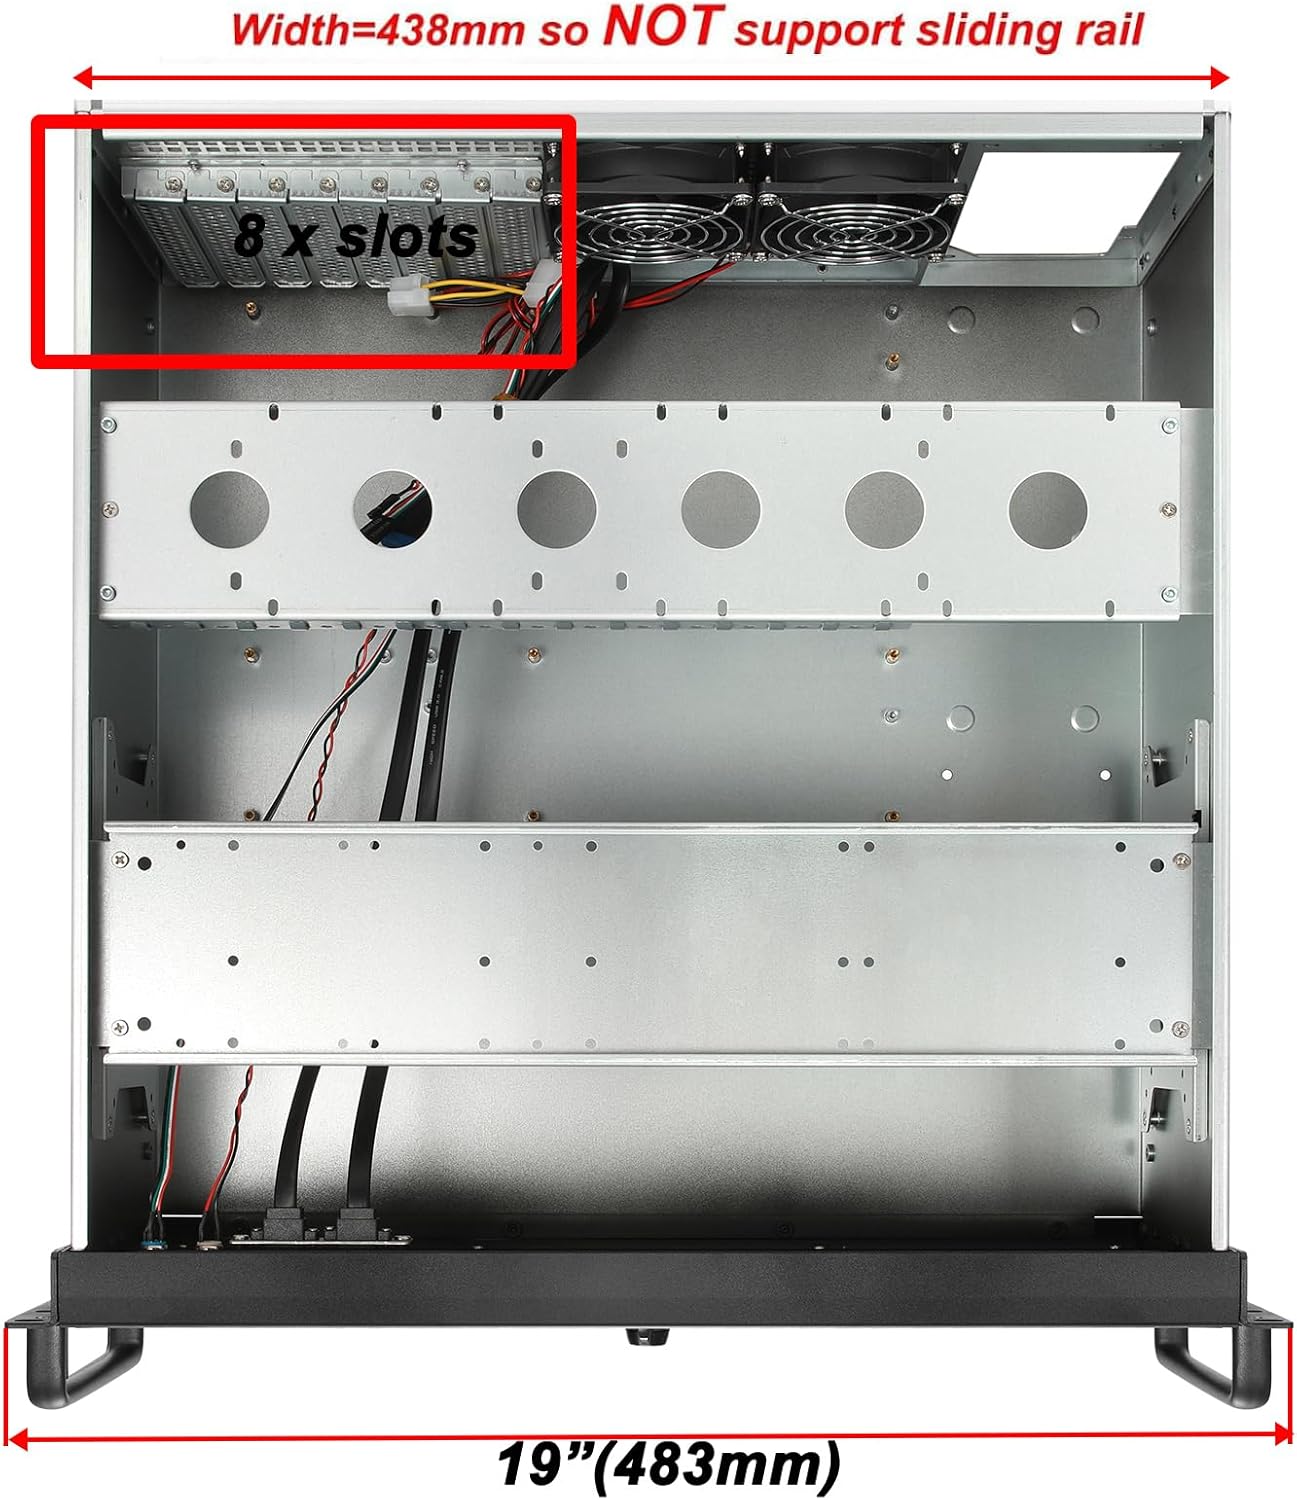
Image: Internal layout of the RackChoice 4U chassis, highlighting the 8 expansion slots and overall width.

Image: Angled front view of the assembled RackChoice 4U chassis.
4.2 Motherboard Installation
- Remove the top cover of the chassis by unscrewing the retaining screws.
- Install the appropriate standoffs for your motherboard form factor (EATX, ATX, MicroATX, Mini-ITX) onto the motherboard tray.
- Carefully place your motherboard onto the standoffs, aligning the screw holes.
- Secure the motherboard with the provided screws.

Image: Interior view of the chassis showing the motherboard mounting area and internal structure.
4.3 Drive Installation
The chassis supports 2x 3.5" internal drive bays. Additional 2.5" drives can be mounted in designated areas.
- Locate the 3.5" drive bays within the chassis.
- Mount your 3.5" hard drives using the provided screws.
- For 2.5" SSDs/HDDs, identify the mounting points (e.g., on the central bar or side panels) and secure them with screws.

Image: Technical drawing illustrating various drive bay configurations and dimensions within the chassis.
4.4 Liquid Cooling (AIO) Installation
The chassis supports liquid cooling radiators up to 360mm. The radiator can be mounted at the front or top, depending on the specific AIO cooler design and fan configuration.
- Identify the mounting points for a 360mm radiator. These are typically located at the front or top of the chassis.
- Attach the fans to the radiator, then secure the radiator assembly to the chassis using the appropriate screws.
- Route the tubing and pump head to the CPU socket, ensuring no kinks or obstructions.
- Connect the pump and fan cables to the motherboard headers.
Video: This video demonstrates the process of installing a liquid cooling system with a radiator up to 360mm in the RackChoice 4U server chassis.

Image: Interior view of the chassis with a liquid cooling radiator installed, demonstrating compatibility.
4.5 PCIe Expansion Card Installation
The chassis features 8 full-height PCI/PCIe expansion slots.
- Remove the necessary slot covers from the rear of the chassis.
- Insert your expansion card (e.g., GPU, network card) into the corresponding PCIe slot on the motherboard.
- Secure the card with a screw to the chassis frame.

Image: Rear view of the chassis, clearly showing the eight full-height PCIe expansion slots.
4.6 Power Supply Installation
Install your ATX or redundant power supply into the designated bay at the rear of the chassis. Ensure proper cable management for optimal airflow.
5. Operating Instructions
After all components are securely installed and cables are connected, you can power on your server system.
- Connect the power cable to the power supply and a wall outlet.
- Press the power button on the front panel of the chassis.
- Monitor system boot-up and ensure all components are recognized.
Video: This video highlights key features of the RackChoice 4U chassis, including liquid cooling support, the keylock front door mechanism, and the magnetic air filter for easy maintenance.

Image: Close-up of the keylock mechanism on the front panel of the chassis.
6. Maintenance
6.1 Dust Filter Cleaning
The chassis features an easy-to-maintain dust filter installed inside the front door.
- Unlock and open the front door of the chassis using the provided key.
- Carefully remove the magnetic dust filter.
- Clean the filter using compressed air or by gently washing it with water. Ensure it is completely dry before reinstallation.
- Reinstall the filter and close the front door.

Image: The front door of the chassis opened, showing the removable dust filter for cleaning.
7. Troubleshooting
- System not powering on: Check all power connections, including the power supply, motherboard 24-pin, and CPU 8-pin connectors. Ensure the power button cable is correctly connected to the motherboard.
- Front panel USB 3.0 issues: If front panel USB 3.0 peripherals are not functioning correctly, ensure the internal USB 3.0 header cable is securely connected to the motherboard. Test the peripherals directly on the motherboard's rear USB ports to isolate the issue.
- Overheating: Verify that all fans are spinning correctly and are oriented for optimal airflow. Ensure liquid cooling systems are properly installed and functioning. Check for any obstructions to airflow.
- No display output: Ensure your graphics card (if installed) is properly seated in its PCIe slot and any necessary power cables are connected. Check monitor connections.
8. Specifications
| Feature | Specification |
|---|---|
| Brand | RackChoice |
| Model | 4U Rackmount Server Chassis |
| Material | Zinc-Coated Steel |
| Color | Black |
| Product Dimensions (W x H x D) | 438mm (19") x 178mm (7") x 465mm (18.3") |
| Motherboard Compatibility | EATX, ATX, MicroATX, Mini-ITX |
| Liquid Cooling Support | Up to 360mm Radiator |
| Drive Bays | 2 x 3.5" (internal) |
| Expansion Slots | 8 x PCI/PCIe Full Height |
| Mounting Type | Rack Mount (requires universal shelf, sliding rails not supported) |
| Item Weight | 15.3 pounds |
| UPC | 787996911809 |
| ASIN | B0BXJ5HF2W |
9. Warranty Information
This RackChoice 4U Rackmount Server Chassis comes with a 2-year manufacturer's warranty. This warranty covers defects in materials and workmanship under normal use. It does not cover damage caused by improper installation, accident, abuse, misuse, natural disaster, or unauthorized modification.
Please retain your proof of purchase for warranty claims.
10. Support
For technical assistance, troubleshooting, or warranty inquiries, please contact RackChoice customer support through the retailer where the product was purchased or visit the official RackChoice website.
Manufacturer: RackChoice