
pouseayar B0BXD8TZSX
pouseayar 36-inch Tool Box with Wheels Instruction Manual
Model: B0BXD8TZSX
1. Introduction and Product Overview
Thank you for choosing the pouseayar 36-inch Tool Box with Wheels. This versatile rolling tool cart is designed to provide efficient storage and a portable workspace for various environments, including garages, warehouses, and repair shops. It combines the robust storage capacity of a cabinet with the mobility of a toolbox, featuring a durable wooden top workbench, four spacious drawers, and heavy-duty casters.

Image 1.1: The pouseayar 36-inch Tool Box with Wheels, showcasing its wooden top, four red drawers, and casters.
Key features include:
- High-quality wooden top workbench for a sturdy work surface.
- Four drawers with smooth ball bearing sliders for easy access.
- Lockable drawers with a key mechanism to secure contents.
- Portable small table top on the side for additional workspace.
- Four wheels, two of which are lockable, for easy maneuverability and stability.
- Total load capacity of approximately 660 lbs.
2. Safety Information
WARNING: Failure to follow these safety instructions may result in injury or damage to the product.
- Always keep hands and fingers away from drawers when opening and closing to prevent pinching.
- Do not overload the cabinet beyond its stated weight capacity of 660 lbs total load, or 100 lbs per drawer. Overloading can compromise stability and structural integrity.
- Use caution when moving the cabinet, especially on uneven surfaces, to prevent tip-overs. Ensure lockable casters are engaged when the cart is stationary.
- Keep the cabinet away from direct heat sources, open flames, and corrosive chemicals.
- Do not use the tool cabinet as a step stool or climbing aid.
- Always use the locking mechanism when the cabinet is not in use to prevent unauthorized access and secure tools.
- Ensure all components are securely fastened during assembly and periodically check for loose parts.
3. Components and Parts List
Before assembly, ensure all parts are present and undamaged. Refer to the diagram below for identification.
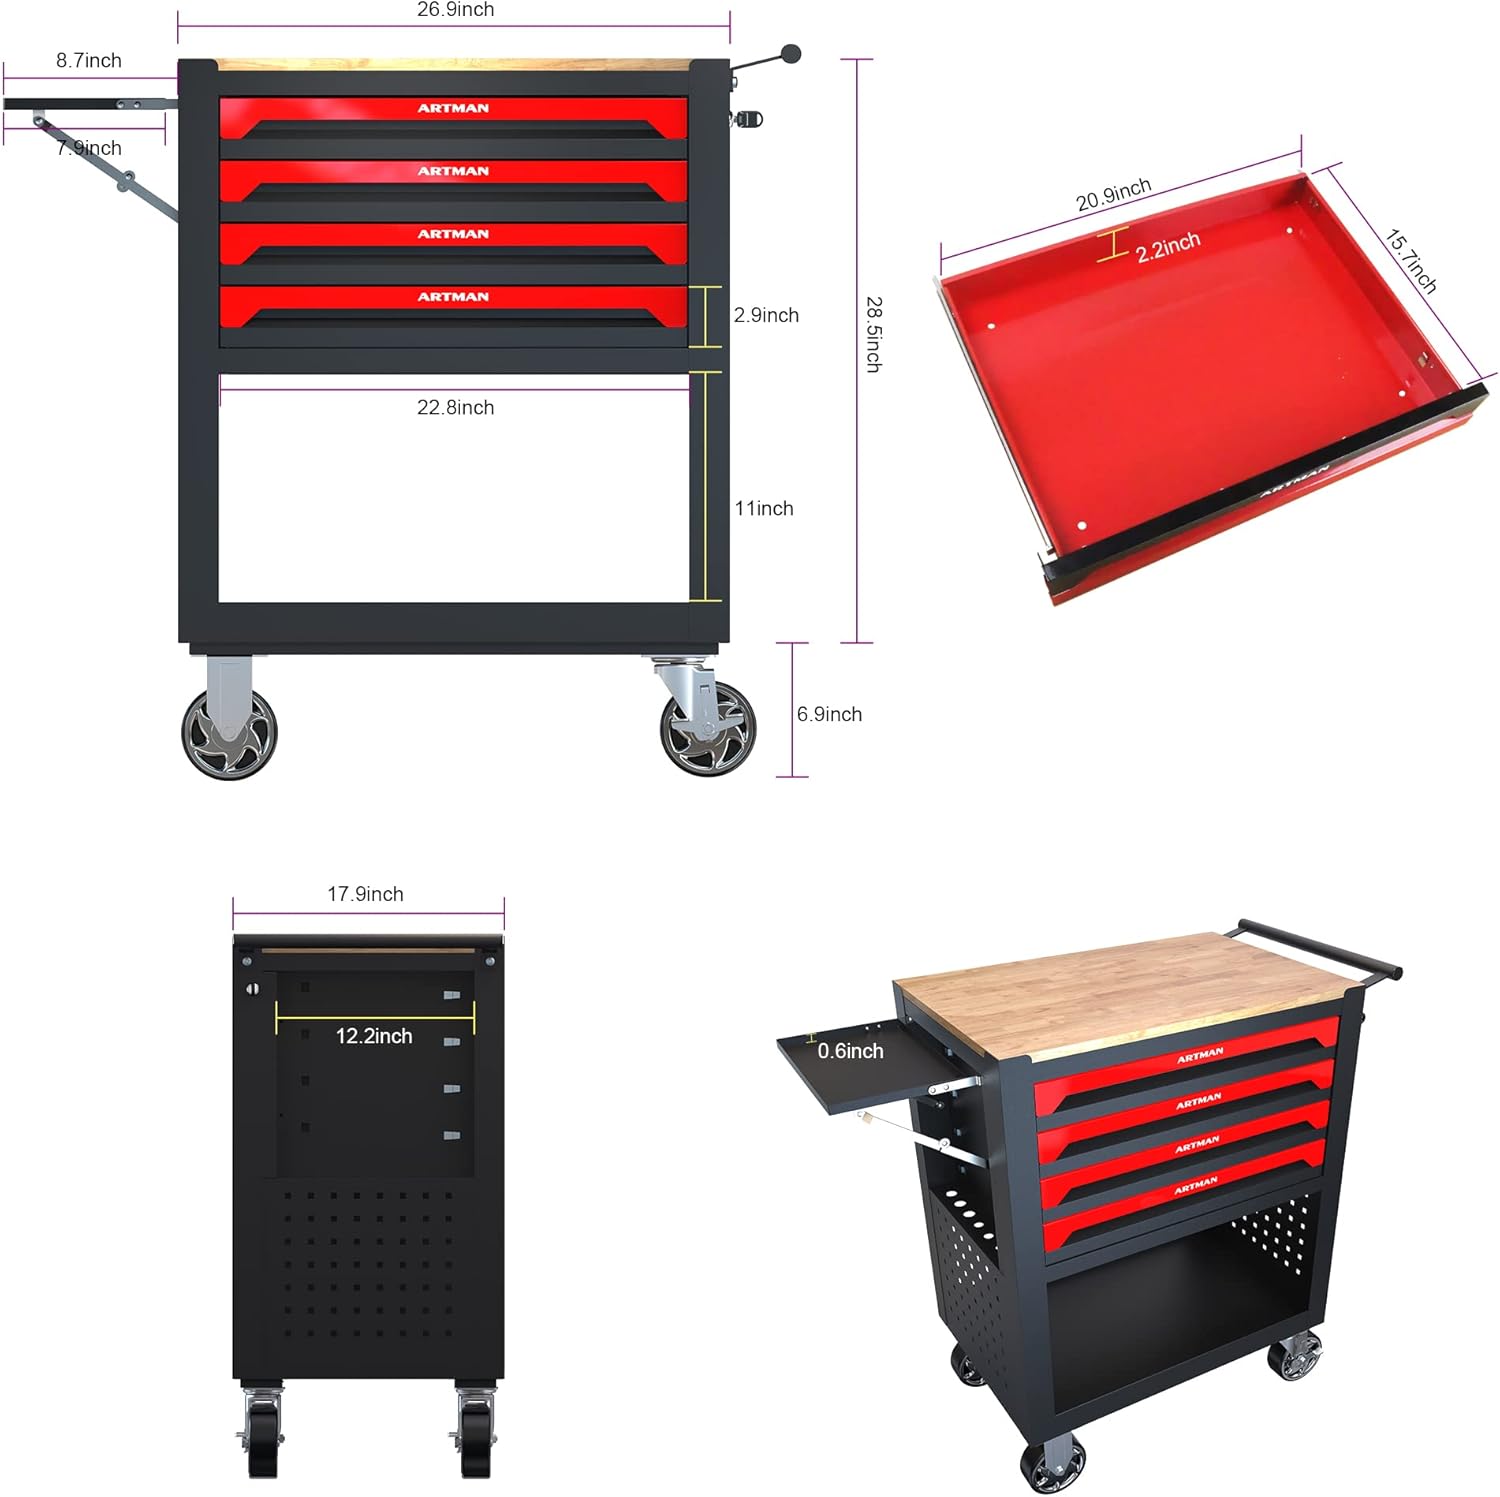
Image 3.1: Diagram showing the main components and dimensions of the tool cart, including the wooden top, drawers, side table, and wheels.
Main components typically include:
- Main Cabinet Frame (Alloy Steel)
- Wooden Top Workbench
- Drawers (4 units)
- Drawer Slides (Ball Bearing)
- Side Expandable Table
- Handle
- Casters (4 units, 2 lockable)
- Keys for Lockable Drawers
- Assembly Hardware (screws, bolts, nuts)
4. Setup and Assembly
Assembly is required for this product. It is recommended to have at least two people for easier and safer assembly. Ensure you have adequate space and the necessary tools (e.g., screwdriver, wrench) before beginning.
- Unpack Components: Carefully remove all parts from the packaging. Check against the parts list to ensure everything is present.
- Attach Casters: Lay the main cabinet frame on its side. Attach the four casters to the designated mounting points on the bottom of the cabinet using the provided hardware. Ensure the two lockable casters are positioned on the same side for convenient access. Tighten all bolts securely.
- Install Handle: Attach the side handle to the cabinet using the provided screws. Ensure it is firmly secured for safe maneuvering.
- Assemble Side Table: Attach the expandable small desktop to the side of the cabinet. Follow the instructions for securing its hinges and support brackets.
- Insert Drawers: Carefully slide each drawer onto its respective ball bearing slides. Ensure they glide smoothly.
- Final Check: Once assembled, gently push and pull the cart to ensure stability. Test the drawer slides and the locking mechanism.
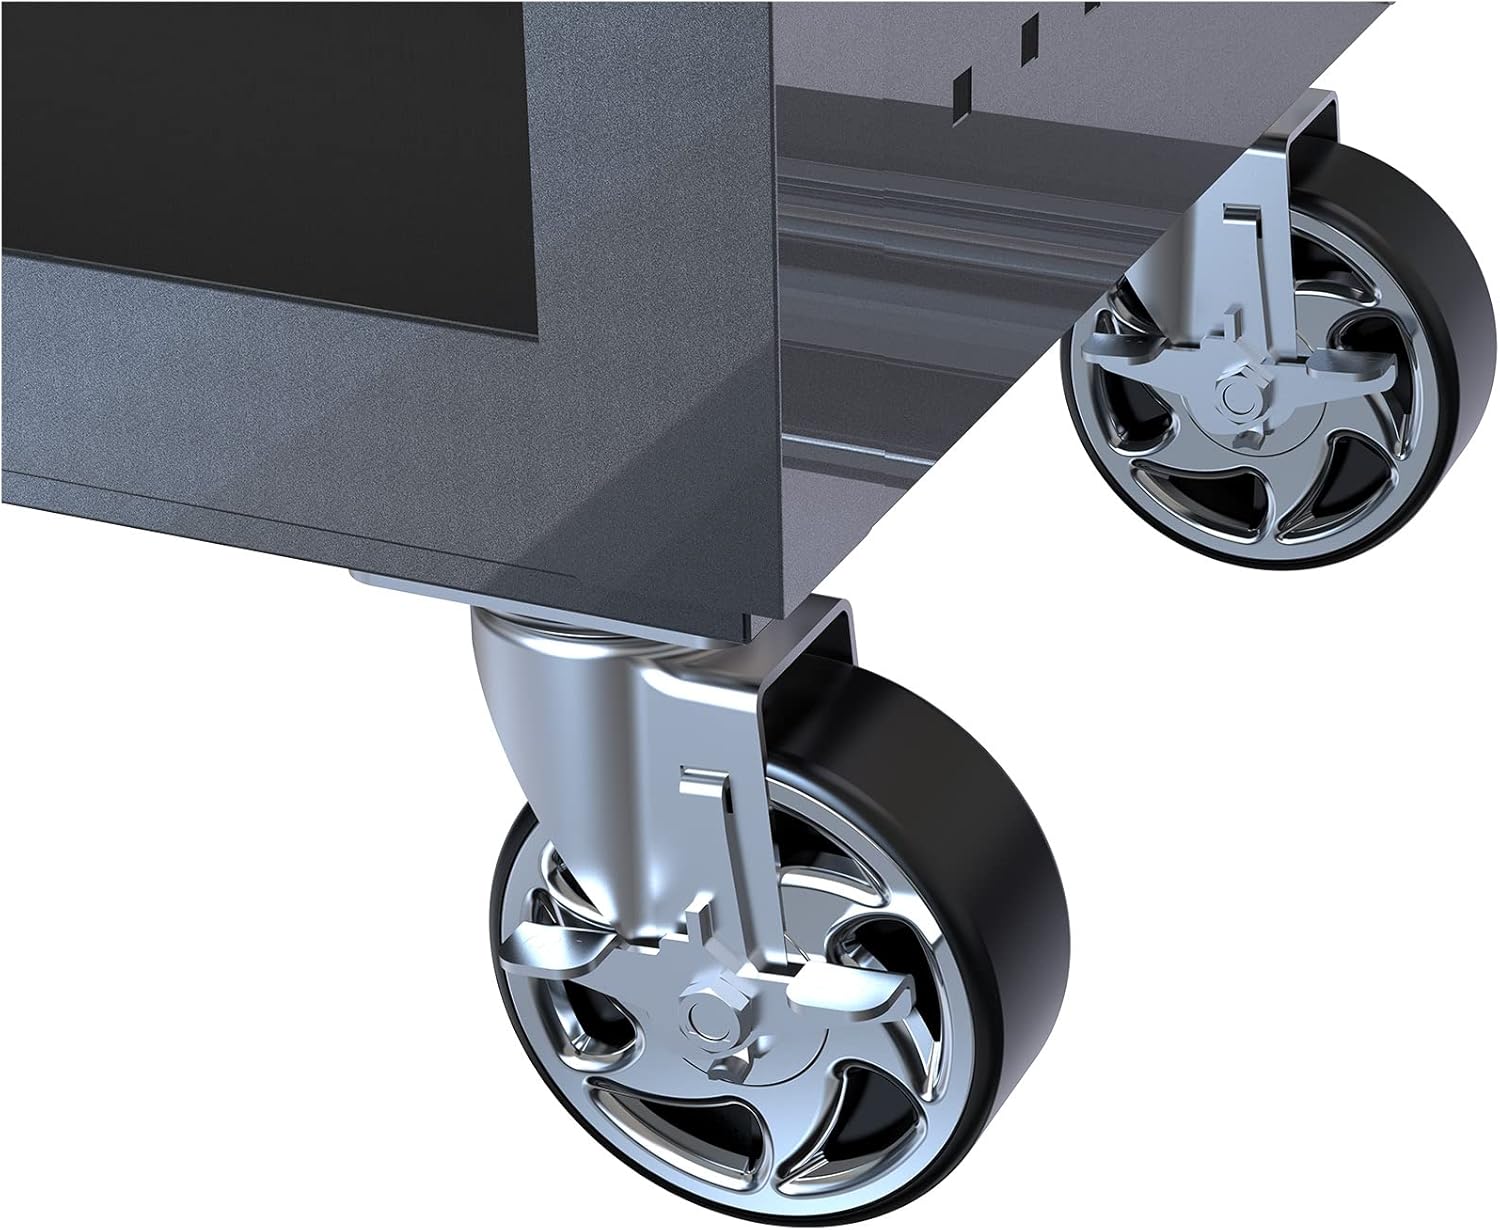
Image 4.1: Close-up view of the 5-inch large wheels, highlighting their robust design and the locking mechanism on two of them.

Image 4.2: Detail of the strong handle and the integrated lock mechanism, providing security for the drawers.

Image 4.3: A close-up view of the expandable small desktop, showing its sturdy support mechanism when extended.

Image 4.4: The four drawers fully extended, demonstrating the smooth operation of the ball bearing slides.
5. Operating Instructions
This tool cart is designed for ease of use and organization.
- Using the Drawers: Pull the drawer handles to open. The ball bearing slides ensure smooth operation. To close, push the drawer firmly until it is fully seated. Avoid slamming drawers.
- Locking Mechanism: Insert the key into the lock on the side of the cabinet (near the handle) and turn to engage or disengage the locking mechanism for all drawers simultaneously. Remove the key after locking to prevent loss.
- Wooden Top Workbench: The sturdy wooden top provides a convenient surface for various tasks. Avoid placing extremely hot items directly on the wood or using it as a cutting surface without protection.
- Expandable Side Table: To use the side table, gently pull it outwards until it locks into its extended position. To retract, disengage the support mechanism and push it back into place.
- Mobility: To move the cart, ensure the two lockable casters are disengaged. Use the side handle to push or pull the cart to your desired location. Once in position, engage the locks on the casters to prevent unintended movement.
- Screwdriver Storage: The side of the cabinet features a perforated panel designed for convenient storage of screwdrivers or other small tools.

Image 5.1: The tool cart positioned next to a car in a repair shop, demonstrating its utility in a professional environment.

Image 5.2: A close-up of the integrated screwdriver storage design on the side of the tool cart, showing tools neatly organized.
6. Maintenance
Regular maintenance will prolong the life and functionality of your tool cart.
- Cleaning: Wipe down the steel surfaces with a damp cloth and mild detergent as needed. Dry thoroughly to prevent rust. For the wooden top, use a wood-safe cleaner and avoid excessive moisture.
- Drawer Slides: Periodically apply a small amount of silicone spray or light grease to the ball bearing slides to ensure smooth operation. Wipe off any excess.
- Casters: Keep the caster wheels free of debris (e.g., dust, hair, metal shavings) that could impede their movement. Lubricate the swivel mechanisms if they become stiff.
- Hardware: Periodically check all bolts and screws for tightness. Retighten any loose fasteners to maintain structural integrity.
- Load Distribution: Distribute the weight of tools evenly across drawers and shelves to prevent strain on any single area and maintain balance.
7. Troubleshooting
Here are some common issues and their potential solutions:
| Problem | Possible Cause | Solution |
|---|---|---|
| Cart is wobbly or uneven. | Uneven floor; loose caster bolts; frame distortion from shipping. | Ensure cart is on a level surface. Check and tighten all caster bolts. If frame is distorted, gently apply pressure to square it, or contact customer support if severe. |
| Drawers stick or are difficult to open/close. | Dirty or dry drawer slides; overloaded drawer; misaligned drawer. | Clean and lubricate drawer slides. Reduce weight in the drawer. Re-seat the drawer on its slides, ensuring proper alignment. |
| Casters do not roll smoothly or lock. | Debris in wheels; stiff swivel mechanism; damaged caster. | Remove any debris from wheels. Lubricate swivel points. If damaged, consider replacing the caster. |
| Locking mechanism does not work. | Key not fully inserted; mechanism jammed; internal damage. | Ensure key is fully inserted and turned correctly. Check for obstructions. If still not working, contact customer support. |
| Cabinet flexes under load. | Exceeding weight limit; uneven weight distribution. | Do not exceed the 660 lbs total load capacity. Distribute heavy items evenly across the bottom shelf and drawers. |
8. Specifications
| Feature | Detail |
|---|---|
| Brand | pouseayar |
| Model Number | B0BXD8TZSX |
| Color | Red |
| Product Dimensions | 30.3"D x 17.9"W x 35.4"H |
| Weight Limit (Total) | 660 Pounds |
| Drawer Load Capacity (Each) | 100 Pounds |
| Material | Alloy Steel (Frame), Wood (Top) |
| Number of Drawers | 4 |
| Caster Size | 5-inch |
| Lock Type | Key |
| Assembly Required | Yes |
| Finish Type | Powder Coated |
9. Warranty and Support
For warranty information and customer support, please refer to the documentation included with your purchase or contact the manufacturer directly. You can also visit the official pouseayar brand store on Amazon for more information and contact options:
Ask a question about this manual
Ask about setup, troubleshooting, compatibility, parts, safety, or missing instructions. Manuals+ will review the question and use this page’s manual context to help answer it.