
1. Introduction
This manual provides comprehensive instructions for the assembly, operation, and maintenance of your Lucky Doug STEM Building Projects Model Airplane Set, model 869-2. Please read all instructions carefully before beginning assembly to ensure correct construction and safe use.
2. Safety Information
- Recommended Age: This product is designed for children aged 8 years and up. Adult supervision is recommended during assembly.
- Small Parts Warning: Contains small parts that may pose a choking hazard for children under 3 years old. Keep all components out of reach of young children.
- Sharp Edges: Some metal parts may have small burrs or sharp edges. Handle with care during assembly.
- Tool Use: Use the provided tools (wrench and screwdriver) carefully. Do not use excessive force.
- Proper Disposal: Dispose of packaging materials responsibly.
3. Package Contents
Verify that all components are present before starting assembly. The set includes 201 parts and pieces, along with assembly tools.

Image: The product box, the fully assembled red model airplane, a silver wrench, and a blue-handled screwdriver. This image illustrates the complete set and included tools.
Included Tools:
- 1 x Wrench
- 1 x Screwdriver
Key Components:
- Various red metal plates and curved pieces
- Screws and nuts
- Wheels
- Transparent hatch cover
- Soft iron parts (may require bending)

Image: A close-up view of several red metal building components, including curved and flat pieces, along with silver screws and nuts. This shows the type of parts included in the kit.
4. Assembly Instructions
Follow the detailed, step-by-step instructions provided in the included manual. The assembly process requires patience and attention to detail.
- Review the Manual: Before starting, carefully examine the entire instruction manual. Identify all parts and understand the sequence of steps. A scale plate on the box can assist in measuring screws.
- Prepare Your Workspace: Ensure a clean, well-lit, and organized area to prevent loss of small parts.
- Identify Components: Match the physical parts to the diagrams in the instruction manual.
- Initial Assembly: Begin by connecting the main structural components as indicated. Use the provided screwdriver and wrench to secure screws and nuts.
- Bending Soft Iron Parts: Some components are made of soft iron and may require manual bending to achieve the correct shape. Refer to the manual for specific instructions on these parts.
- Attaching Wings and Tail: Securely attach the wings and tail sections, ensuring all connections are firm.
- Installing Landing Gear: Mount the wheels and landing gear according to the diagrams.
- Final Touches: Attach the transparent hatch cover and any remaining decorative elements.
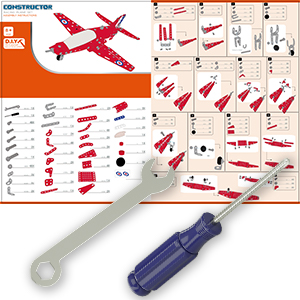
Image: A close-up of the detailed assembly instruction booklet, showing various diagrams for connecting parts. A silver wrench and a blue-handled screwdriver are also visible, highlighting the tools used for assembly.

Image: A child is shown at a desk, focused on assembling the red model airplane. Various metal pieces, screws, and the instruction manual are spread out, illustrating the assembly process.
5. Operating the Model
Once assembled, the Lucky Doug Model Airplane is designed for display and imaginative play. It does not feature motorized parts or remote control functionality.
- Display: The finished model can be a decorative item for desks, shelves, or display cases.
- Play: The model is sturdy for manual play. Avoid dropping or applying excessive force to prevent damage.
- Movement: The model features glide wheels for smooth movement on flat surfaces.

Image: The fully assembled red model airplane is positioned on a wooden desk, alongside books and a small plant, demonstrating its use as a display item.

Image: Two children and an adult are shown on a carpeted floor, observing and interacting with the assembled red model airplane, illustrating its use for shared play and display.
6. Maintenance
- Cleaning: Wipe the model with a soft, dry cloth to remove dust. Do not use abrasive cleaners or solvents.
- Storage: Store the model in a dry place away from direct sunlight to prevent material degradation.
- Inspections: Periodically check screws and nuts to ensure they remain tight. Re-tighten as necessary with the provided tools.
7. Troubleshooting
- Problem: Parts do not fit together.
Solution: Double-check the instruction manual to ensure the correct parts are being used for the current step. Some soft iron parts may need to be gently bent into shape. - Problem: Screws or nuts are loose after assembly.
Solution: Use the provided wrench and screwdriver to carefully tighten all connections. Avoid over-tightening. - Problem: Missing parts.
Solution: Carefully check the packaging and your workspace. If parts are genuinely missing, contact Lucky Doug customer support (see Section 9).
8. Specifications
| Feature | Detail |
|---|---|
| Model Number | 869-2 |
| Brand | Lucky Doug |
| Number of Parts | 201 |
| Material | Anti-rust metal |
| Recommended Age | 8 years and up |
| Assembled Dimensions (approx.) | 4.8" high, 10.4" long, 9.6" wide |
| Item Weight | 1.01 pounds |

Image: A visual representation of the assembled red model airplane with its approximate dimensions labeled: 4.8 inches high, 10.4 inches long, and 9.6 inches wide.
9. Warranty and Support
Lucky Doug products are manufactured to high-quality standards. For specific warranty details or support inquiries, please refer to the information provided with your product packaging or visit the official Lucky Doug store.
Lucky Doug Store: Visit the Lucky Doug Store on Amazon