Introduction
Thank you for choosing the PUTORSEN Single Monitor Arm Mount PTMA-75-1. This monitor arm is designed to provide an ergonomic and space-saving solution for your workspace, supporting monitors from 17 to 35 inches and weighing between 2.2 lbs to 23.1 lbs (1 kg to 10.5 kg). It features full range of motion, including tilt, swivel, and rotation, along with height adjustment, to optimize your viewing experience. Please read this manual carefully before installation and use to ensure proper setup and safe operation.

Image: The PUTORSEN monitor arm is designed to support larger monitors, up to 35 inches in size and with a maximum weight capacity of 23.1 lbs (10.5 kg).
Setup and Installation
This monitor arm offers two installation options: C-clamp for desk edges and grommet for desks with a pre-drilled hole. Ensure your desktop thickness is within the specified range for your chosen method.
1. Choose Your Mounting Option
The package includes components for both C-clamp and grommet installation. Select the method that best suits your desk.
- C-Clamp: Suitable for desk edges with a thickness of 0.39" to 2.2" (10mm to 55mm).
- Grommet: Suitable for desks with a pre-drilled hole and a thickness of 0.39" to 1.6" (10mm to 40mm).

Image: Illustration of the two primary installation methods: C-clamp for desk edges and grommet for through-desk mounting.
2. Install the Base
Follow the instructions provided in the included manual for your chosen mounting option to securely attach the base to your desk. Ensure all screws are tightened appropriately to prevent instability.
3. Set 180°/360° Movement Option (Important)
Before attaching the arm segments, decide whether you need a 180° or 360° rotation stop at the base. This setting prevents the monitor arm from hitting walls or partitions behind your desk. This adjustment must be made during the base installation phase.

Image: Visual guide demonstrating how to configure the base for either 180-degree or 360-degree arm rotation, preventing collisions with walls.
4. Assemble the Arm Segments
Connect the lower and upper arm segments to the installed base according to the diagrams in your physical manual. Ensure they click securely into place.
5. Attach the VESA Plate to Your Monitor
Use the provided screws to attach the VESA plate to the back of your monitor. The mount supports VESA patterns of 75x75 mm and 100x100 mm.
6. Mount the Monitor to the Arm
The PUTORSEN monitor arm features a quick-release VESA plate design. Simply slide the VESA plate with the attached monitor onto the arm's mounting head until it locks into place. Ensure it is securely fastened.

Image: Detail of the quick-release VESA plate, allowing for easy attachment and removal of the monitor from the arm.
7. Adjust Gas Spring Tension
After mounting your monitor, adjust the gas spring tension to match your monitor's weight. Use the included Allen key to turn the adjustment screw (usually located on the upper arm) until the monitor stays in your desired position without drifting up or down. Turn clockwise to increase tension for heavier monitors, and counter-clockwise to decrease tension for lighter monitors.
Operating the Monitor Arm
The PUTORSEN monitor arm offers extensive adjustability to achieve optimal ergonomic positioning.
Adjusting Monitor Position
- Height Adjustment: Gently push or pull the monitor up or down to adjust its vertical position. The gas spring mechanism will hold it in place once released.
- Tilt: The monitor can be tilted +40° to -40° to reduce glare and find the best viewing angle.
- Swivel: Swivel the monitor +90° to -90° horizontally to share your screen or adjust your viewing perspective.
- Rotation: Rotate the monitor +180° to -180° to switch between landscape and portrait orientations.
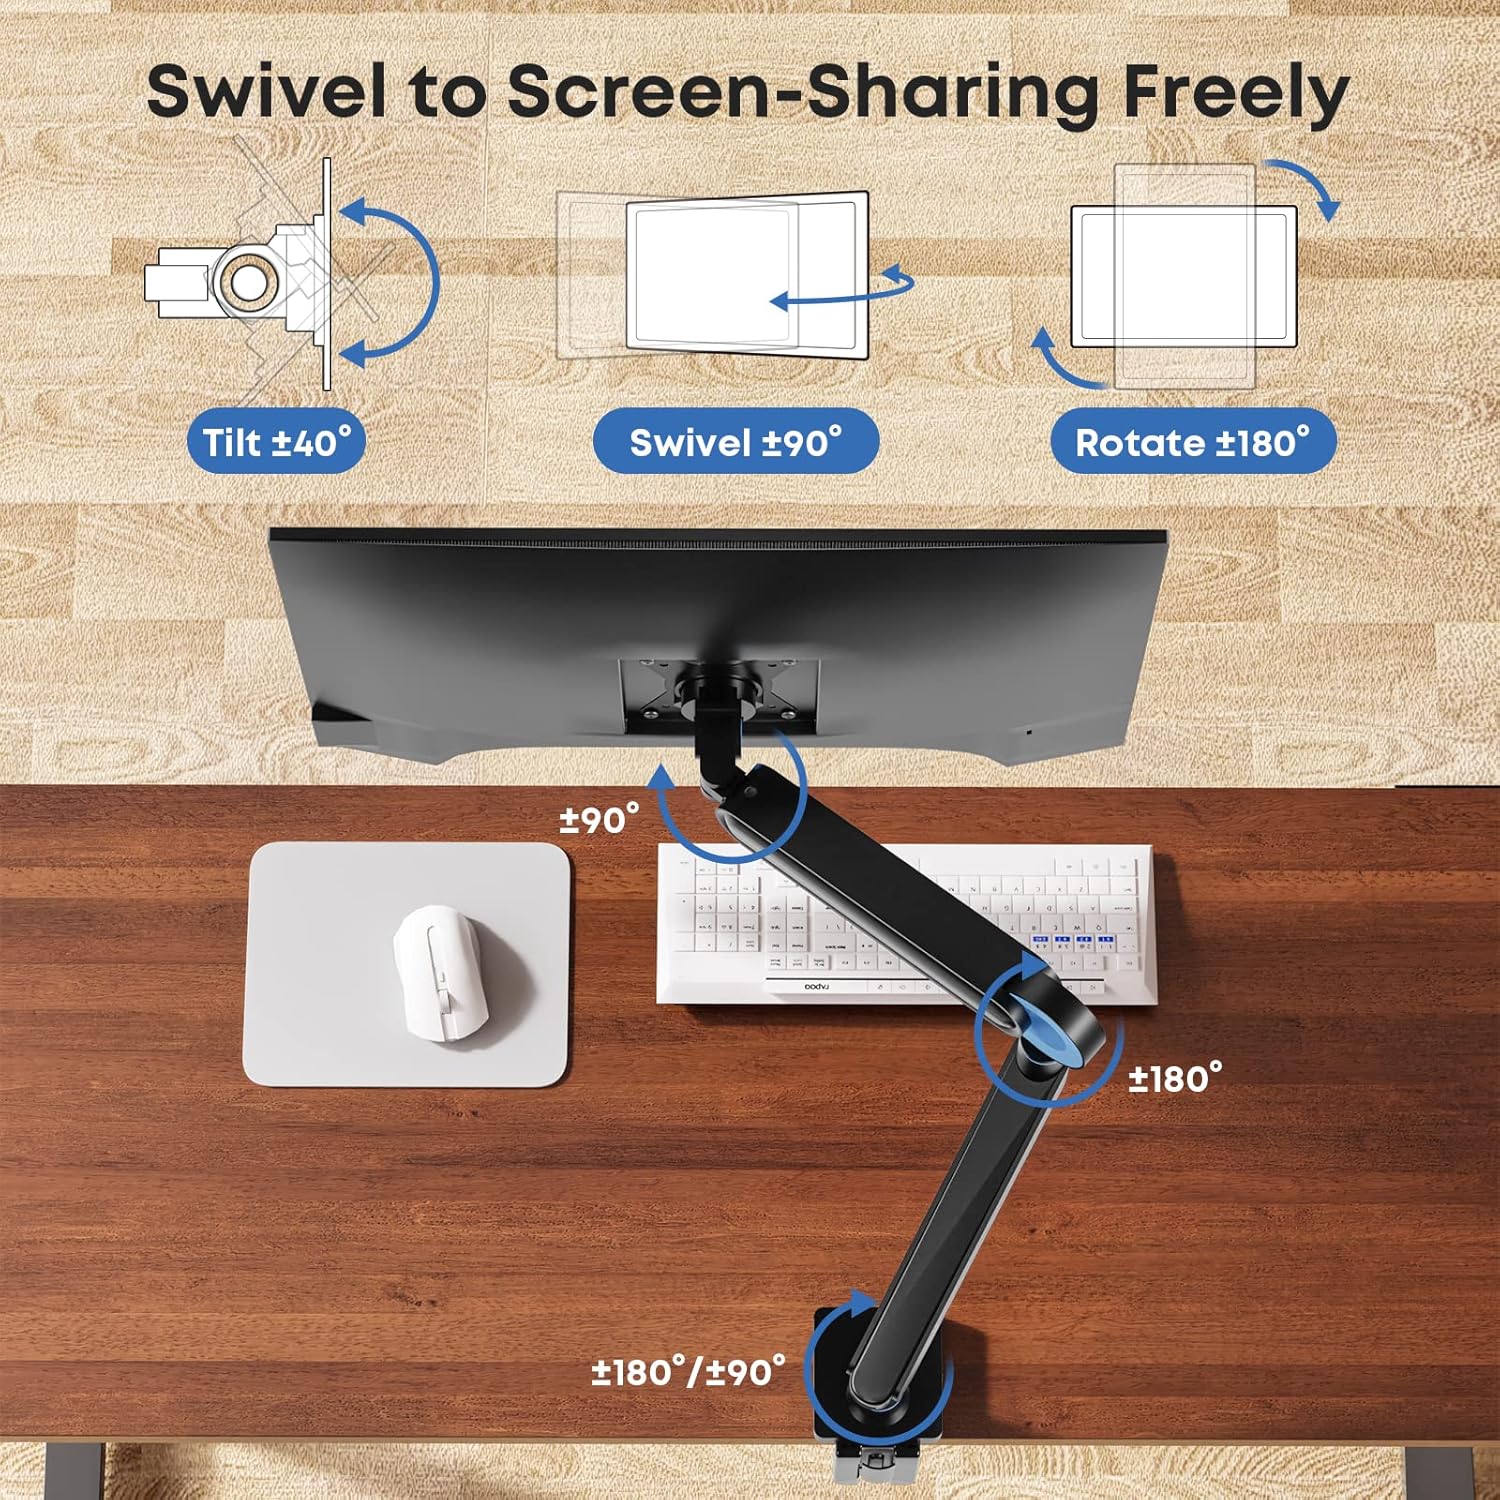
Image: This diagram shows the full range of motion for the monitor arm, including tilt (±40°), swivel (±90°), and rotation (±180°), allowing for flexible screen sharing and ergonomic positioning.
Cable Management
Utilize the integrated cable management channels along the arm to route and conceal your monitor cables. This helps maintain a tidy and organized workspace.
Video: This video demonstrates the various movements and adjustments possible with the PUTORSEN Single Monitor Arm Mount, showcasing its flexibility for different viewing needs.
Maintenance
To ensure the longevity and optimal performance of your monitor arm, follow these simple maintenance guidelines:
- Cleaning: Wipe the arm and base with a soft, damp cloth. Avoid using abrasive cleaners or solvents that could damage the finish.
- Check Connections: Periodically check all screws and bolts to ensure they remain tight. Re-tighten if necessary to maintain stability.
- Gas Spring Adjustment: If your monitor's weight changes (e.g., switching monitors), re-adjust the gas spring tension as described in the setup section to ensure proper balance.
Troubleshooting
If you encounter any issues with your PUTORSEN Single Monitor Arm Mount, refer to the following common problems and solutions:
- Monitor does not stay in position (drifts up or down):
This indicates incorrect gas spring tension. Use the included Allen key to adjust the tension screw on the upper arm. Turn clockwise to increase tension for heavier monitors, and counter-clockwise to decrease tension for lighter monitors, until the monitor holds its position. - Monitor wobbles or feels unstable:
Ensure the desk clamp or grommet base is securely tightened to the desk. Check that all arm segments are properly connected and that the VESA plate is firmly attached to both the monitor and the arm. Verify that your desk itself is stable and can support the weight of the arm and monitor. - Difficulty moving the arm:
If the arm is too stiff, the gas spring tension might be too high for your monitor's weight. Try decreasing the tension by turning the adjustment screw counter-clockwise. If it's too loose, increase tension. - Cables do not fit into management channels:
Ensure you are using appropriate cable sizes. Avoid forcing cables into the channels, as this can damage them or the arm. If cables are too thick, they may need to be routed externally.
Specifications
| Feature | Specification |
|---|---|
| Model Number | PTMA-75-1 |
| Compatible Monitor Size | 17" to 35" |
| Weight Capacity | 2.2 lbs - 23.1 lbs (1 kg - 10.5 kg) |
| VESA Compatibility | 75x75 mm, 100x100 mm |
| Tilt Angle | +40° to -40° |
| Swivel Angle | +90° to -90° |
| Rotation Angle | +180° to -180° |
| Height Adjustment | Up to 18.9" |
| Mounting Options | C-Clamp, Grommet |
| C-Clamp Desk Thickness | 0.39" - 2.2" (10mm - 55mm) |
| Grommet Desk Thickness | 0.39" - 1.6" (10mm - 40mm) |
| Material | Metal |
| Item Weight | 8.01 pounds |

Image: Detailed dimensional drawing of the monitor arm, showing various measurements for installation and compatibility.
Warranty Information
PUTORSEN products are manufactured to high-quality standards. This product is covered by a manufacturer's warranty against defects in materials and workmanship. Please refer to the warranty card included in your product packaging or visit the official PUTORSEN website for specific warranty terms and conditions.
Customer Support
If you have any questions, require assistance with installation, or need troubleshooting support that is not covered in this manual, please contact PUTORSEN customer service. You can typically find contact information on the PUTORSEN official website or through the retailer where you purchased the product.
For the most up-to-date information and support resources, please visit the PUTORSEN Store on Amazon.


