
1. Introduction
This manual provides essential information for the safe and efficient operation of your RXUJYC 2.3 Cubic Home Safe. Please read these instructions carefully before installation and use, and retain them for future reference.

Image: The RXUJYC 2.3 Cubic Home Safe, showcasing its digital keypad and spacious interior for valuables.
2. Safety Information
- Do not store the emergency keys inside the safe. Keep them in a secure, separate location.
- Ensure the safe is installed on a stable, level surface or securely mounted to a wall/floor to prevent tipping.
- Keep the safe away from excessive moisture or direct heat sources.
- Regularly check battery levels to ensure proper function of the digital lock.
- Do not attempt to force the safe open if the digital lock malfunctions. Use the emergency keys.
3. Package Contents
Verify that all items are present in the package:
- RXUJYC 2.3 Cubic Home Safe
- Emergency Keys (2)
- Emergency Battery Box
- Mounting Hardware (Expansion bolts/screws)
- Instruction Manual
- Removable Shelf
4. Product Overview
The RXUJYC 2.3 Cubic Home Safe is designed to protect your valuables with its robust construction and advanced security features. It features a digital keypad, emergency key access, and an alarm system.

Image: Visual representation of the safe's external dimensions (50cm/19.68in height, 38cm/14.96in width, 31cm/12.2in depth).
4.1 Key Features
- Digital Keypad: For secure and convenient access.
- Emergency Key Access: Provides backup entry in case of forgotten password or battery failure.
- Alarm System: Activates after multiple incorrect password attempts or external vibration.
- Fireproof and Waterproof Construction: Designed to protect contents from fire and water damage.
- Solid Steel Anti-Pry Bolts: Enhanced security against forced entry.
- Removable Shelf: For organized storage.

Image: Diagram illustrating the multi-layered fireproof and waterproof construction of the safe, including high-temperature paint, ionic coating, 25mm thick fireproof cotton, anti-drilling steel plate, and anti-scratch steel plate.
5. Setup
5.1 Installing Batteries
- Locate the battery compartment on the inside of the safe door.
- Insert 4 AA batteries (not included) according to the polarity markings.
- Close the battery compartment cover.
5.2 Initial Opening
For the first use, or if the batteries are depleted, use the emergency keys:
- Insert the emergency key into the emergency keyhole, usually located behind a small cover on the digital panel.
- Turn the key clockwise while simultaneously turning the main knob clockwise to open the safe door.
- Once open, install the batteries as described in Section 5.1.
5.3 Mounting the Safe
The safe can be securely mounted to a wall or floor using the provided expansion bolts.

Image: Step-by-step guide for wall mounting, including drilling pilot holes, inserting expansion bolts, and securing the safe.
- Choose a suitable location for mounting.
- Mark the drilling points through the pre-drilled holes at the back or bottom of the safe.
- Drill holes in the wall or floor using an appropriate drill bit.
- Insert the expansion bolts into the drilled holes.
- Align the safe with the bolts and secure it tightly using the washers and nuts.
6. Operation
6.1 Setting/Changing Passcode
- With the safe door open, press the red reset button located on the inside of the door. The indicator light on the keypad will flash.
- Enter your desired 3-8 digit passcode on the digital keypad.
- Press the "#" button to confirm. The indicator light will stop flashing, confirming the new passcode is set.
6.2 Opening the Safe
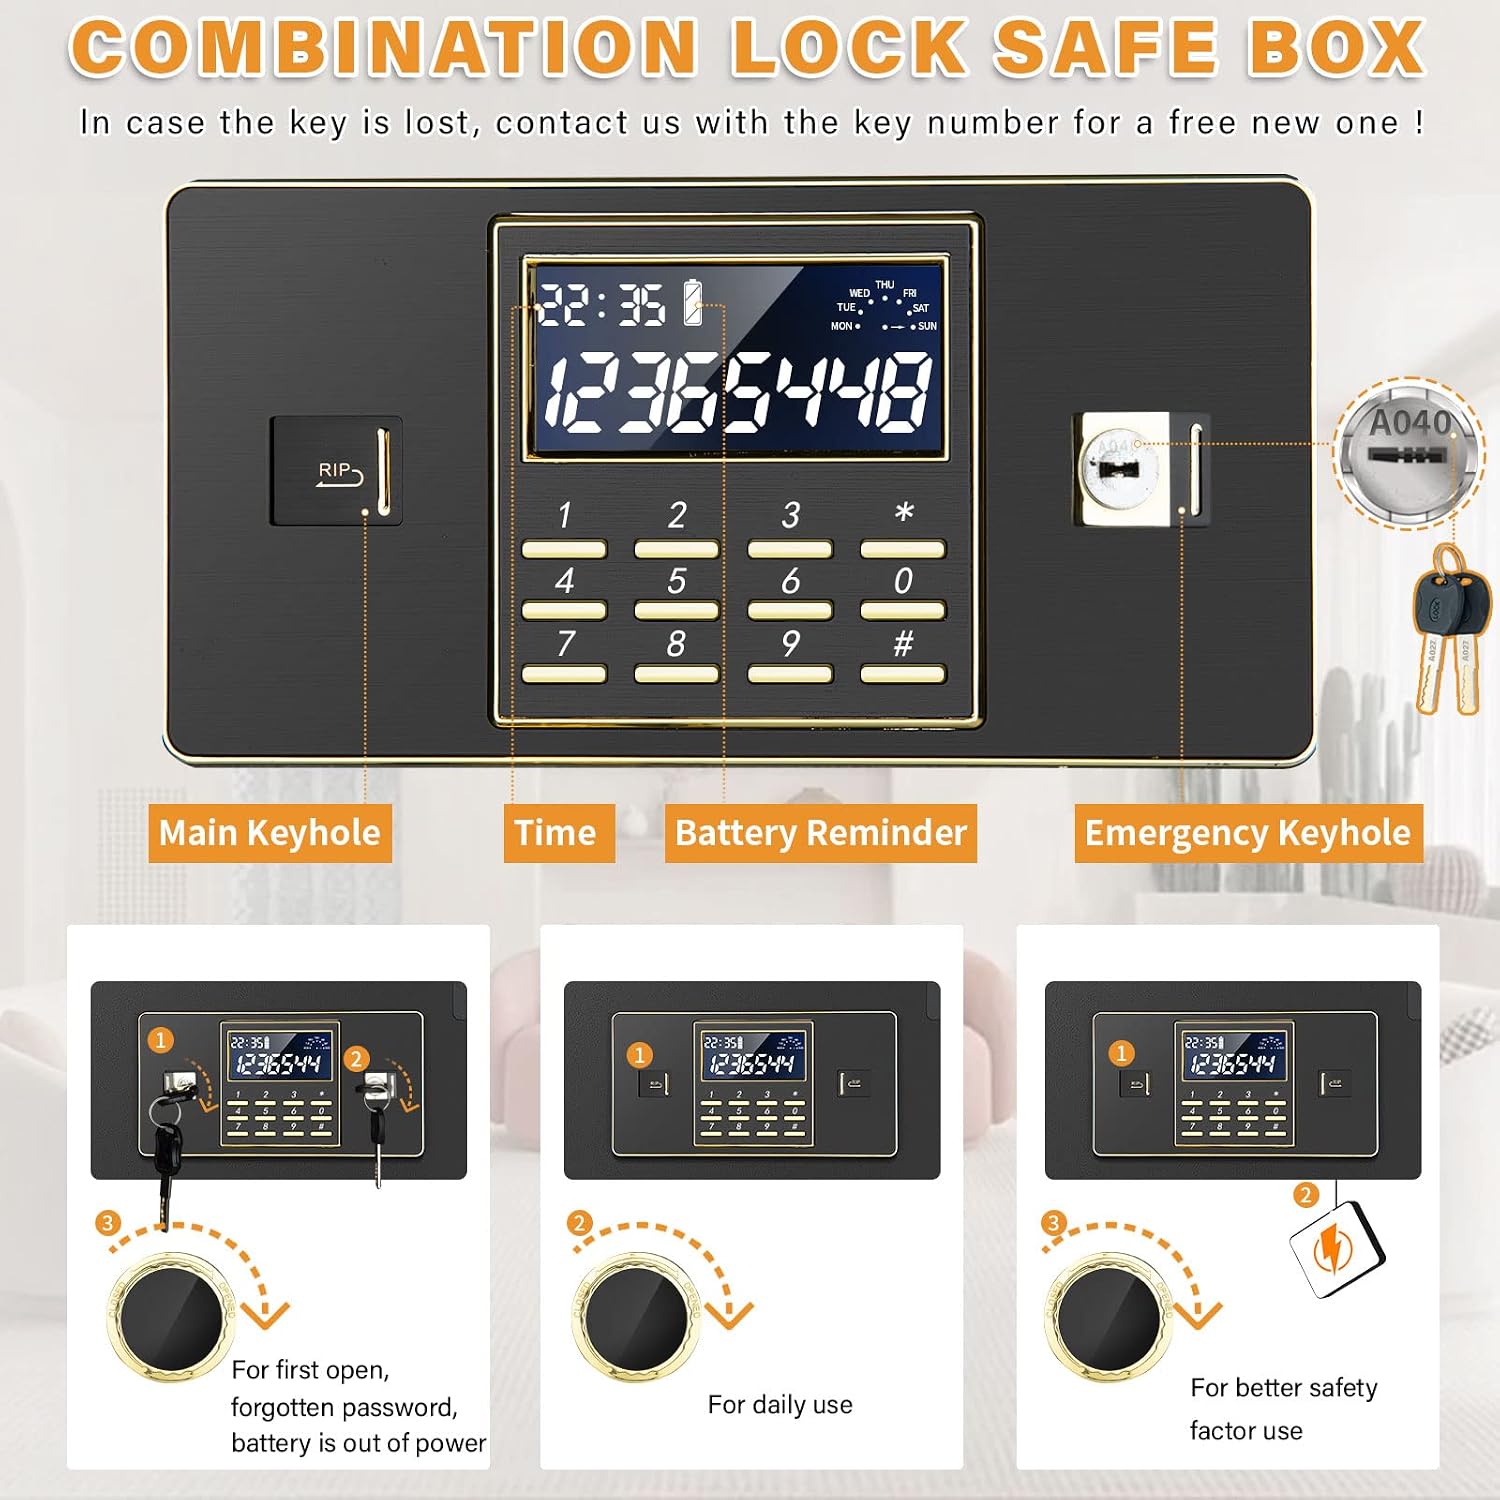
Image: Detailed view of the safe's digital keypad, highlighting the main keyhole, emergency keyhole, time display, and battery reminder icon.
6.2.1 Using the Digital Keypad
- Enter your 3-8 digit passcode.
- Press the "#" button. The green indicator light will illuminate.
- Within 5 seconds, turn the main knob clockwise to open the safe door.
6.2.2 Using Emergency Keys
Refer to Section 5.2 for instructions on using emergency keys.
6.3 Alarm System

Image: The safe with an alarm light, illustrating the three anti-theft protection features: 3 failed password attempts, external vibration alarm, and hidden password function.
- Multiple Failed Passcode Attempts: If an incorrect passcode is entered 3 consecutive times, the alarm will sound for 60 seconds.
- External Vibration Alarm: The alarm will activate if the safe detects significant external vibration or impact.
6.4 Hidden Password Function
To hide your password entry, press "#" first, then enter your passcode, and press "*" last. The numbers entered will not be displayed on the screen.
6.5 Battery Reminder
The LCD display will show a battery icon when the battery level is low, indicating that the batteries need to be replaced soon.
7. Maintenance
7.1 Battery Replacement
When the low battery indicator appears, replace all 4 AA batteries promptly. Use the emergency battery box if the batteries are completely depleted and the safe cannot be opened via the keypad.
7.2 Cleaning
Wipe the safe's exterior with a soft, damp cloth. Avoid using abrasive cleaners or solvents that could damage the finish or electronic components.
8. Troubleshooting
| Problem | Possible Cause | Solution |
|---|---|---|
| Safe does not open with passcode. | Incorrect passcode entered; batteries are low or dead. | Re-enter passcode carefully. Replace batteries or use emergency keys. |
| Alarm sounds unexpectedly. | Multiple incorrect passcode entries; external impact/vibration. | Ensure correct passcode entry. Avoid bumping or moving the safe forcefully. |
| Digital display is blank. | Batteries are dead or not installed correctly. | Check battery installation and replace batteries. Use emergency battery box if needed. |
| Emergency key does not turn. | Keyhole obstructed; incorrect key. | Ensure keyhole is clear. Use the correct emergency key provided with the safe. |
9. Specifications
- Model: 2.3 Cub Home Safe
- Brand: RXUJYC
- Material: Steel
- Lock Type: Digital Keypad with Emergency Key
- External Dimensions: Approximately 19.68 in (H) x 14.96 in (W) x 12.2 in (D)
- Chamber Width: 11.5 Inches
- Fire Protection: Up to 1 hour at 2000°F (internal layers)
- Power: 4 x AA Batteries (not included)
10. Fireproof Test Video
Watch this video to see a demonstration of the safe's fireproof capabilities.
Video: A fireproof test demonstrating the safe's ability to protect documents from extreme heat. The video shows the safe being subjected to fire, then opened to reveal intact documents inside a fireproof inner box.
11. Warranty and Support
RXUJYC provides a 4-year replacement warranty and lifetime service for this product. For any questions, technical assistance, or warranty claims, please contact our customer support.
11.1 Contact Information
- Customer Support: Available for 12-hour support.
- Refer to your purchase documentation or the manufacturer's website for specific contact details.