1. Introduction
This manual provides essential information for the LILYGO T3S3 ESP32-S3 LoRa Development Board. This board integrates an ESP32-S3 microcontroller, a LoRa wireless module (SX1280 2.4G), and a 0.96 inch OLED display, making it suitable for various wireless communication and IoT projects, including Meshtastic applications. It supports Wi-Fi and Bluetooth 5.0 connectivity.

Figure 1: Front view of the LILYGO T3S3 ESP32-S3 LoRa Development Board, showing the integrated 0.96 inch OLED display.

Figure 2: Back view of the LILYGO T3S3 ESP32-S3 LoRa Development Board, highlighting the LoRa module and other components.
2. Product Components
The LILYGO T3S3 ESP32-S3 LoRa Development Board package typically includes the following items:
- 1 x LILYGO T3S3 ESP32-S3 LoRa Development Board
- 1 x Antenna (for LoRa communication)
- 1 x Power Cable
- 2 x Pin Headers

Figure 3: Contents of the LILYGO T3S3 ESP32-S3 LoRa Development Board package, showing the board, antenna, power cable, and pin headers.
3. Setup Instructions
Follow these steps to set up your LILYGO T3S3 development board:
- Attach the Antenna: Carefully screw the provided LoRa antenna onto the SMA connector on the board. Ensure it is finger-tight to avoid damage.
- Power Connection: Connect the board to a power source using the USB Type-C port. Alternatively, use the provided power cable for a 3.7V LiPo battery connection. The board supports USB/3.7V LiPo battery power supply.
- Initial Firmware: The board may come with pre-installed firmware (e.g., Meshtastic). To install or update firmware, refer to the official LILYGO Wiki or GitHub repository for detailed instructions and tools. A common method involves using the ESP-IDF or Arduino IDE.
- TF Card Insertion (Optional): If your application requires external storage, insert a compatible TF card into the designated slot on the board.
- Pin Headers (Optional): Attach the included pin headers if you plan to integrate the board into a breadboard or custom circuit. Refer to the pinout diagram for correct connections.
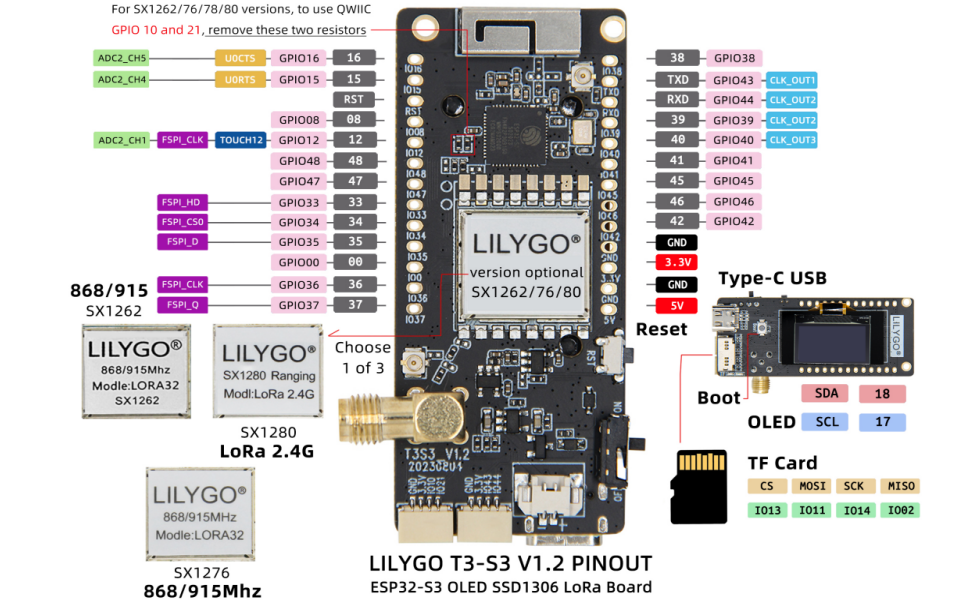
Figure 4: Detailed pinout diagram for the LILYGO T3S3 ESP32-S3 LoRa Development Board, showing GPIO assignments and component locations.
4. Operating Instructions
Once the board is set up and firmware is loaded, you can begin operation:
- Power On: Connect the board to a power source. The OLED display should illuminate, showing information based on the loaded firmware (e.g., network status, messages for Meshtastic).
- OLED Display: The 0.96 inch SSD1306 OLED display provides visual feedback. Its resolution is 128x64, and it uses an I2C interface (SDA-IO18, SCL-IO17).
- Wireless Communication: Utilize the integrated Wi-Fi and Bluetooth 5.0 for local network connectivity or device pairing. The LoRa module (SX1280 2.4G) enables long-range, low-power communication.
- Reset and Boot Buttons: The board features a Reset button to restart the microcontroller and a Boot button, typically used for entering bootloader mode during firmware flashing.
- Software Interaction: Interact with the board through its serial interface (via USB) or wirelessly, depending on the firmware's capabilities. For Meshtastic, a mobile application or web interface is commonly used.
5. Maintenance
Proper maintenance ensures the longevity and reliable operation of your development board:
- Keep Dry: Protect the board from moisture and humidity.
- Clean Gently: Use a soft, dry brush or compressed air to remove dust. Avoid liquid cleaners.
- Firmware Updates: Regularly check the official LILYGO GitHub repository (github.com/Xinyuan-LilyGO/LilyGo-LoRa-Series) for firmware updates and security patches.
- Antenna Care: Ensure the antenna is securely connected but do not overtighten. Avoid bending or damaging the antenna.
6. Troubleshooting
If you encounter issues with your LILYGO T3S3 board, consider the following:
- Board Not Powering On:
- Verify the USB cable is properly connected to a working power source.
- If using a LiPo battery, ensure it is charged and correctly connected to the battery switch.
- OLED Display Blank:
- Check power supply.
- Ensure firmware is correctly loaded and configured to initialize the OLED.
- No Wireless Connectivity (Wi-Fi/Bluetooth/LoRa):
- Confirm the antenna is attached correctly for LoRa.
- Verify that the firmware includes the necessary drivers and configurations for the wireless modules.
- Check for local interference.
- Firmware Upload Issues:
- Ensure correct drivers for the USB-to-serial chip are installed on your computer.
- Press and hold the Boot button while pressing and releasing the Reset button, then release Boot to enter flashing mode.
- Consult the LILYGO Wiki (wiki.lilygo.cc) or GitHub for specific flashing instructions for your operating system and development environment.
7. Specifications
Detailed technical specifications for the LILYGO T3S3 ESP32-S3 LoRa Development Board (SX1280 2.4G Without PA):
| Feature | Specification |
|---|---|
| Processor | ESP32-S3FH4R2 (Dual-core Xtensa LX7) |
| Flash Memory | 4MB |
| PSRAM | 2MB |
| Wireless Protocols | Wi-Fi (802.11 b/g/n), Bluetooth 5.0 (LE) |
| LoRa Transceiver | SX1280 (2.4 GHz) |
| LoRa TX Power | +13dBm |
| OLED Display | 0.96 inch SSD1306, 128x64 pixels, I2C (SDA-IO18, SCL-IO17) |
| Onboard Functions | Reset Button, Boot Button, TF Card Support |
| Power Supply | USB Type-C, 3.7V LiPo battery (with battery switch) |
| Operating System | FreeRTOS (typical) |
| Dimensions (LxWxH) | 3.45 x 2.6 x 1.06 inches (approx. 87.6 x 66 x 26.9 mm) |
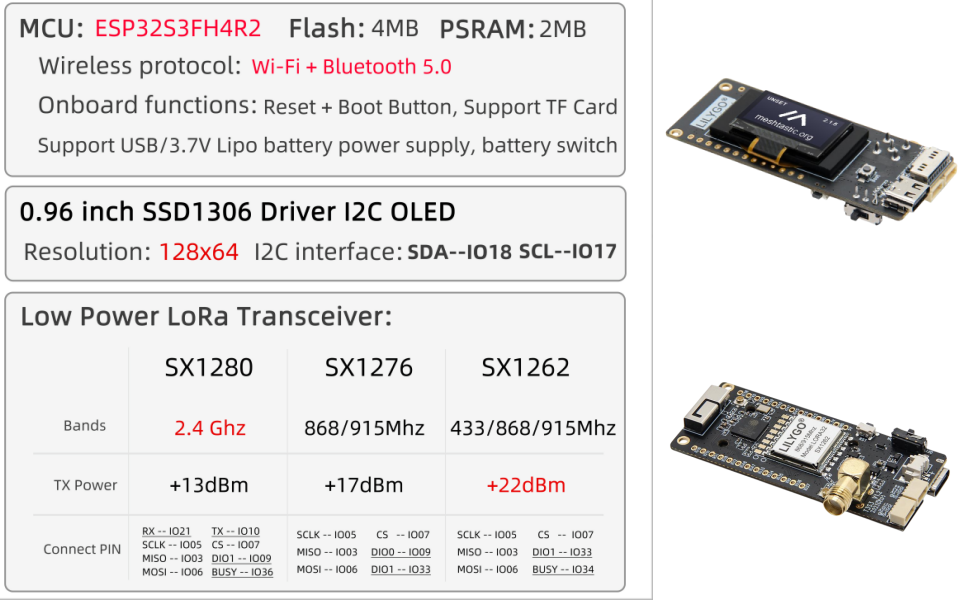
Figure 5: Comprehensive technical specifications for the LILYGO T3S3 series, highlighting the SX1280 2.4G module details.

Figure 6: Physical dimensions of the LILYGO T3S3 ESP32-S3 LoRa Development Board.
8. Support and Warranty
For any questions or suggestions regarding the LILYGO T3S3 ESP32-S3 LoRa Development Board, please contact LILYGO customer service. Detailed technical support and community resources can be found on the official LILYGO Wiki and GitHub pages:
- Official Wiki: wiki.lilygo.cc
- GitHub Repository: github.com/Xinyuan-LilyGO/LilyGo-LoRa-Series
Specific warranty information is not provided in the product details. Please refer to your point of purchase or contact LILYGO directly for warranty terms and conditions.


